Before you start:
The consignment setup in Quick3 can only be configured by users with access to Client Configuration, and requires an active subscription to a shipping service like Logistra Cargonizer or Consignor. If your user does not have access to Client Configuration, see our article on User privileges.
Introduction
In Norway, Quick3 offers integration with Logistra and Consignor as shipping solutions. In other countries, providers like ShipIt can be used. The different shipping methods are imported directly from the solution as separate items in Quick3, and you can then create consignments directly in the program. All created consignments are also shown in our Packing Queue view, where you have full control over the packing process in connection with picking.
All created consignments, available shipping methods, packing templates, bulk shipment options, and options for defining dangerous goods are found under Sales > Consignments.
Table of Contents
Setup
Connect to a consignment provider
Account information for your consignment provider must be entered in Client Configuration, under the Miscellaneous > Consignments tab:
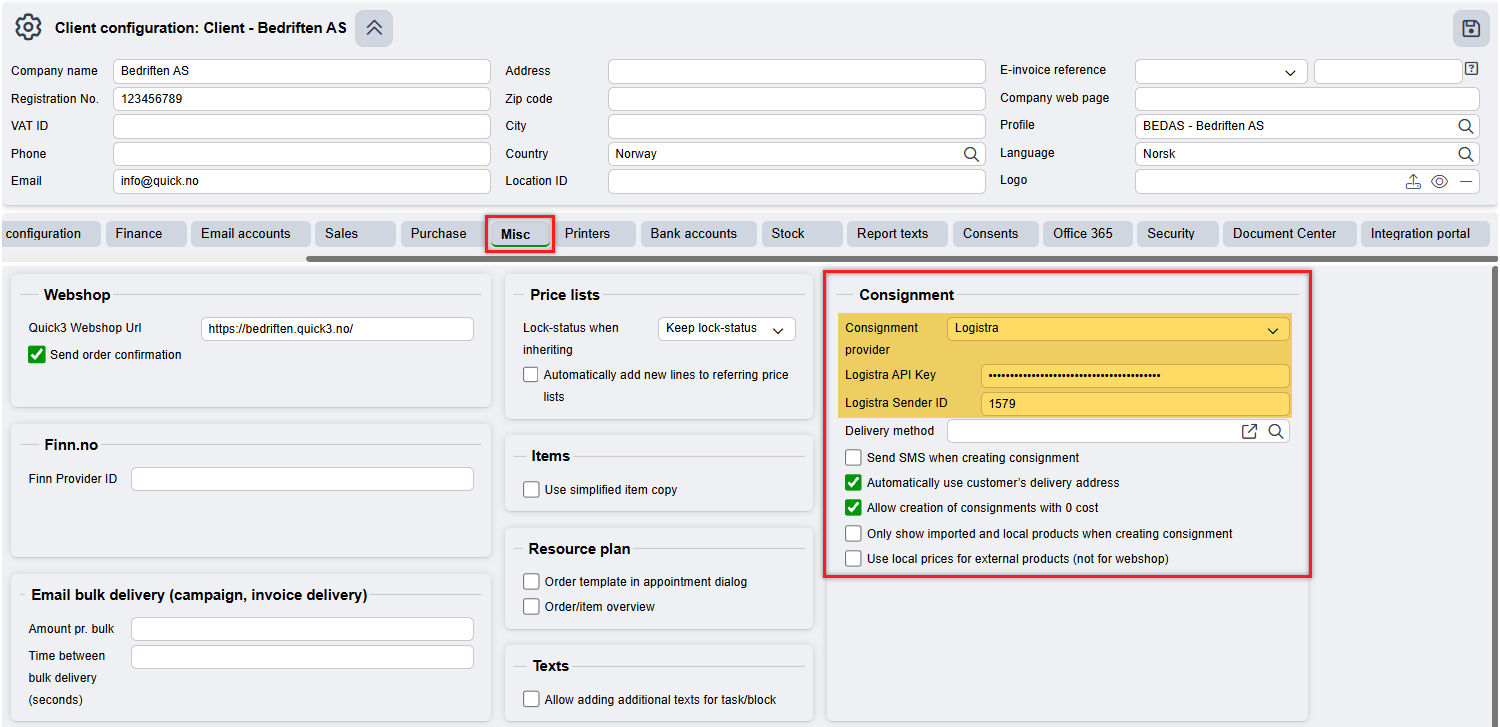
Select your Consignment provider from the drop-down menu and enter the required information before you save. The connection will be established when you save.
You can also enable various general options for consignments in Quick3 here, including a default delivery method, automatic SMS notifications to customers when new consignments are created, and the option to create consignments without a price.
Configure delivery methods
Once the integration with Logistra or Consignor is established, you must activate the available delivery methods you want to use. You can find the available methods under Sales > Consignments > Delivery Methods.
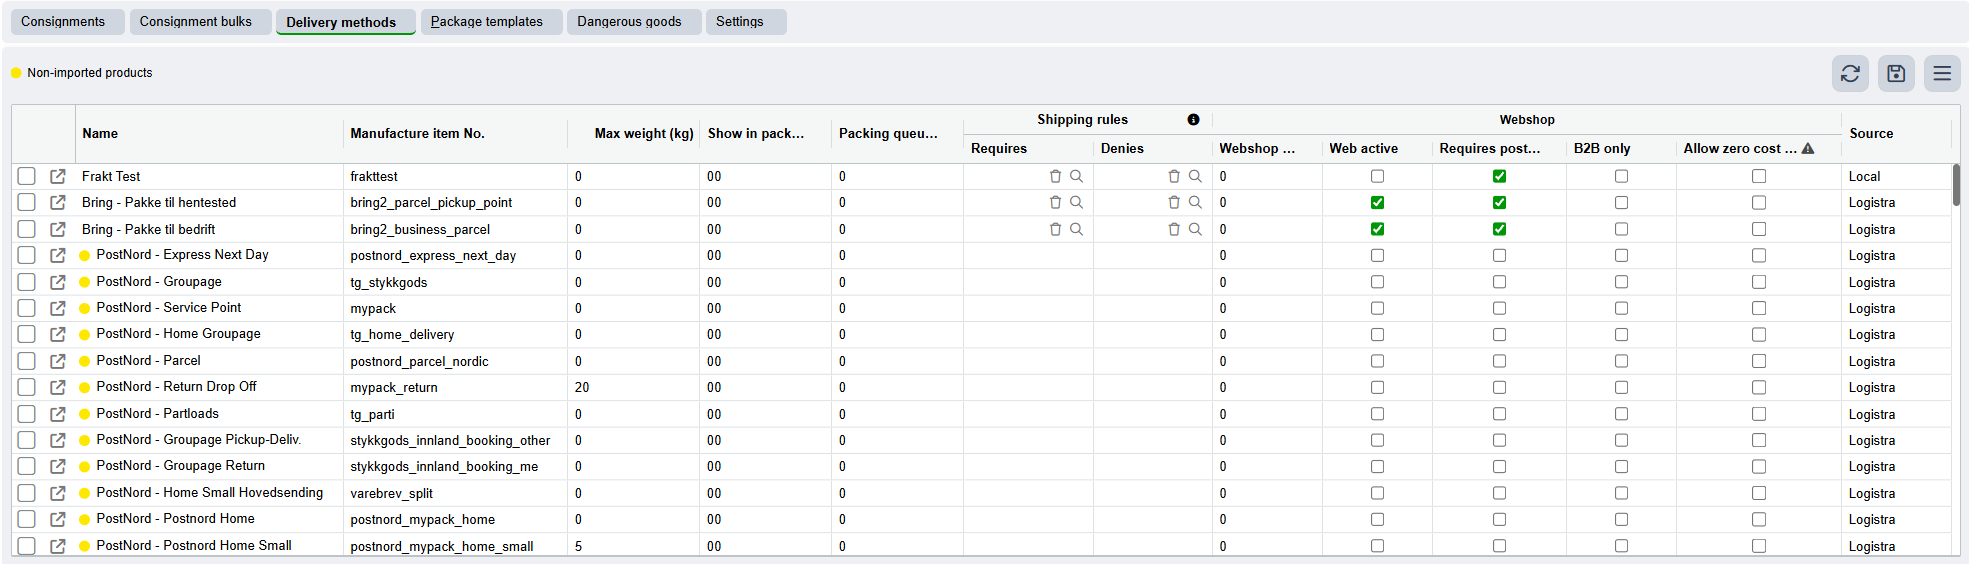
Rows marked with a yellow dot are items imported from the provider. To use these, you must activate them. Click the gray arrow at the far left of the row for the product you want to activate. This opens a new item card where you must fill in the following required fields:
- Item number
- Supplier
- Primary item group
- Inventory management: Off
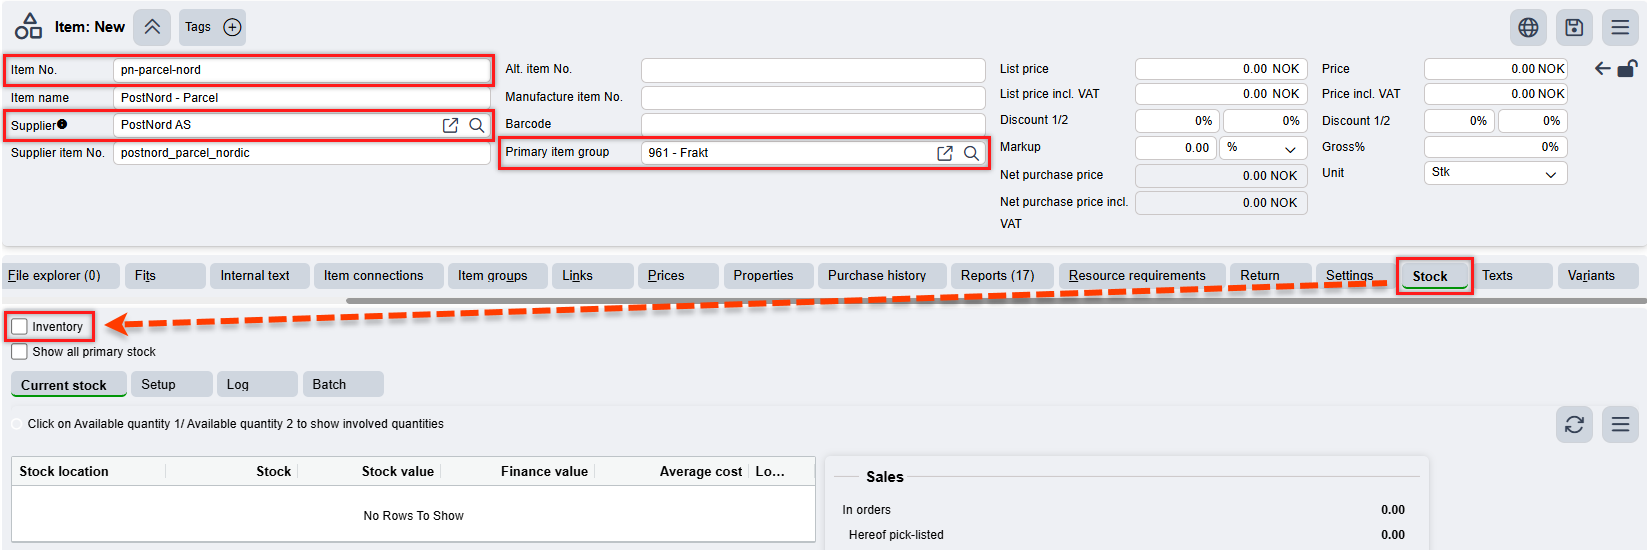
IMPORTANT: Do not change the Supplier item no. on the item created during activation. This number must match the Product item no. in the shipping methods table. These numbers must match in order to use the delivery method.
You do not need to enter the item's price unless you want to set a fixed price for specific shipping methods. After entering the required item information, click Save. To check that the item was created correctly, refresh the Shipping Methods table and check that the row no longer has a yellow marker dot.
If Logistra or Consignor are not already available as suppliers in your client, you can create them using the Supplier Wizard in Supplier Search.
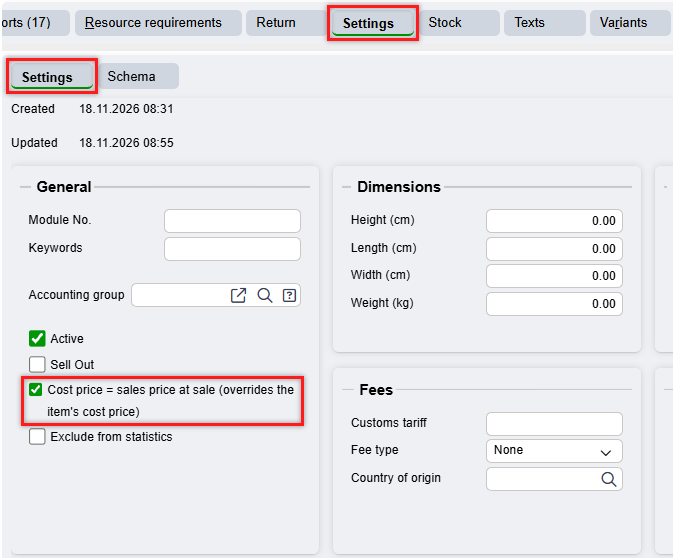
To prevent freight from being calculated with a 100% margin, open the Settings tab and select the "Cost price = Sales price at sale" option.
To connect shipping methods to the online store, go to the Shipping Methods table and check the shipping methods you want to use there. See our separate article on how to configure shipping methods for the webshop.

Creating consignments
Consignments can be created from a customer, a supplier, or an order, as well as directly from the Consignments view.
From an order
Creating consignments from orders is the most common way to create consignments in Quick3.
Orders have a dedicated shipping tab. The screenshot below shows the different options available there, including Shipping method, Shipping priority, Combined delivery, and Free shipping.
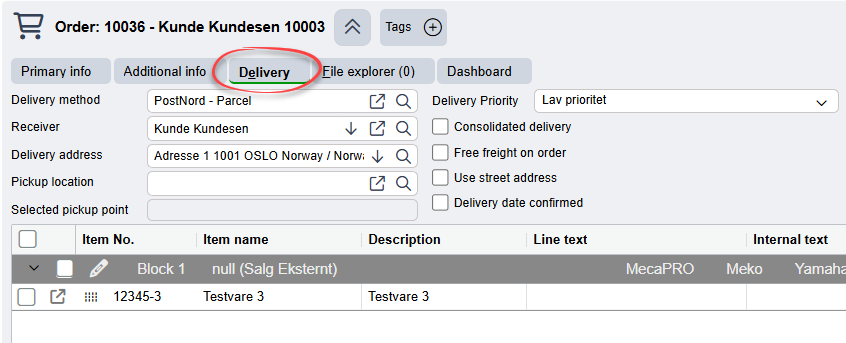
Make sure a Delivery address is specified. If the customer has only one address on their customer card, it will be used. If the recipient has multiple delivery addresses, select the correct one from the drop-down menu. If there is no delivery address, add one by clicking the search icon and selecting "Add" from the search box menu. Remember to enter the country code if the recipient's address is outside Norway.
To create the consignment, find the "Consignments" tab at the bottom of the order view and click the Plus sign.

A pop-up window will appear with the selected shipping method preselected. Here you can continue by specifying, among other things, multiple packages, the correct dimensions and weight, whether the consignment should be cash on delivery, and any additional services or shipping instructions. Details about these additional services are available on the shipping provider's help pages.
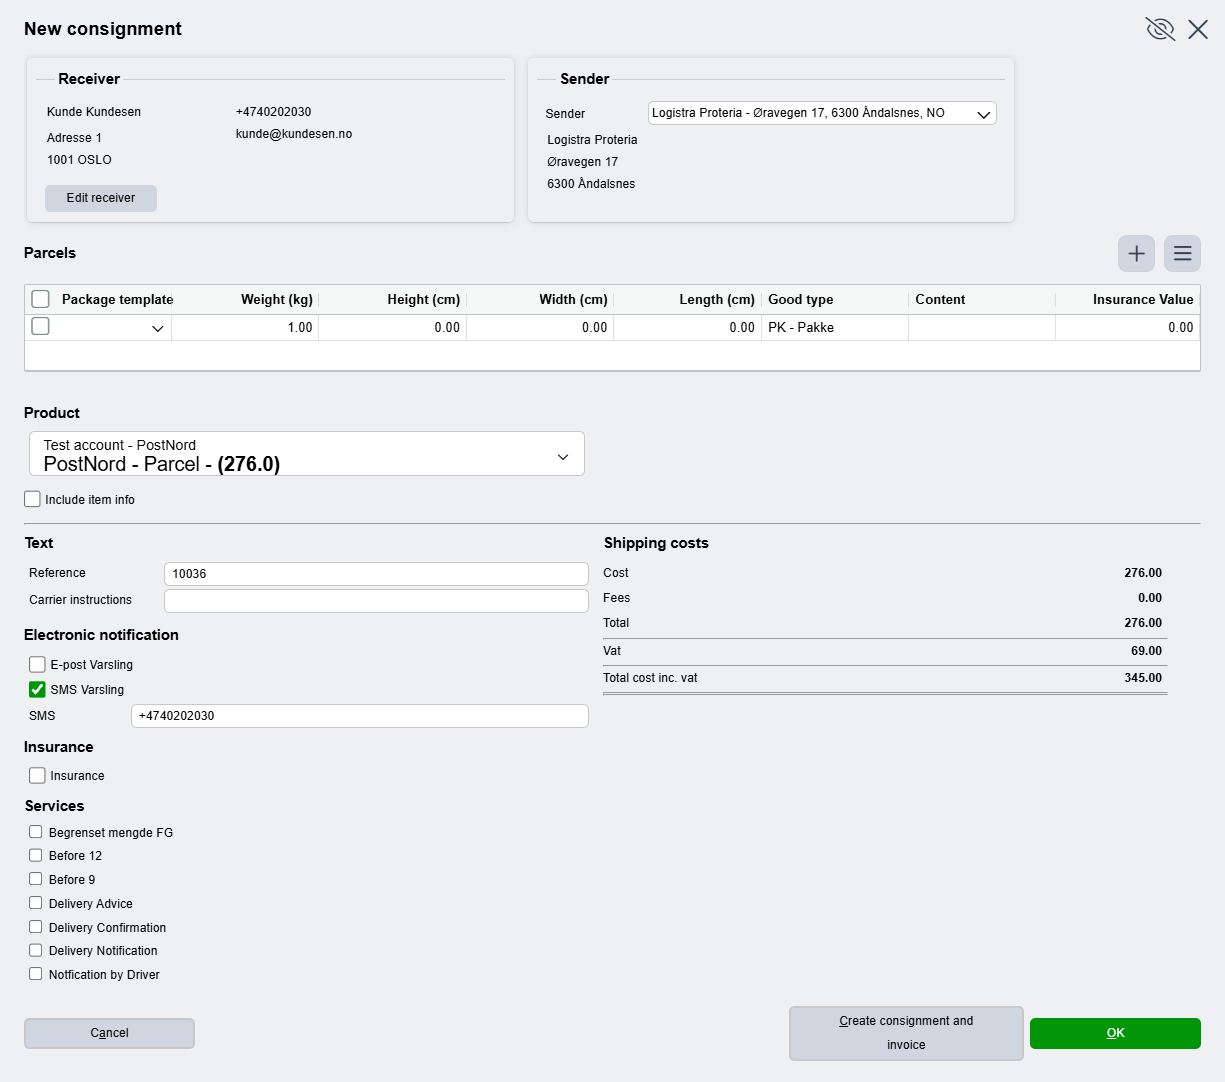
Once the consignment has been created, it will appear as a row in the order's Consignments tab. You can also find it in the Consignments view, accessible from the main menu. The table shows most relevant information, such as the consignment number, package number, postage, and more.
From the customer or supplier card
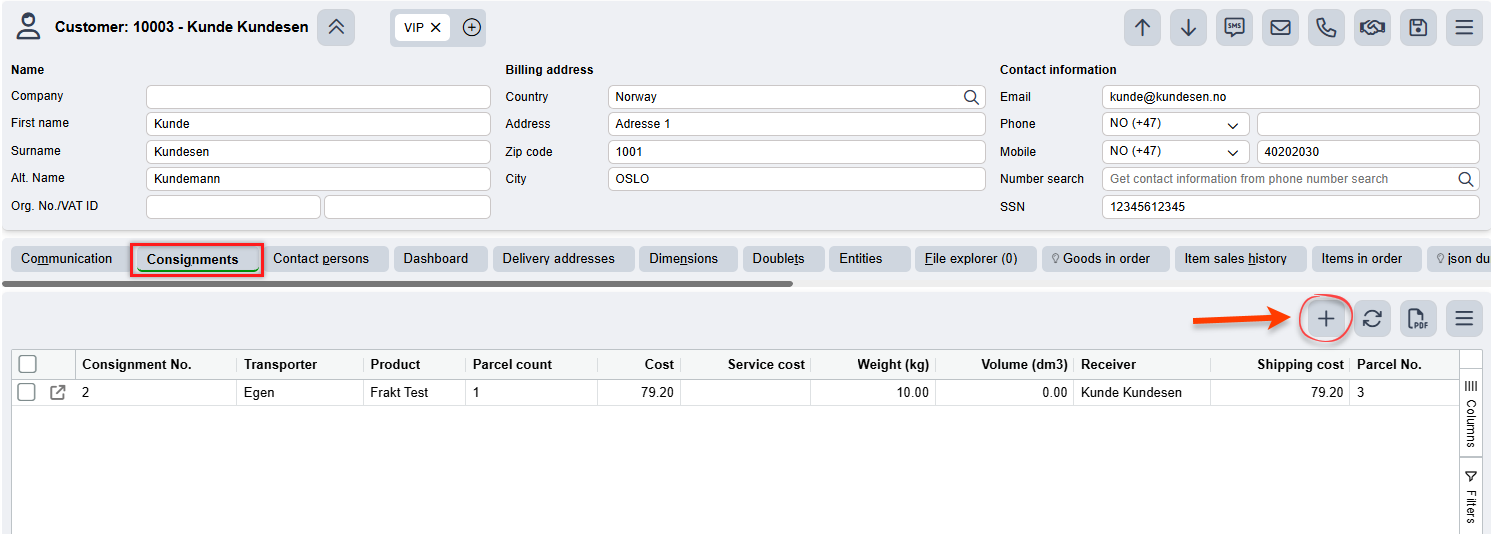
The customer and supplier views also have their own Consignments tabs, where you can create consignments directly to the customer or supplier.
From Consignments
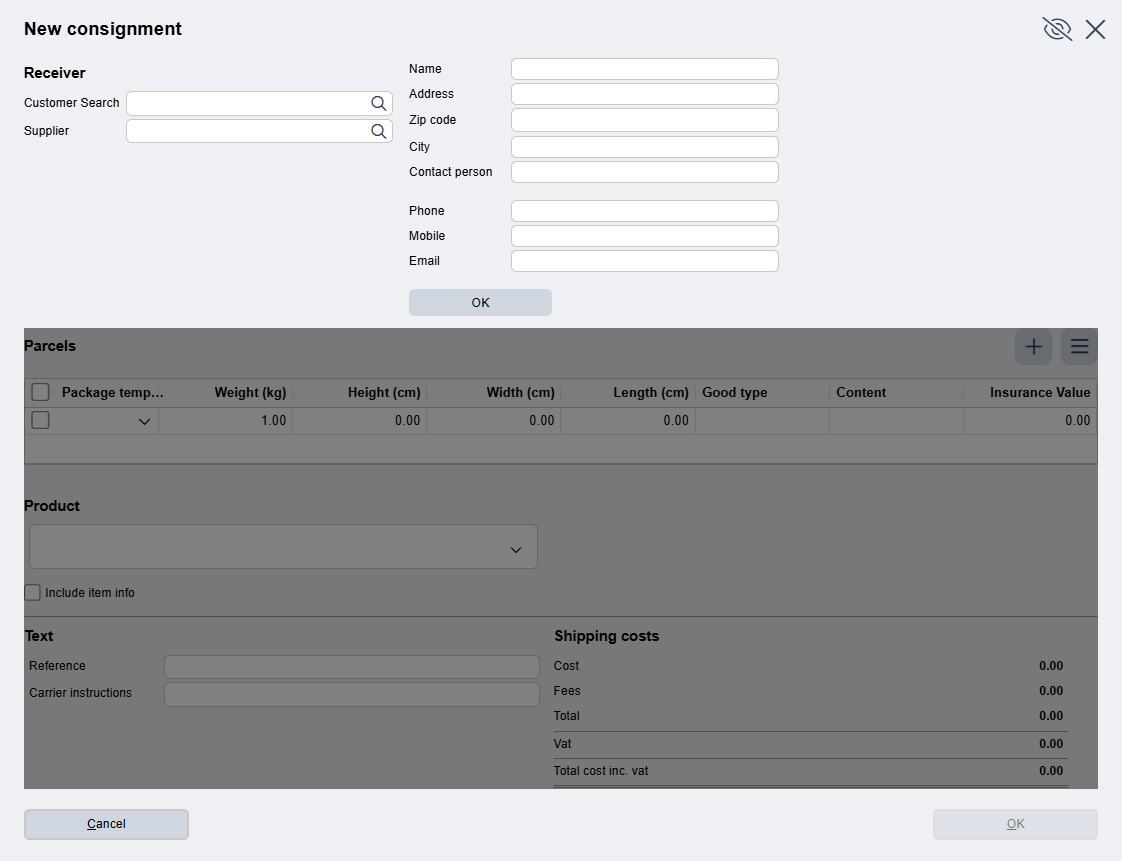
You can also create new consignments directly from the Consignments view. The pop-up window will be completely blank, with no information prefilled. Once enough information about the customer and shipping method has been entered, you can define dimensions, additional services, etc.
A blank consignment window looks like this (note that the consignment properties are grayed out because there is no recipient):
NVIT (Norwegian Goods in Transit)
Quick3 supports adding mandatory NVIT information to consignments. When creating a new consignment, enable the option called "Include item information" in the product drop-down menu. Enter the required NVIT information about the items in the consignment here.
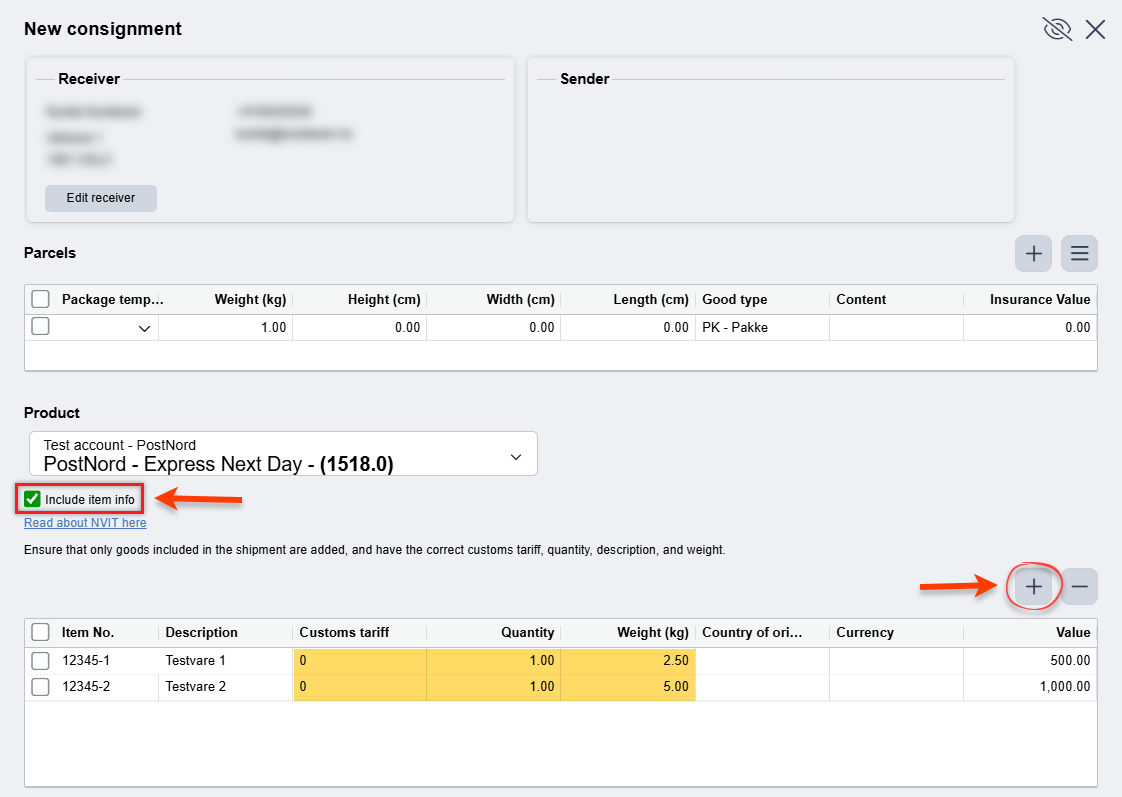
Users are responsible for finding information about, among other things, the tariff codes for their items. Properties such as description and weight are retrieved directly from the item card, but if information is missing, it can be entered manually in the table as needed.
For more information about NVIT, click the link below "Include item information" to go directly to the Norwegian Customs website.
Packing templates
You can predefine package sizes and maximum weights using the Packing Templates feature in the Consignments view. Click the Plus sign to add a new row, enter a description for the packing template, and specify the package's maximum weight, length, height, and width. Don't forget to save!

Once created and saved, these will be available as packing templates when you create new consignments.
Bulk consignments
More information coming soon...
Dangerous goods
Items can be designated as "dangerous goods" and assigned different handling rules for shipping. Open Item Search, find the item, and open its item card on the Settings tab. The Dangerous goods flag is in the Shipping and packaging section.
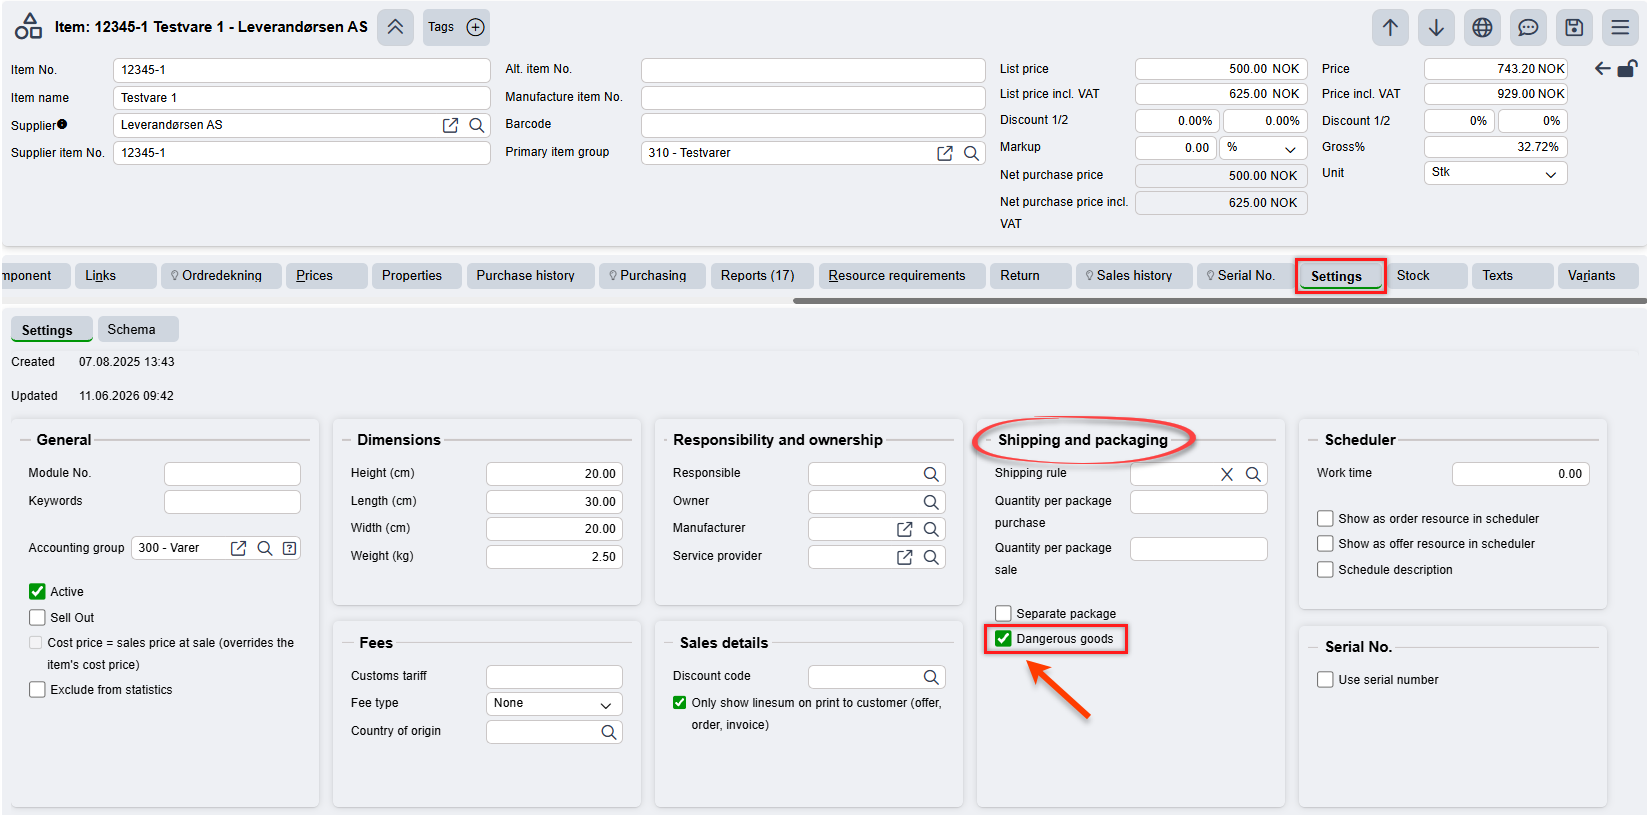
All items marked as dangerous goods are printed on a separate picklist, as they often require additional labeling and handling during shipping and delivery.
Types of dangerous goods
In the Consignments view, you can register different types of dangerous goods and later associate them with specific consignments. Go to the "Dangerous goods" tab, open the hamburger menu, and click Add to add a new type.

For each type of dangerous goods relevant to your product range, enter the UN number, a description, the class, and the packing group. Details about all types of dangerous goods can be found in DSB's Dangerous Goods Handbook.
Remember to save!
All created types of dangerous goods can be associated with individual consignments through the Consignments table.
Dangerous goods report
A transport document report that must accompany shipments containing dangerous goods can be printed from Main Menu > Reports > Reports. Enter "Dangerous goods" in the search field and open the report named "Transport document for dangerous goods".
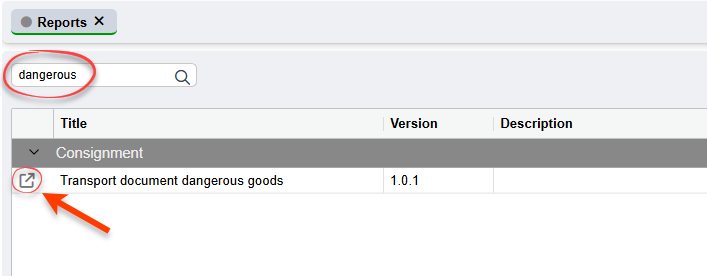
Then enter the consignment number for the shipment containing dangerous goods and click Print. A preview of the report will appear, ready to print or download.
TIP: The item or item group for the dangerous goods can also be associated with different shipping rules if, for example, certain shipping methods must be prohibited for that type of goods. Read more about shipping rules here.
Orders with a debtor
If an order is to be invoiced to multiple parties using a debtor on a block, the created consignment will always appear on the invoice for the first block to be invoiced. If the consignment is to be invoiced to someone other than the party on the first block to be invoiced, the shipping item must be added manually to the block for the party who will be invoiced for the shipping cost.
Was this article helpful?
That’s Great!
Thank you for your feedback
Sorry! We couldn't be helpful
Thank you for your feedback
Feedback sent
We appreciate your effort and will try to fix the article