Introduction
QuickCommerce is an ERP-connected eCommerce plugin for WordPress that integrates with the Quick3 ERP system. It delivers a fully synchronized storefront where products, inventory, orders, and customer data flow between WordPress and your Quick3 instance.
Unlike traditional WordPress eCommerce plugins, QuickCommerce does not store orders or cart data in WordPress. Instead, it uses your Quick3 system as the primary backend for commerce operations, while WordPress serves as the customer-facing storefront.
Key features include:
- Real-time product synchronization from Quick3 with automatic scheduling.
- 50 Gutenberg blocks for building a complete storefront using the WordPress Site Editor.
- Cart and checkout with ERP-based order management for both B2B and private customers
- Customer account dashboard with order history, invoices, addresses, wishlists, and settings
- Wishlist functionality with bidirectional ERP synchronization
- Bidirectional category management between WordPress and Quick3
- Model specification sync for vehicle/product compatibility filtering
- Payment integration with Nets Easy for online card payments
- Configurable price display with VAT handling and B2B awareness
- Product reviews with star ratings
- Multi-language support (Norwegian Bokmål, Swedish)
QuickCommerce connects to your Quick3 instance through a secure API. The ERP system serves as the source of truth for:
- Product data (prices, stock, codes, supplier info)
- Orders and shopping carts
- Customer records
- Wishlists
WordPress serves as the display and management layer for:
- Product descriptions and images (optionally managed in WordPress)
- Storefront layout and design (via Gutenberg blocks)
- Tags and brands (WordPress-only taxonomies)
- Cross-sell and upsell product recommendations
Table of Contents
- Installation and Requirements
- Setup Wizard
- Admin Settings
- Product Management
- Categories and Taxonomies
- Storefront Blocks
- Shopping Cart
- Checkout
- Customer Accounts
- Orders and Invoices
- Wishlists
- Navigation
- Sync and Data Management
- WP-CLI Commands
- Troubleshooting
- FAQ
Installation and Requirements
System Requirements
| Requirement | Minimum Version |
|---|---|
| PHP | 8.2 or higher. |
| WordPress | 6.0 or higher. |
| Quick3 ERP | Active instance with API access. |
A valid Quick3 API key and endpoint URL are also required. You can read more about our APIs here.
Installation Steps
- Upload the
quickcommercefolder to/wp-content/plugins/, or install via the WordPress plugin upload screen. - Activate the plugin through Plugins in the WordPress admin.
- You will be redirected to the Setup Wizard to configure your ERP connection and perform the initial data sync.
Initial Configuration
After activation, the Setup Wizard guides you through connecting to your Q3 ERP system and importing your product catalog. See the next section for a detailed walkthrough.
Setup Wizard
When you first activate QuickCommerce, a 3-step setup wizard guides you through the initial configuration.
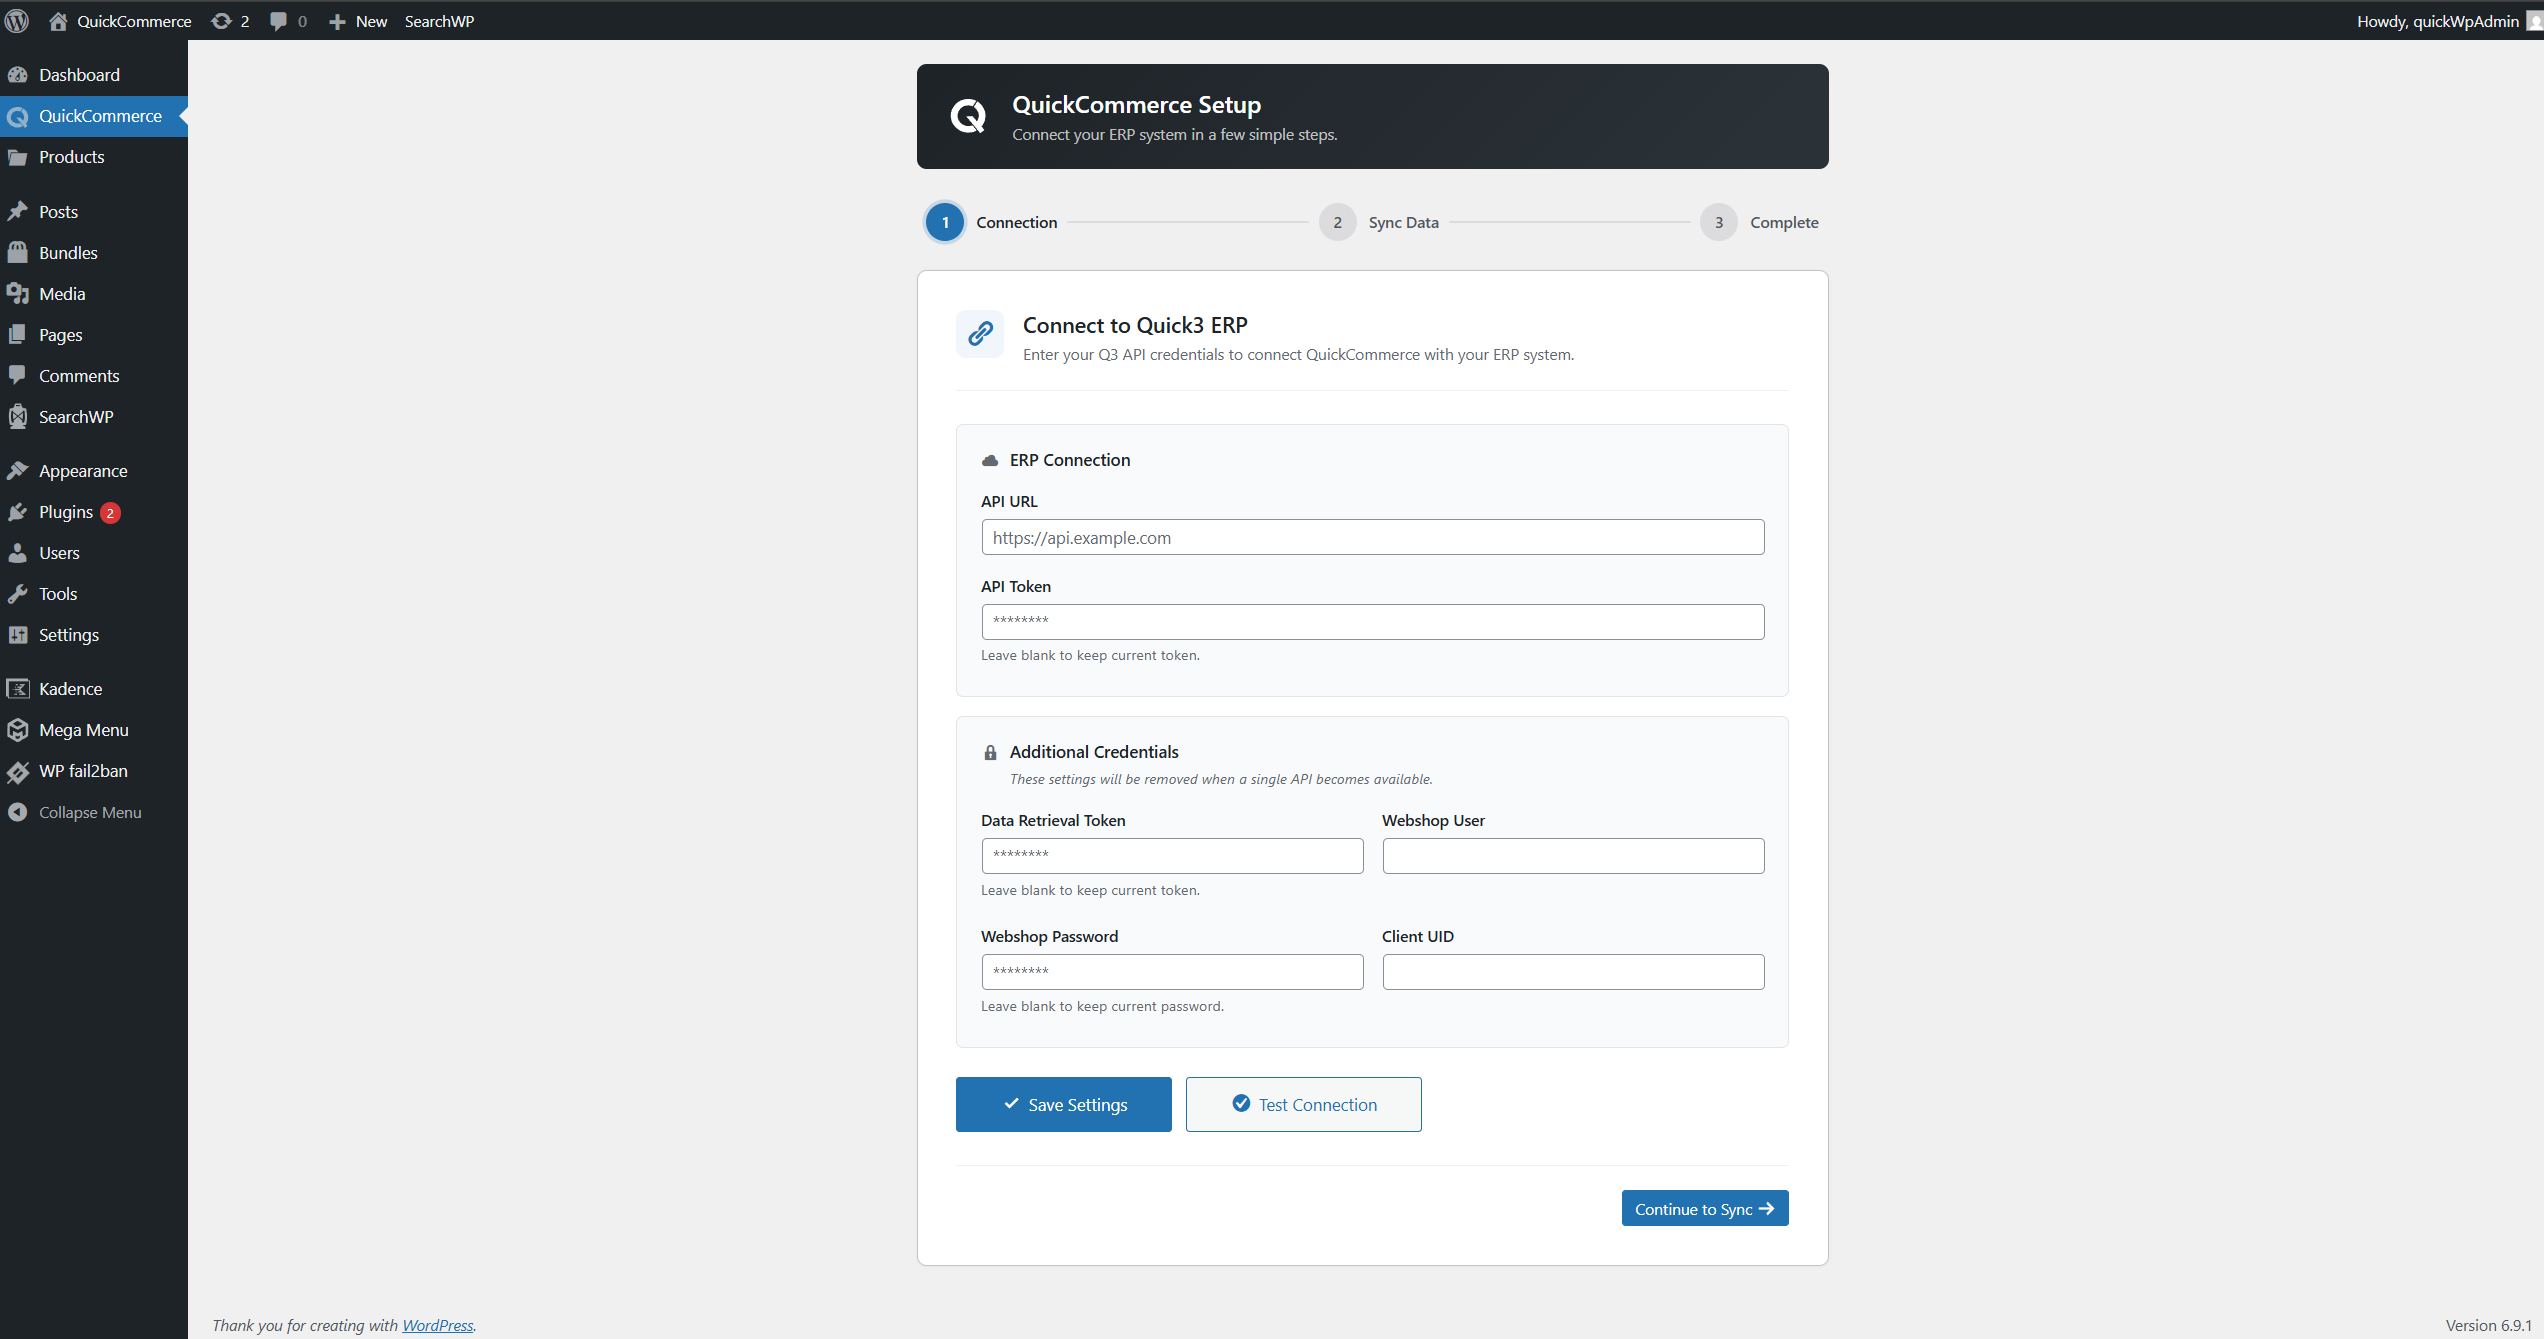
Step 1: Connection
Connect your store to Quick3.
| Field | Description |
|---|---|
| API URL | Your Quick3 API endpoint URL (required). |
| API Token | Authentication token for the API (required). |
- Enter your Q3 API credentials.
- Click Save Settings to store the credentials, then click Test Connection to verify connectivity.
- Click Continue to Sync to proceed. The button validates the connection on click and will not advance if the connection test fails.
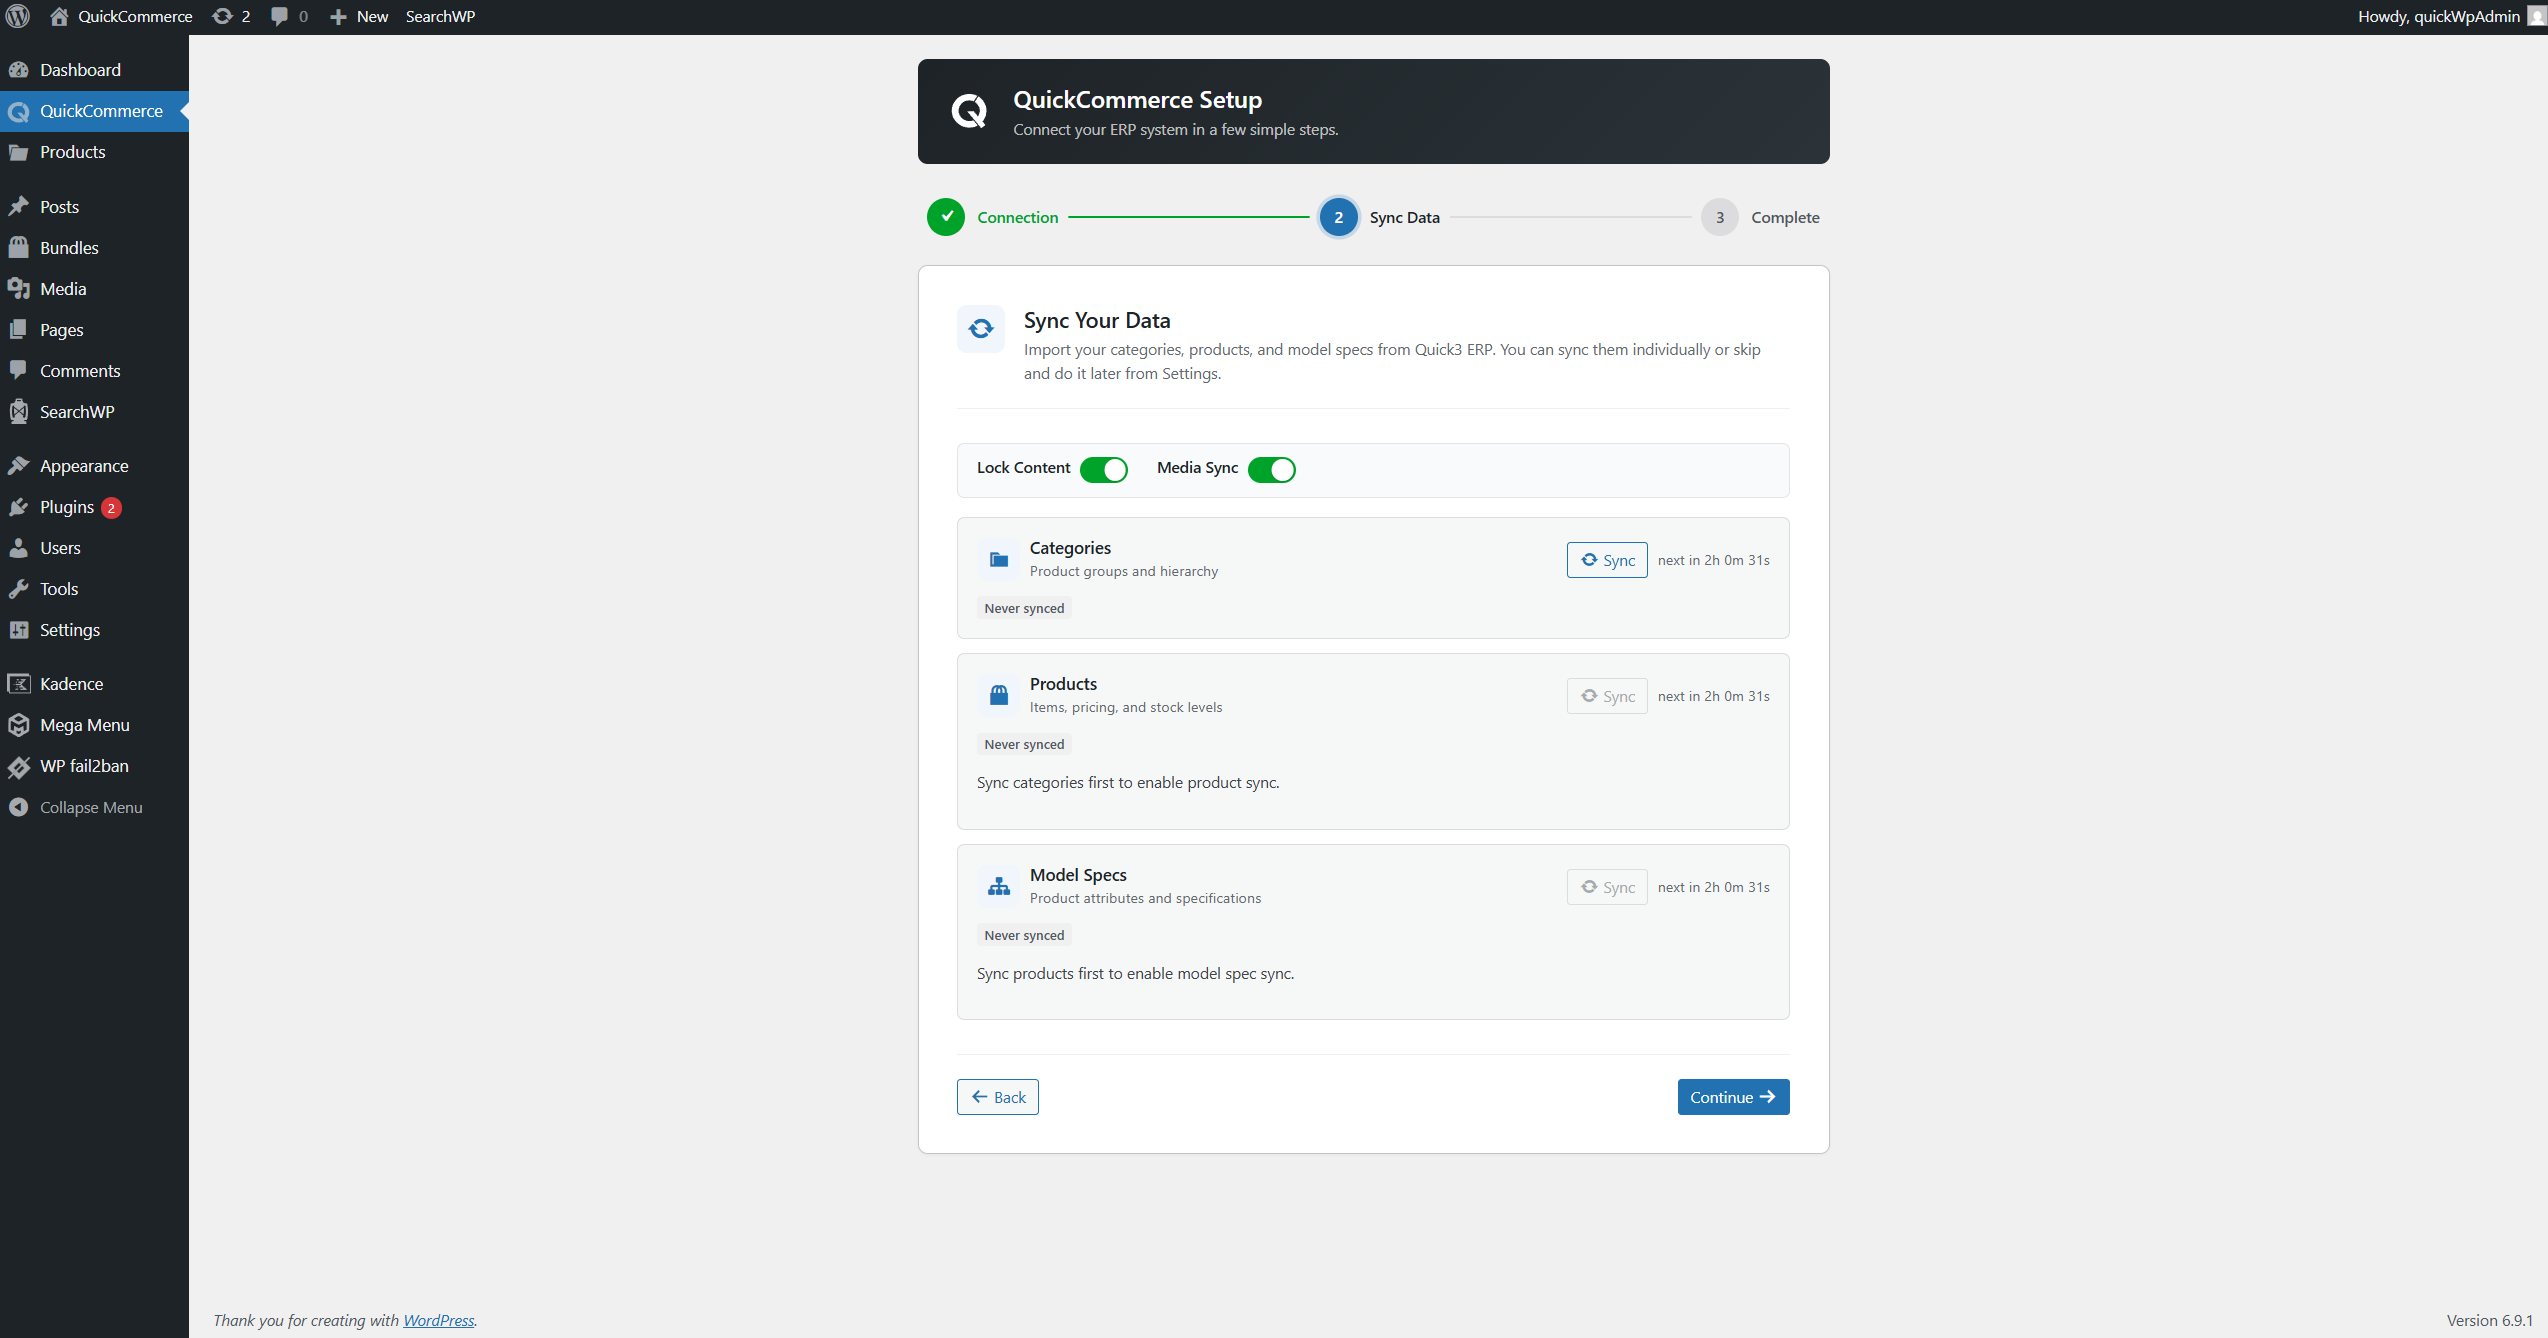
Step 2: Data Sync
Perform the initial data synchronization from your ERP system.
- Click the Categories sync button to sync categories first (so products can reference them). The Categories button is always enabled.
- Once categories complete, the Products sync button becomes enabled. Click it to import the full product catalog.
- Once products complete, the Model Specs sync button becomes enabled. Click it to sync model specifications.
- Each entity type shows its own status indicator: waiting (grey), running (spinner), done (green checkmark), or error (red X).
- If any step fails, re-click the same sync button to retry.
- The Continue button is always enabled, allowing you to skip sync if desired.
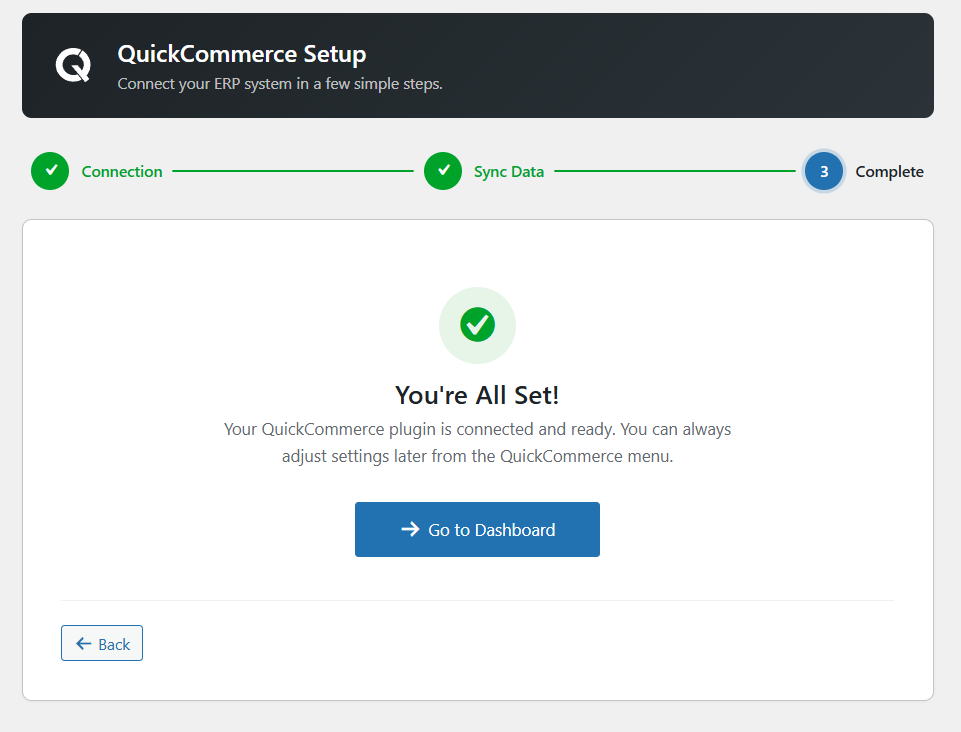
Step 3: Complete
Review the setup summary and click Go to Dashboard. You will be redirected to the regular settings interface. QuickCommerce is now fully configured and running.
Admin Settings
Access: WordPress Admin > QuickCommerce
Required Permission: Administrator (manage_options capability)
The settings interface is organized into tabs. Below is a detailed guide for each tab.
Admin Menu Structure
WordPress Admin
+-- QuickCommerce (main menu)
|   +-- Settings Page
|       +-- Connection
|       +-- Store Info
|       +-- Cache
|       +-- Data Sync
|       +-- Prices
|       +-- Pages
|       +-- Settings
|       +-- Logs
|       +-- Cleanup
|
+-- Products (QProd)
    +-- All Products
    +-- Categories
    +-- Brands
    +-- Tags
    +-- Models
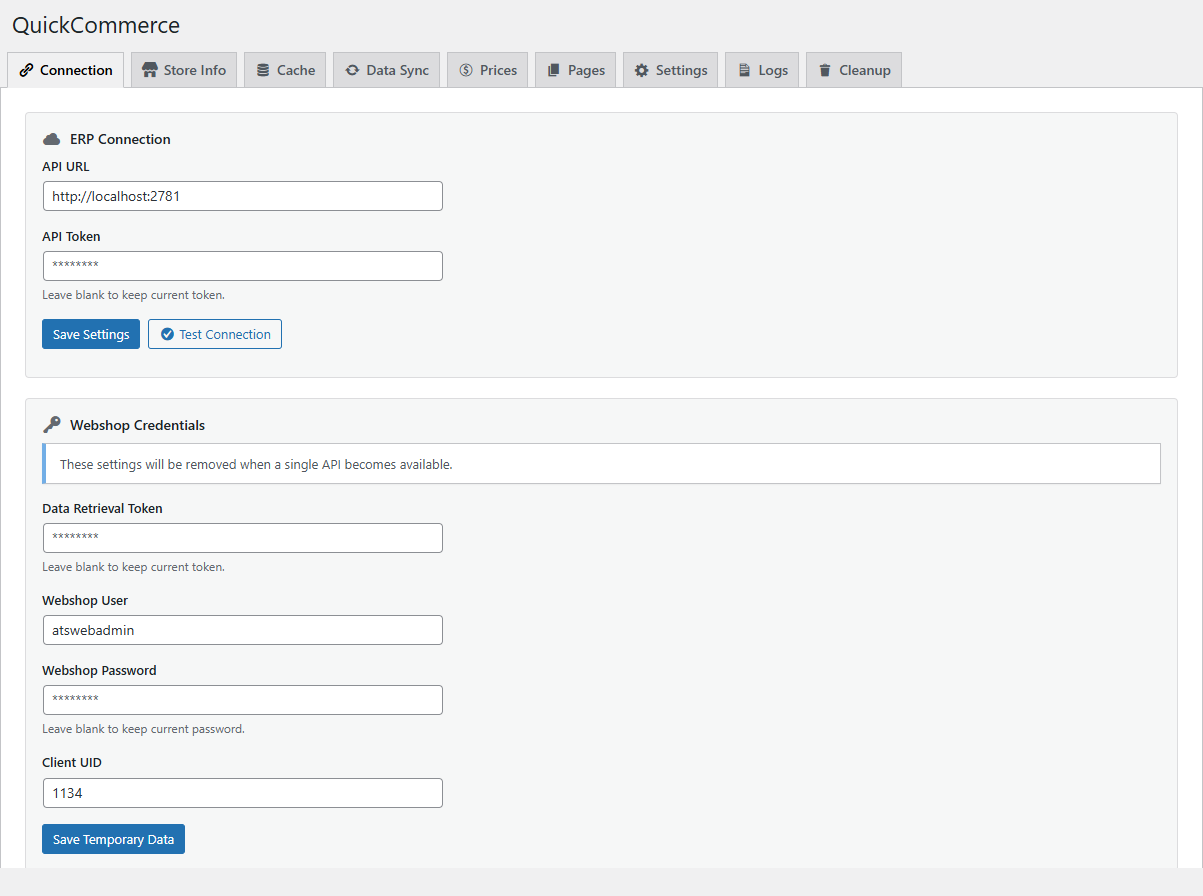
Connection Settings
Tab: Connection
Manage the API credentials for your Quick3 connection.
| Field | Description |
|---|---|
| API URL | The base URL for your Quick3 API. |
| API Token | Your API authentication token (leave blank to keep current). |
Actions:
- Save Settings -- Save the API credentials
- Test Connection -- Verify that the connection to Quick3 is working
The test result displays below the button, showing success or the specific error encountered.

Legacy Webshop Settings
Additional fields for backward compatibility with the legacy API may appear below the main connection settings. These include Data Retrieval Token, Webshop User, Webshop Password, and Client UID.
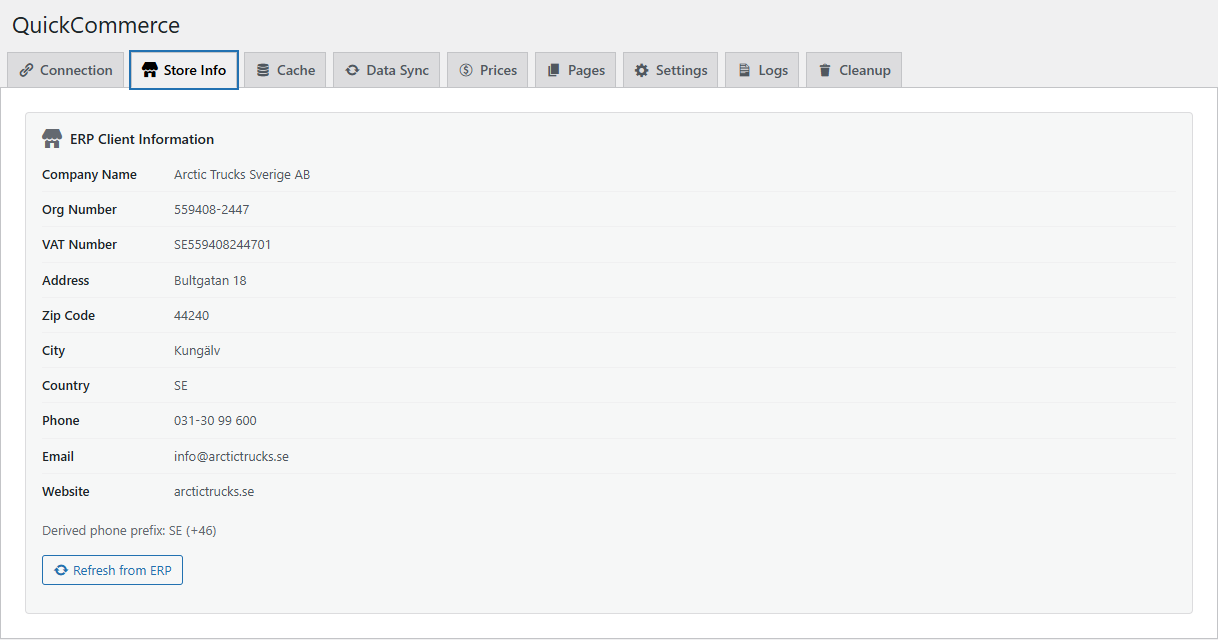
Store Info
Tab: Store Info
Displays store information retrieved from the connected Q3 ERP system. This tab is read-only and shows your ERP client details including company name, organization number, VAT number, address, phone, email, and website. Click Refresh from ERP to re-fetch the latest information from your Q3 instance.
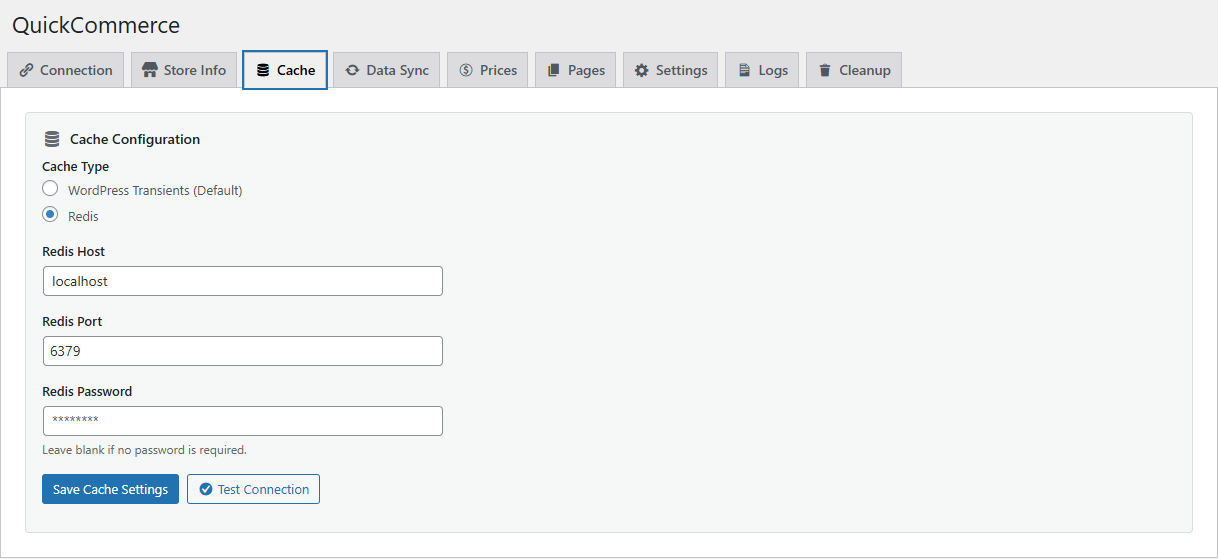
Cache Settings
Tab: Cache
Configure how QuickCommerce caches data to improve performance.
| Cache Type | Description |
|---|---|
| WordPress Transients | Default option. Uses WordPress built-in caching. Good for most sites. |
| Redis | High-performance caching. Recommended for busy stores. Requires a Redis server. |
When Redis is selected, additional fields appear:
| Field | Default | Description |
|---|---|---|
| Redis Host | 127.0.0.1 | Redis server hostname or IP. |
| Redis Port | 6379 | Redis server port. |
| Redis Password | (empty) | Redis authentication password (optional). |
Use Test Connection to verify Redis connectivity before saving.
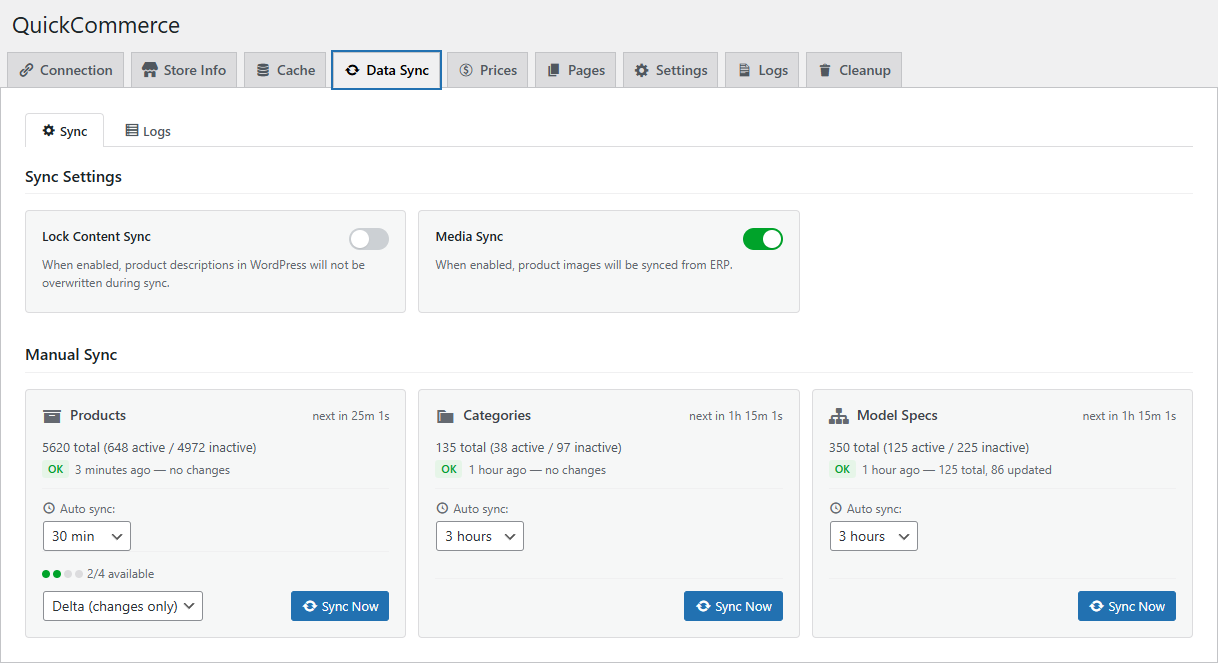
Data Sync
Tab: Data Sync
The most frequently used tab. Controls product, category, and model spec synchronization between Quick 3 ERP and your WordPress store.
Sync Settings
| Toggle | Description |
|---|---|
| Lock Content Sync | When enabled, product descriptions in WordPress will not be overwritten during sync. |
| Media Sync | Enable or disable product image synchronization. |
Entity Status Overview
Three status cards show current counts for:
- Products -- Total, Active (published), Inactive (draft)
- Categories -- Total, Active, Inactive
- Models -- Total, Active, Inactive
Manual Sync Controls
Each entity type has its own sync section with controls:
| Entity | Controls |
|---|---|
| Products | Sync Mode (Delta or Full), Sync Now button, Auto Sync Interval selector, Rate Limit indicator, Last Sync timestamp. |
| Categories | Sync Now button, Auto Sync Interval selector, Last Sync timestamp. |
| Model Specs | Sync Now button, Auto Sync Interval selector, Last Sync timestamp. |
Available auto sync intervals: Disabled, 15 min, 30 min, 1 hour, 3 hours, 6 hours, 12 hours, 24 hours, 7 days. During sync, a progress bar shows real-time progress. You can cancel an in-progress sync by clicking the Cancel Sync button.
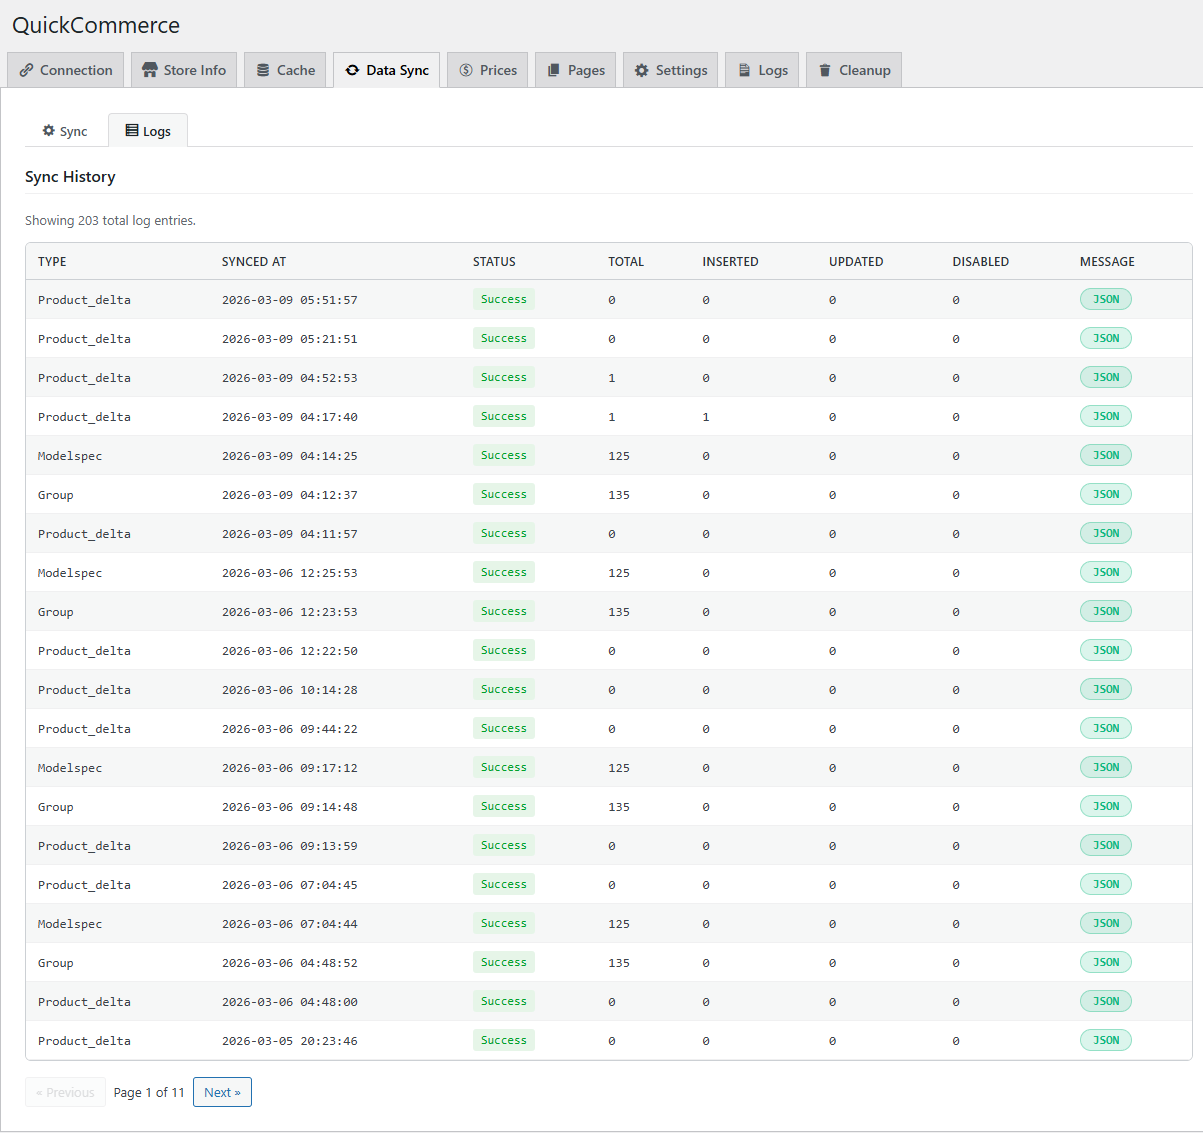
Sync Logs (Sub-tab)
The Data Sync tab contains a Logs sub-tab showing a paginated history of all sync operations (20 entries per page).
| Column | Description |
|---|---|
| Type | Entity type (Product_delta, Group, Modelspec). |
| Synced At | Date and time of the sync. |
| Status | Color-coded badge: Success (green), Failed (red). |
| Total | Total items processed. |
| Inserted | New items created. |
| Updated | Existing items updated. |
| Disabled | Items marked inactive. |
| Message | JSON button to view detailed sync data. |
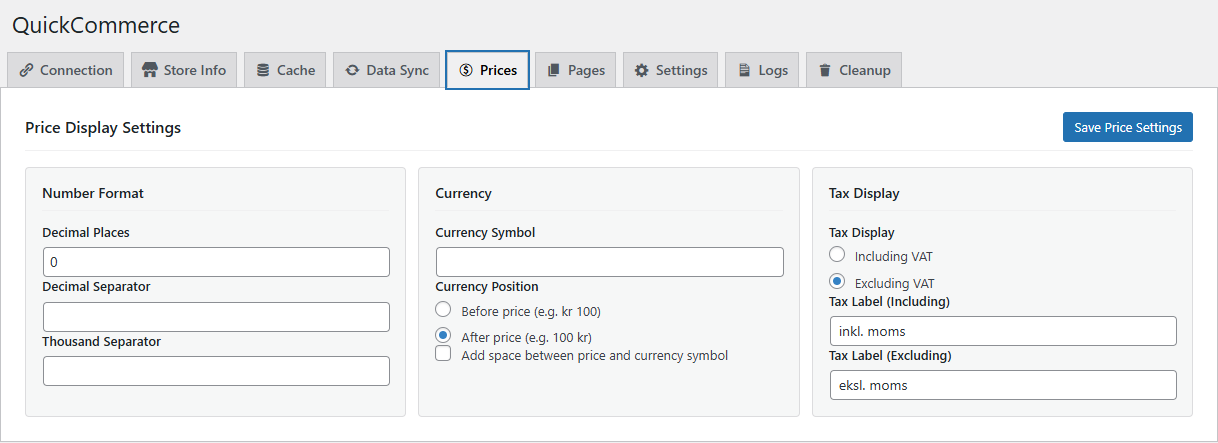
Price Settings
Tab: Prices
Configure how product prices display throughout your store.
Display Format
| Setting | Default | Description |
|---|---|---|
| Decimal Places | 2 | Number of decimal digits (0-4). |
| Decimal Separator | , | Character between whole and decimal parts. |
| Thousand Separator | (space) | Character for thousands grouping. |
| Currency Symbol | kr | Currency symbol to display. |
| Currency Position | After | Symbol placement: Before (kr 100) or After (100 kr). |
| Add Space | Yes | Whether to add space between price and symbol. |
Tax Display
| Setting | Default | Description |
|---|---|---|
| Tax Display Mode | Including VAT | Options: Including VAT, Excluding VAT. |
| Tax Label (Including) | inkl. mva | Label shown when price includes VAT. |
| Tax Label (Excluding) | ekskl. mva | Label shown when price excludes VAT. |
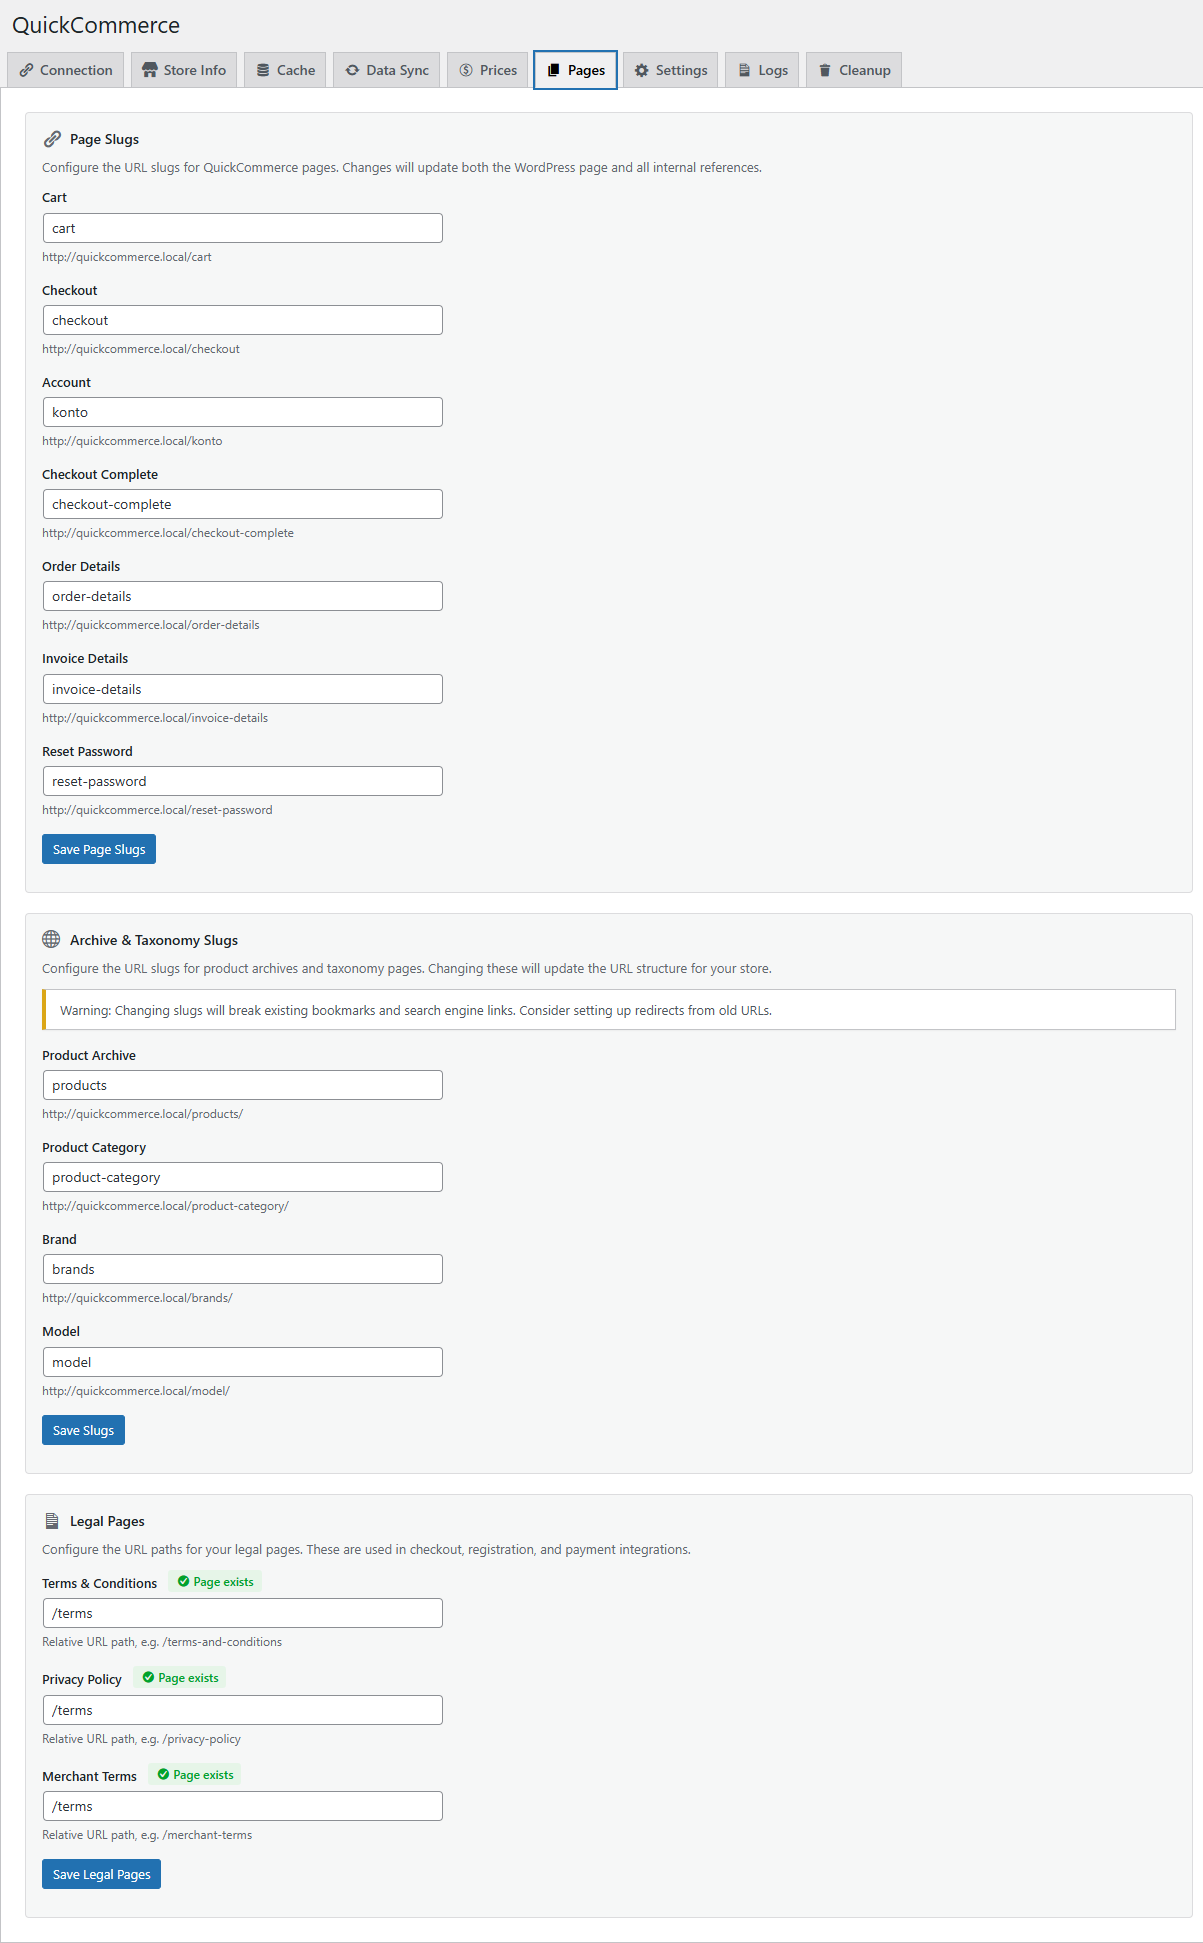
Pages
Tab: Pages
This tab contains three sections for configuring URL slugs and legal page paths.
Page Slugs
Configure the URL slugs for core QuickCommerce pages. Changes update both the WordPress page and all internal references.
| Page | Default Slug | Description |
|---|---|---|
| Cart | cart | Shopping cart page. |
| Checkout | checkout | Checkout form page. |
| Account | konto | Customer account dashboard. |
| Checkout Complete | checkout-complete | Order confirmation page. |
| Order Details | order-details | Single order detail page. |
| Invoice Details | invoice-details | Single invoice detail page. |
| Reset Password | reset-password | Password reset form page. |
Archive & Taxonomy Slugs
Configure the URL slugs for product archives and taxonomy pages.
| Slug | Default | Description |
|---|---|---|
| Product Archive | products | Product listing page. |
| Product Category | product-category | Category archive pages. |
| Brand | brands | Brand archive pages. |
| Model | model | Model specification pages. |
| Warning: Changing slugs will break existing bookmarks and search engine links. Consider setting up redirects from old URLs. |
Legal Pages
Configure the URL paths for your store's legal pages. These URLs appear in the checkout terms checkbox, the registration form, and the Nets Easy payment session.
| Setting | Default | Description |
|---|---|---|
| Terms & Conditions | /terms | Path to your terms and conditions page. |
| Privacy Policy | /privacy | Path to your privacy policy page. |
| Merchant Terms | /merchant-terms | Path to your merchant terms page (used by Nets Easy). |
Where these URLs are used:
- Checkout page -- "I have read and accept the website terms" link
- Account registration form -- "I agree to the Terms and Conditions and Privacy Policy" links
- Nets Easy payment session --
termsUrlandmerchantTermsUrlsent to Nets when creating a payment
Page existence indicator:
Each field shows a status badge:
- Page exists (green) -- A WordPress page was found at that slug.
- Page not found (yellow) -- No page exists. Click Create page to open the WordPress page editor.
Values must be relative URL paths starting with /, for example /terms-and-conditions.
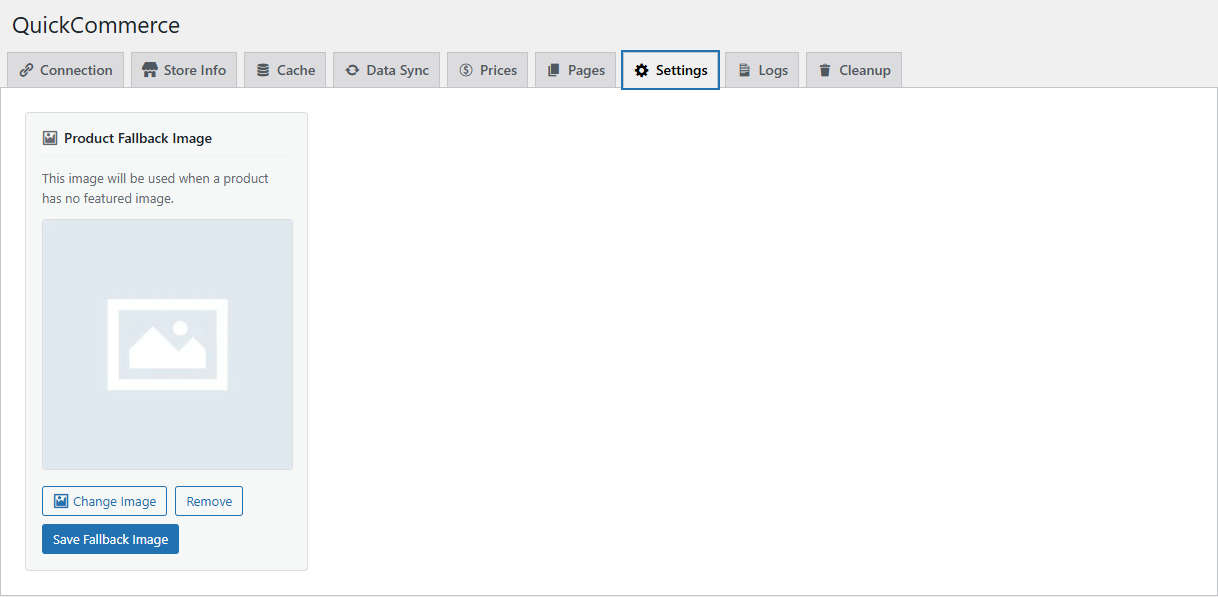
General Settings
Tab: Settings
Product Fallback Image
Set a default image displayed when products do not have a featured image. For variable products without images, the system first checks variant images before falling back to this default.
- Click Change Image to choose from the WordPress Media Library
- Click Remove to clear the fallback image
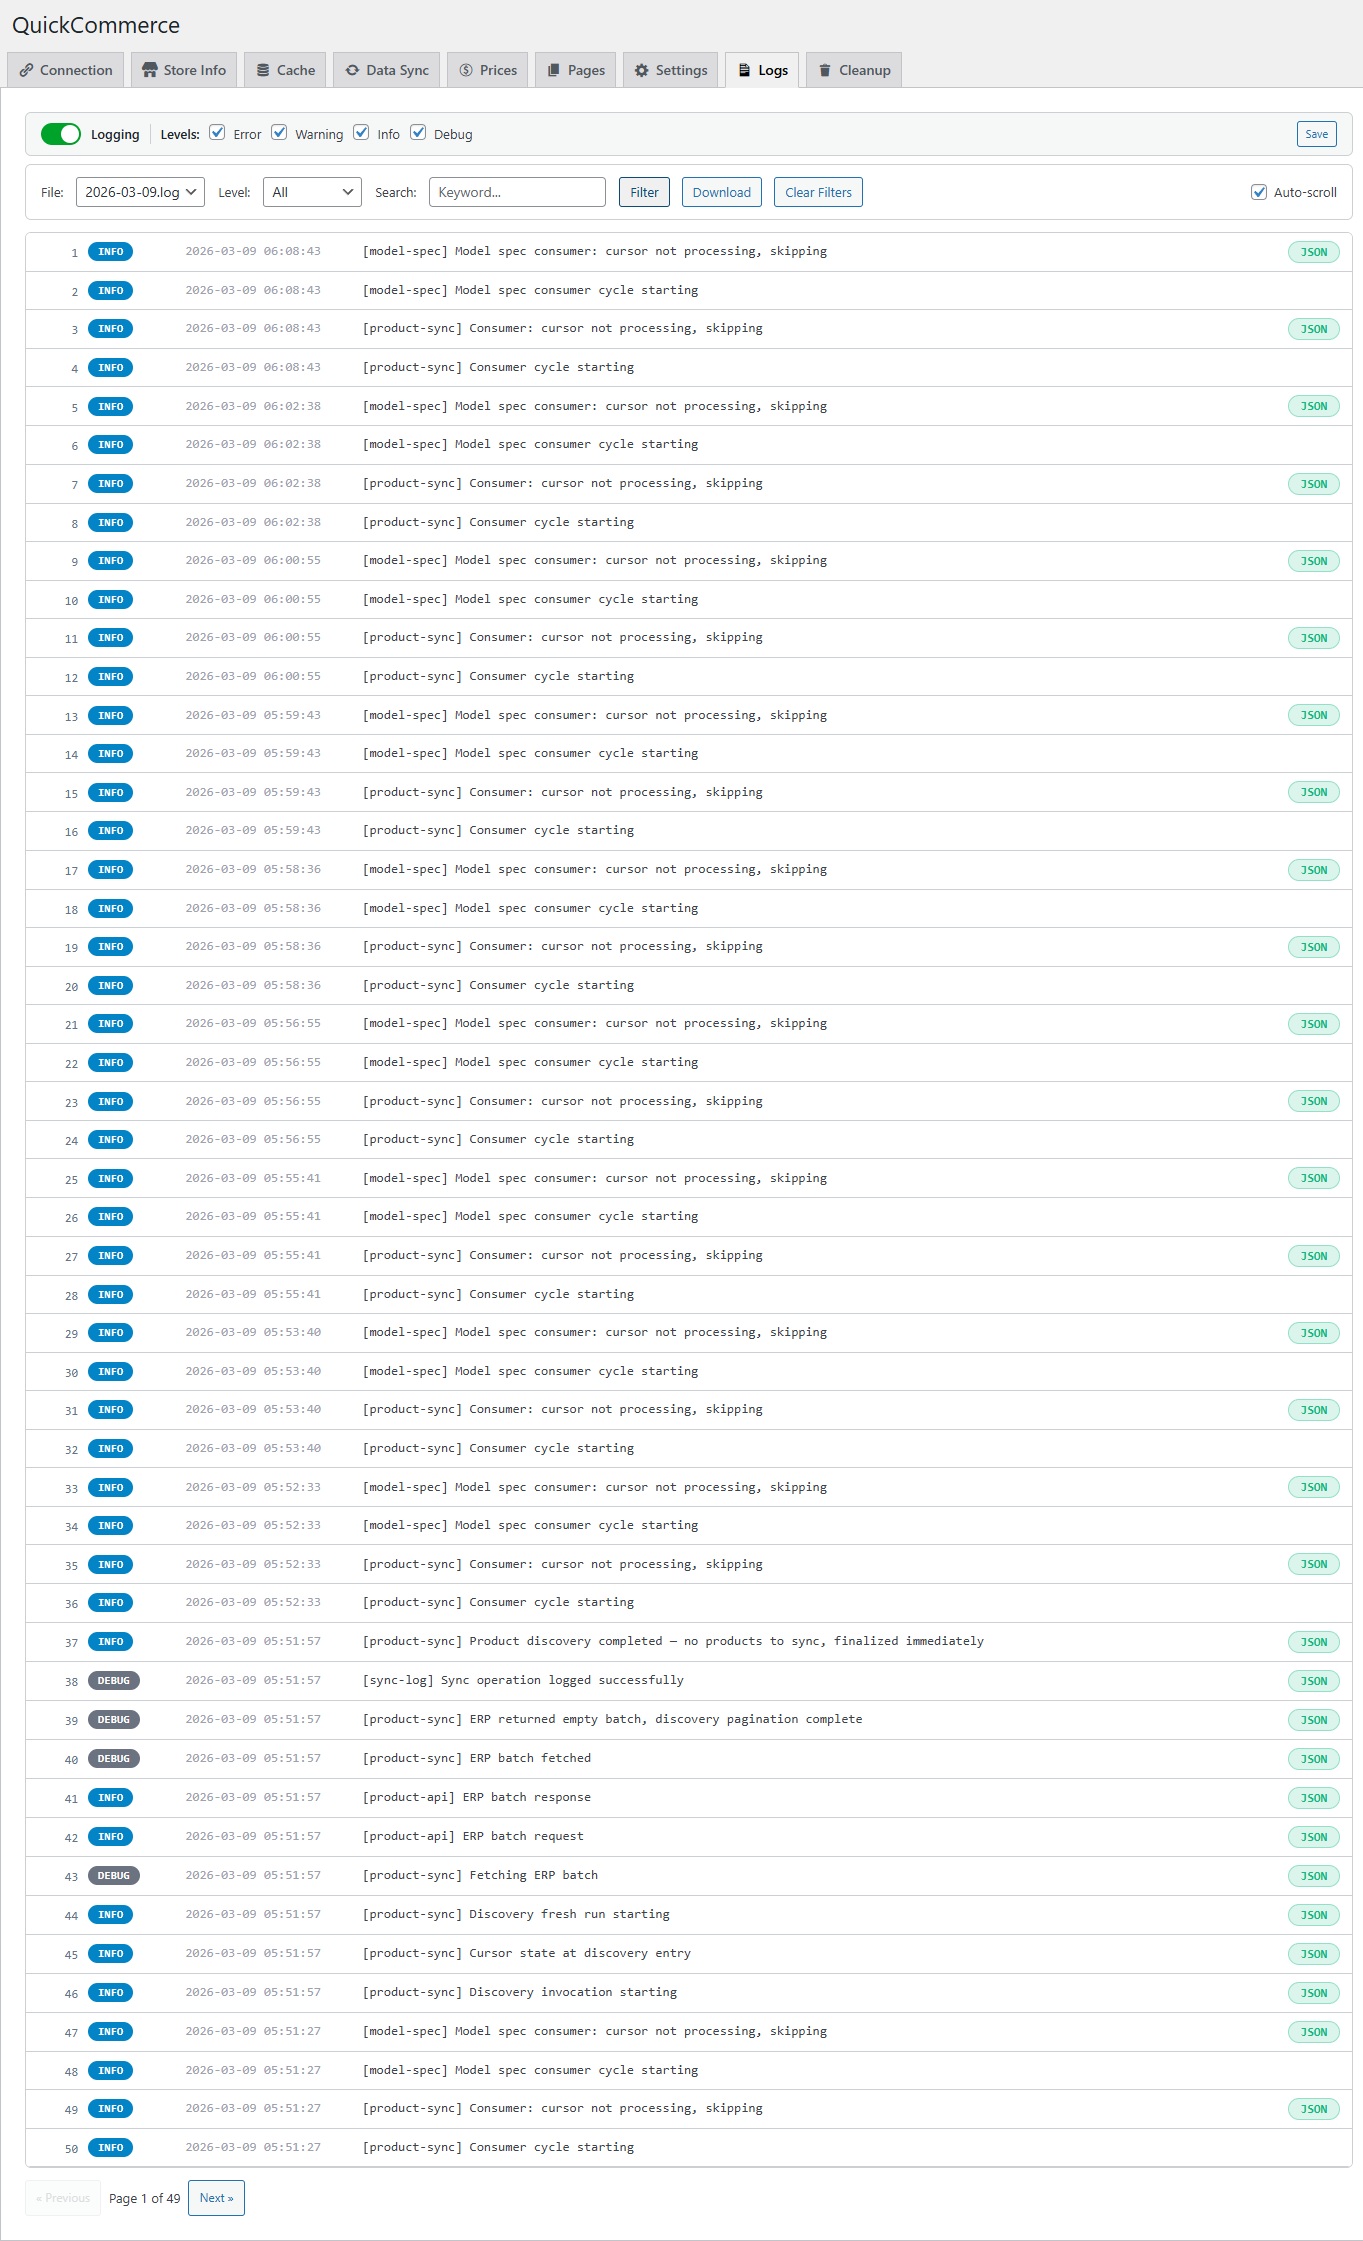
Log Viewer
Tab: Logs
A full-featured log viewer for monitoring plugin activity and debugging issues.
Log Settings
At the top of the tab, configure logging behavior:
| Setting | Default | Description |
|---|---|---|
| Logging Toggle | On | Master toggle for all plugin logging. |
| Log Levels | All checked | Which severity levels to log: ERROR, WARNING, INFO, DEBUG. |
Log Viewer Controls
| Control | Description |
|---|---|
| File Selector | Choose which log file to view (one file per day). |
| Level Filter | Filter by severity: All, ERROR, WARNING, INFO, DEBUG. |
| Search | Search for specific text within log entries. |
| Download | Download the current log file. |
| Clear Filters | Reset all filters. |
| Auto-scroll | Automatically scroll to newest entries. |
Each log entry shows a line number, color-coded level badge, timestamp, message, and an optional JSON button to view structured data in a formatted modal. Navigate through pages of 50 entries each.
Cleanup
Tab: Cleanup
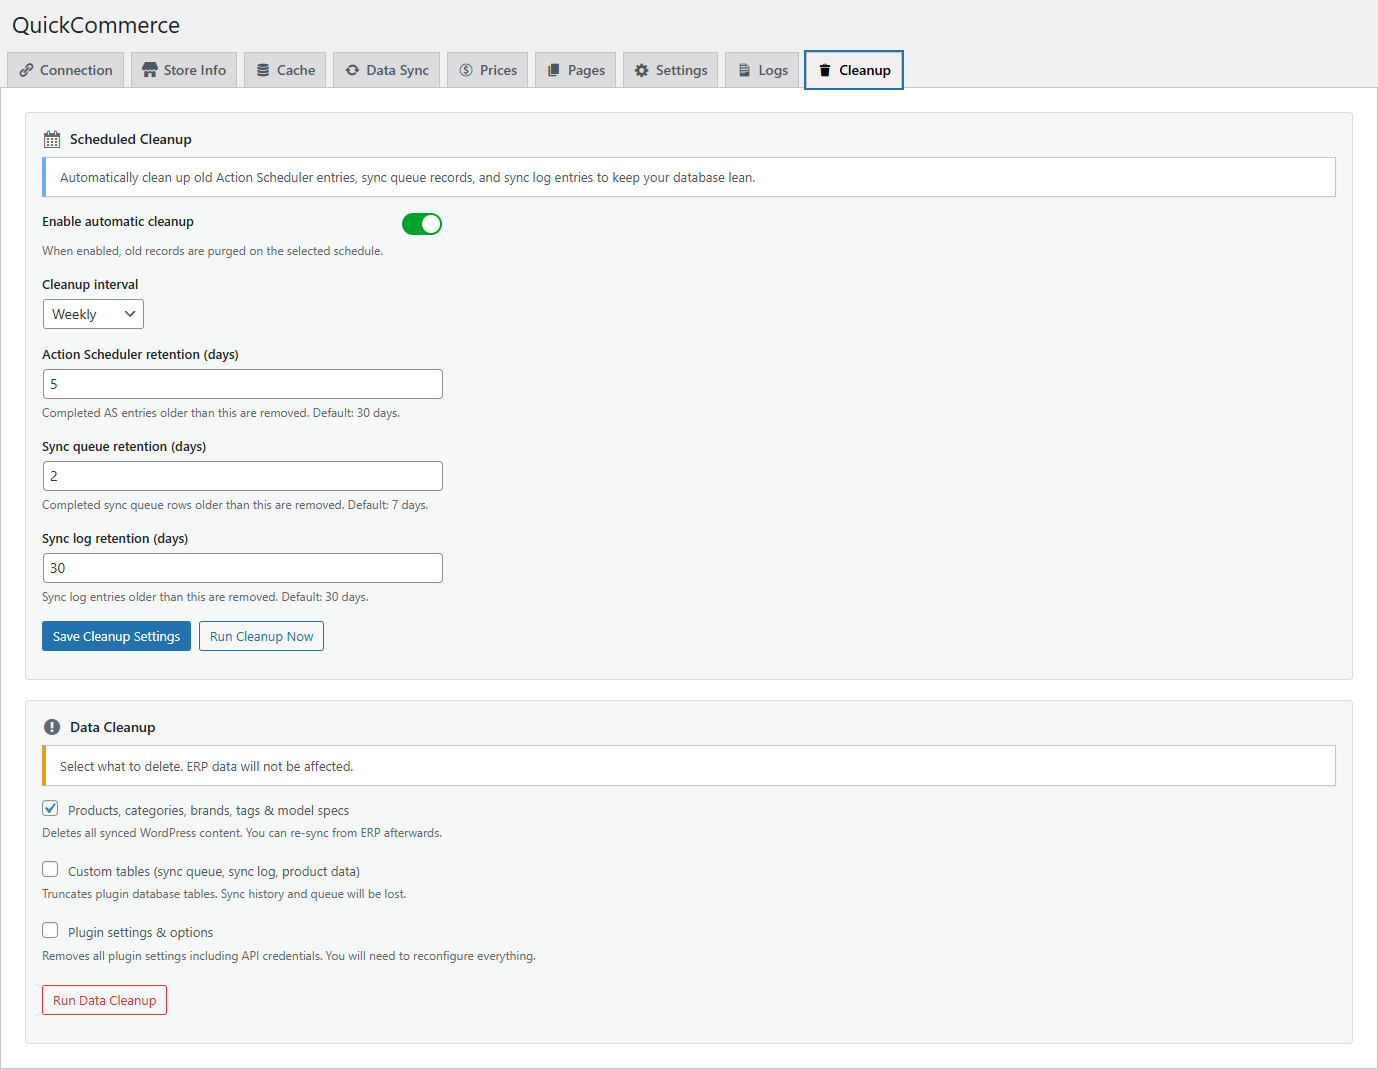
Scheduled Cleanup
Automatically clean up old Action Scheduler entries, sync queue records, and sync log entries to keep your database lean.
| Setting | Default | Description |
|---|---|---|
| Enable automatic cleanup | On | Toggle automatic purging of old records. |
| Cleanup interval | Weekly | How often cleanup runs: Twice daily, Daily, or Weekly. |
| Action Scheduler retention | 30 days | Completed AS entries older than this are removed. |
| Sync queue retention | 7 days | Completed sync queue rows older than this are removed. |
| Sync log retention | 30 days | Sync log entries older than this are removed. |
Click Run Cleanup Now to trigger an immediate cleanup.
Data Cleanup
Select what to delete using the checkboxes. Quick3 data will not be affected.
| Option | Description |
|---|---|
| Products, categories, brands, tags & model specs | Deletes all synced WordPress content. You can re-sync from Quick3 afterwards. |
| Custom tables (sync queue, sync log, product data) | Truncates plugin database tables. Sync history and queue will be lost. |
| Plugin settings & options | Removes all plugin settings including API credentials. You will need to reconfigure everything. |
Click Run Data Cleanup to execute the selected cleanup operations.
| Warning: These operations are destructive and cannot be undone. |
Product Management
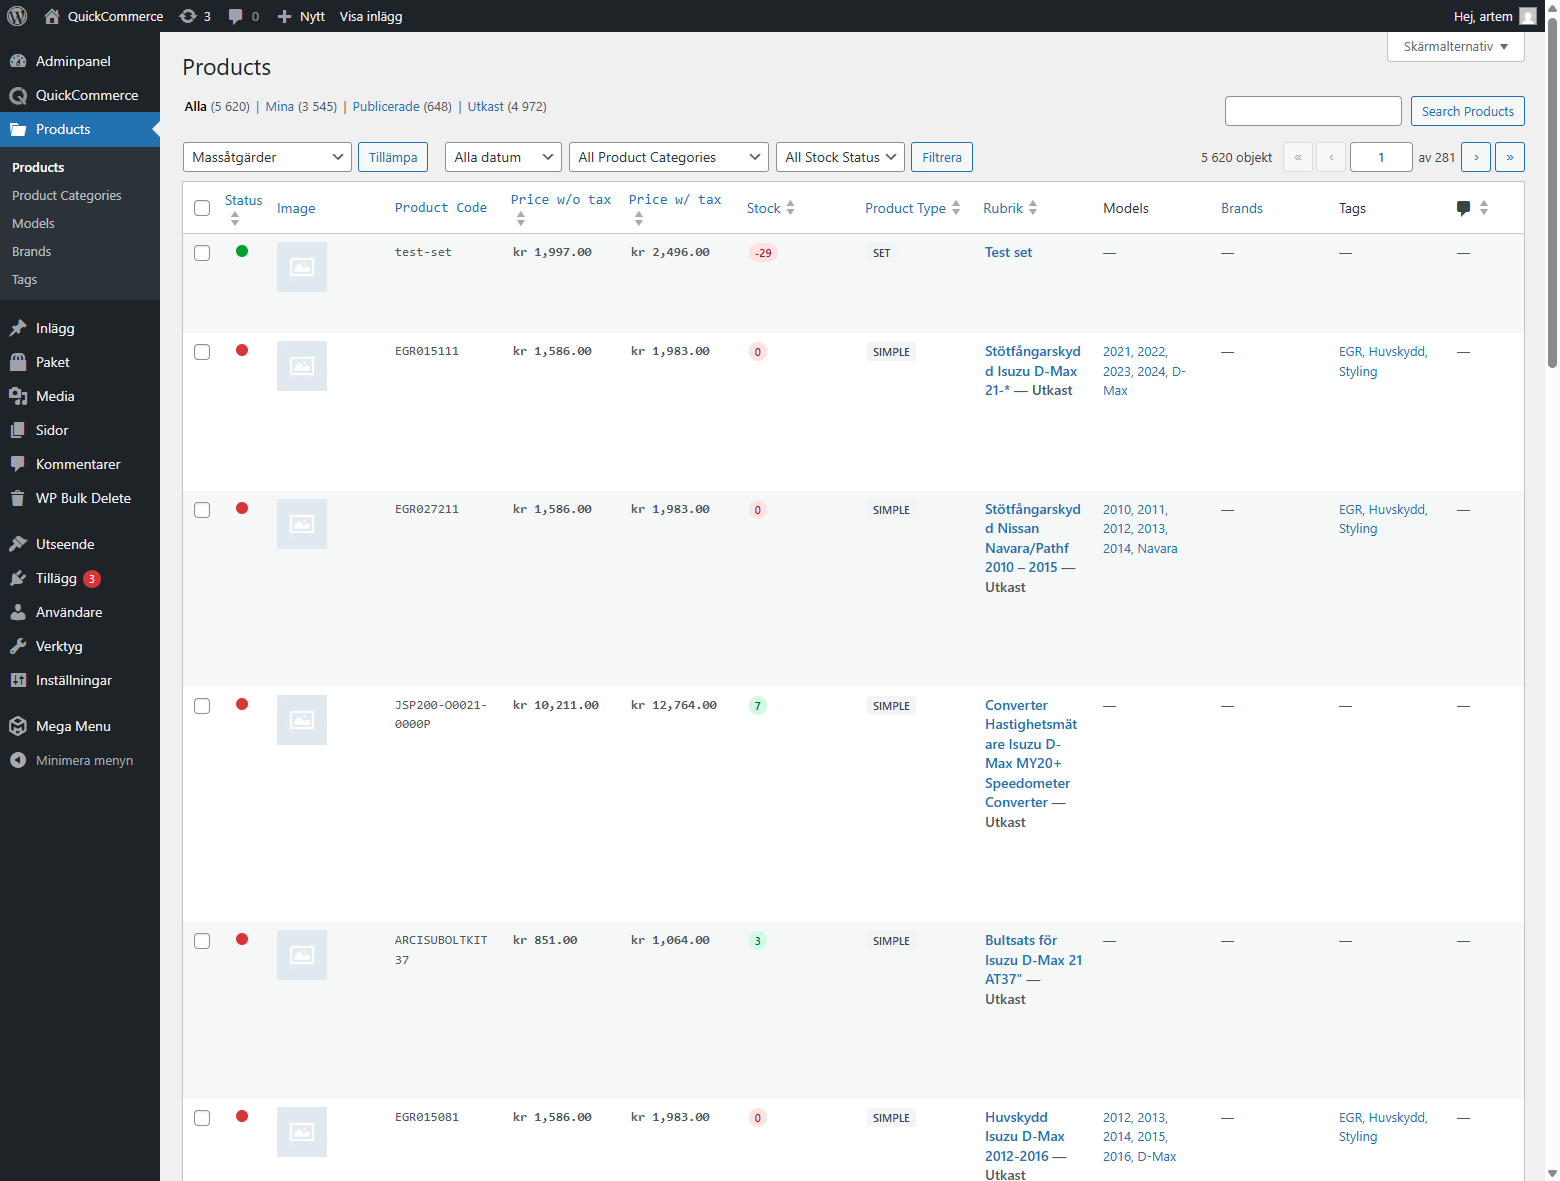
Product List
Location: WordPress Admin > Products
The product list is your primary view for browsing all synced products.
Custom Columns
| Column | Description |
|---|---|
| Status | Green dot = published (visible), Red dot = draft (hidden). |
| Image | Product thumbnail. |
| Product Code | Unique code from Quick3. |
| Price w/o tax | Price excluding VAT; shows original and sale prices when a discount is active. |
| Price w/ tax | Price including VAT; shows original and sale prices when a discount is active. |
| Stock | Badge showing stock quantity -- green for in-stock, red for out-of-stock. |
| Product Type | Simple, Variable (has variants), Variant (child of a variable product), Component, or Set. |
| Title | Product name, linked to the product editor. |
| Categories | Assigned product categories (auto-column from taxonomy). |
| Models | Connected vehicle models (auto-column from taxonomy). |
| Brands | Associated brands (auto-column from taxonomy). |
| Tags | Assigned tags (auto-column from taxonomy). |
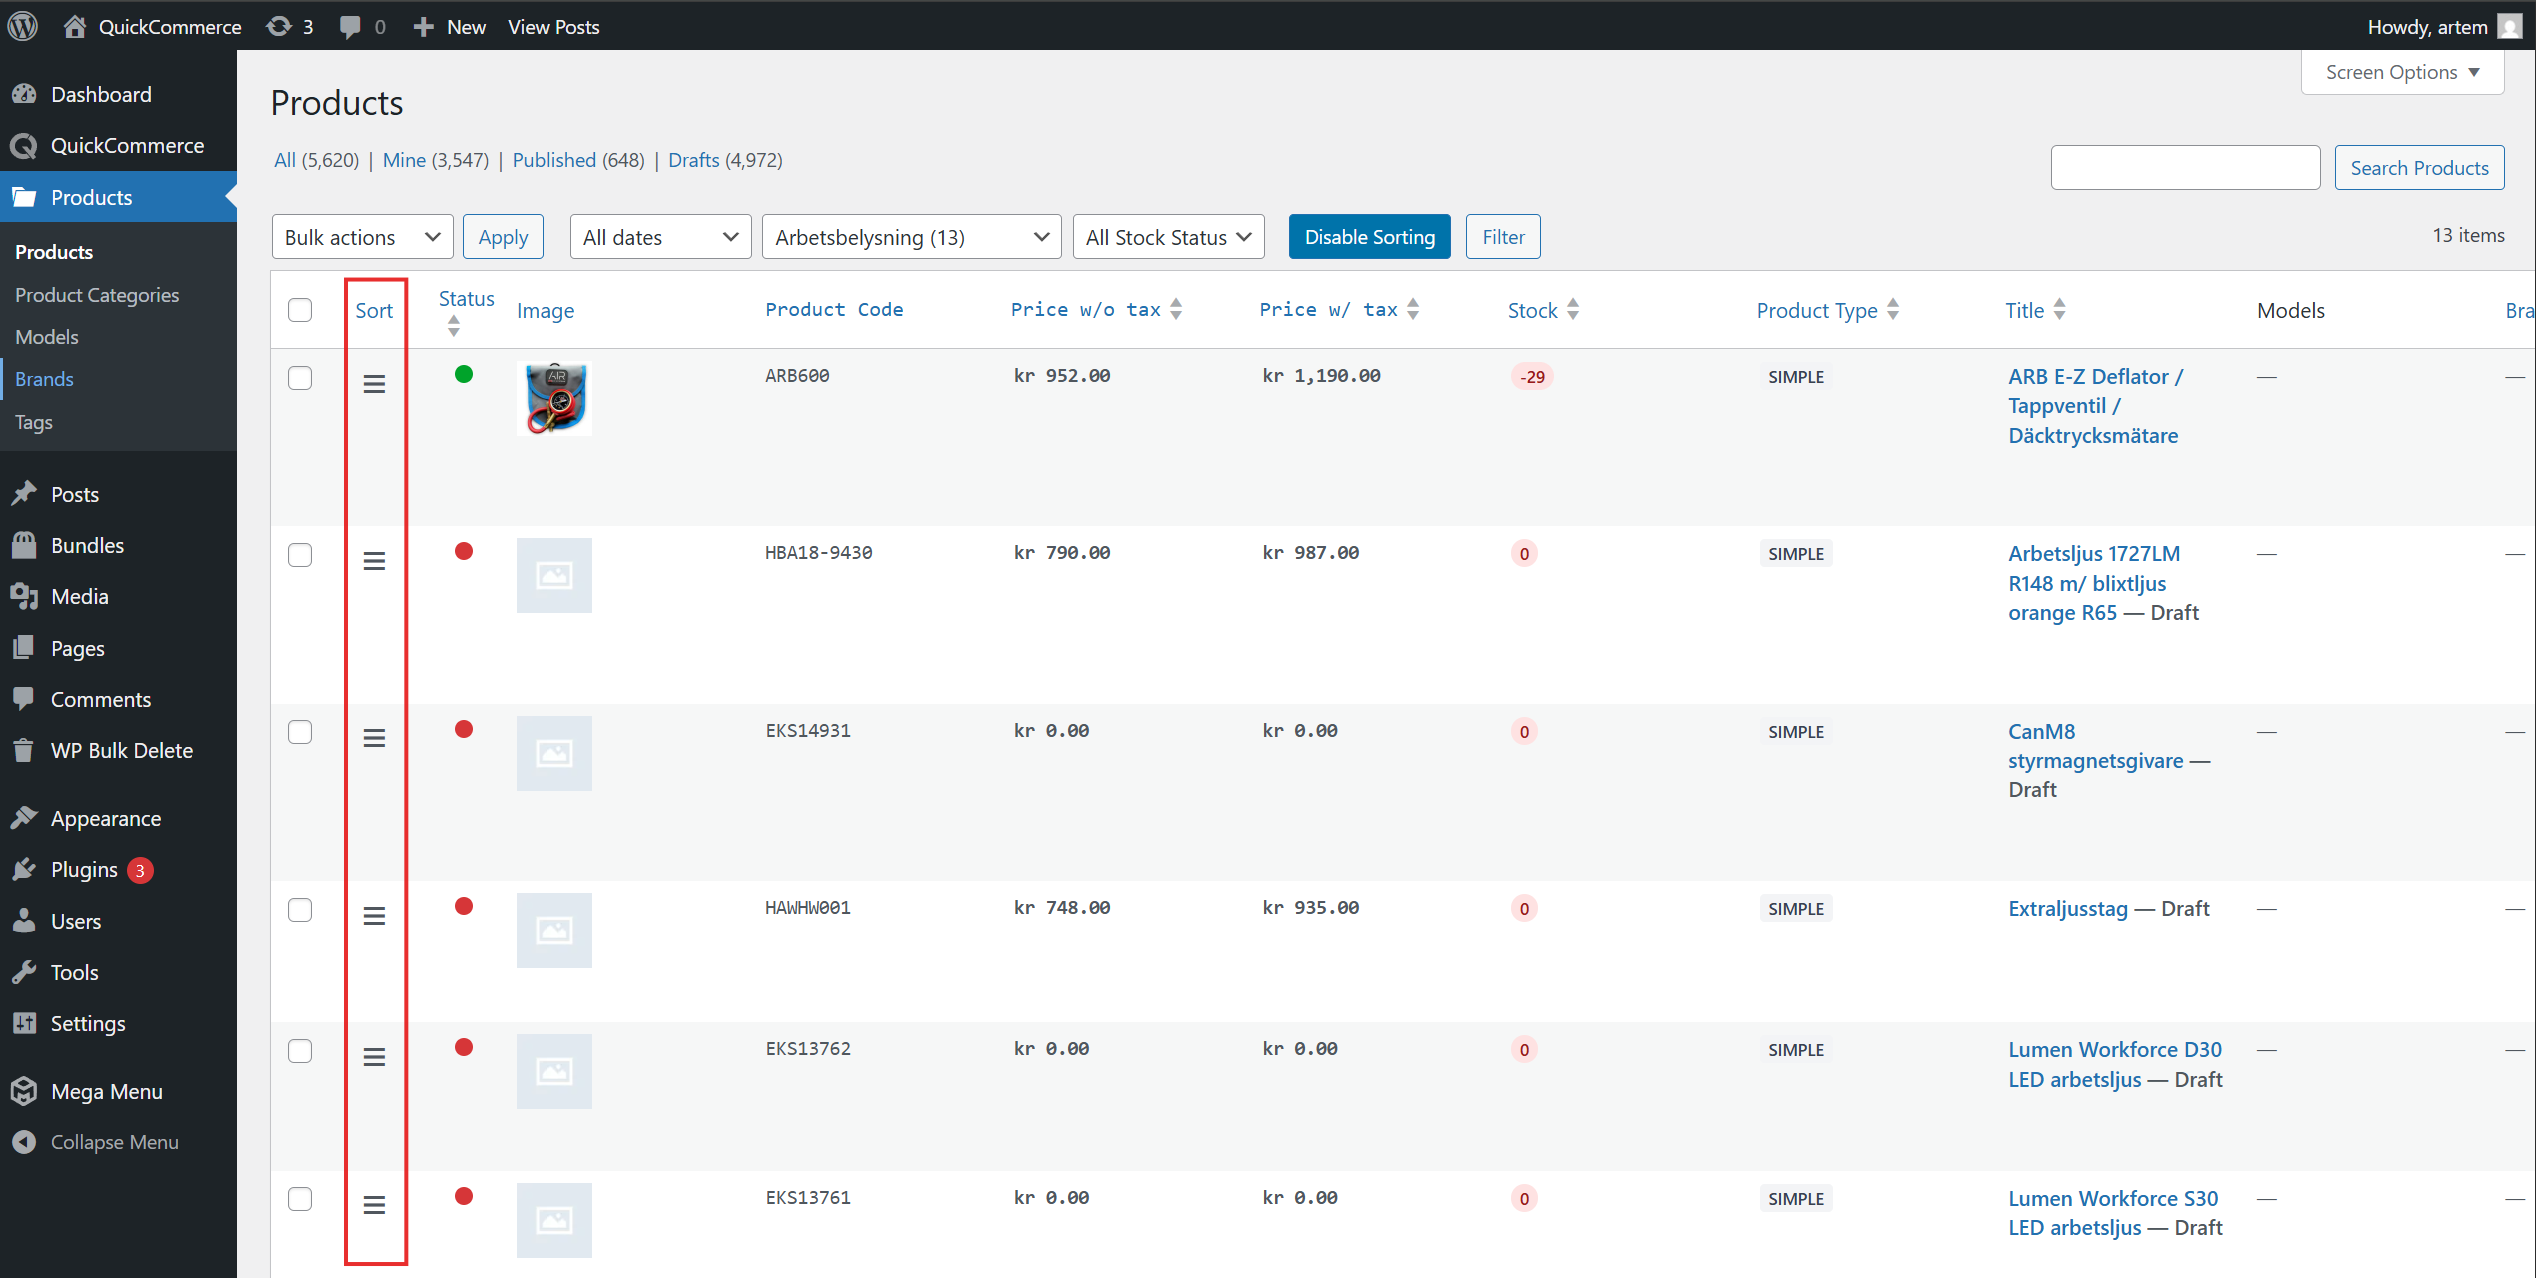
Sorting
Click column headers for Status, Price, Stock, and Product Type to sort. Click again to reverse.
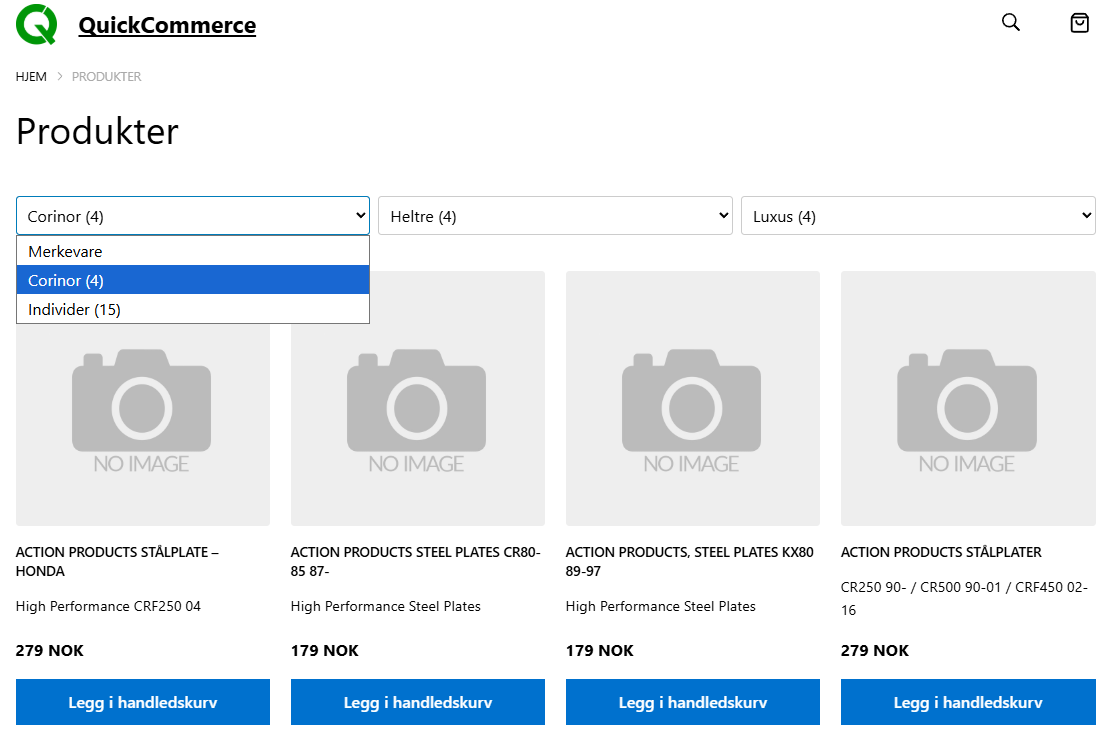
Filtering
Three filter dropdowns are available above the product list:
- Category Filter -- Filter by product category (shows product counts in parentheses)
- Brand Filter -- Filter by brand
- Stock Status Filter -- Choose In Stock or Out of Stock
Select values and click Filter to apply.
Searching
Use the search box to find products by name or product code. QuickCommerce extends the standard WordPress search to also match against product codes from Quick3.
Manual Sort Order
When you filter by a specific category, an Enable Sorting button appears. This lets you drag-and-drop products to arrange their order within that category. The new order is saved automatically.
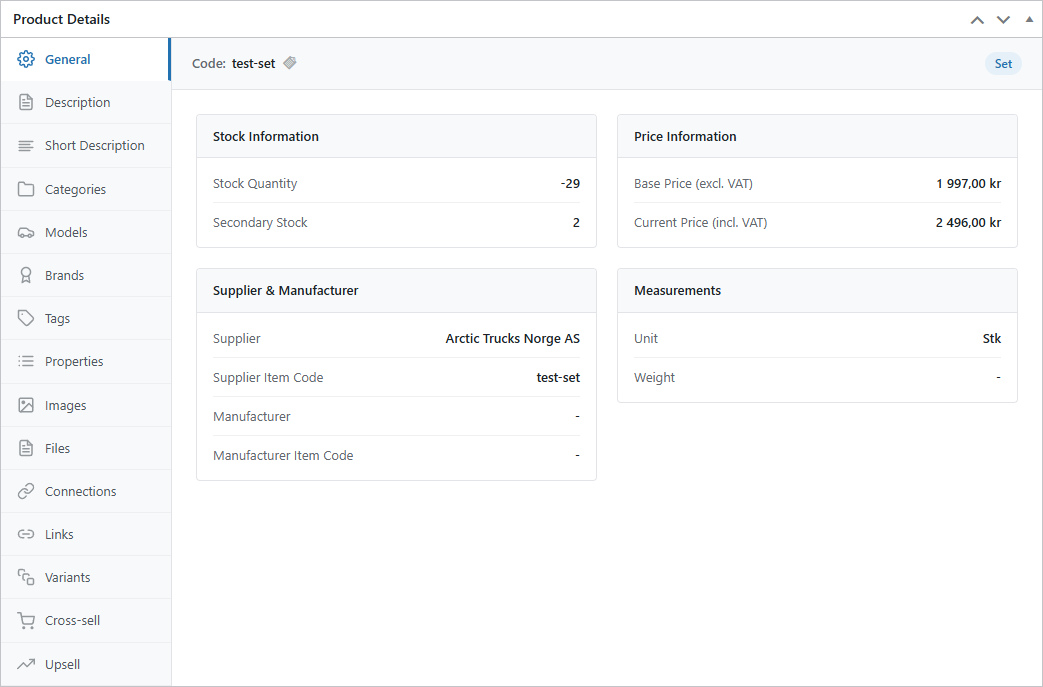
Product Editor
Location: WordPress Admin > Products > Edit Product
The product editor features a Product Details metabox with a tabbed interface containing 15 sections.
Product Details Tabs
| Tab | Description | Editable |
|---|---|---|
| General | Product code, type, stock info, prices, supplier/manufacturer details, measurements. | No (read-only from Q3) |
| Description | Full rich-text editor for the main product description. | Yes |
| Short Description | Simplified editor for the product excerpt. | Yes |
| Categories | Hierarchical checkbox tree for assigning product categories. | Yes |
| Models | Read-only tree showing connected vehicle models. | No (managed in Q3) |
| Brands | Hierarchical checkbox tree for assigning brands. | Yes |
| Tags | Create, search, and assign tags; selected tags shown as chips. | Yes |
| Properties | Key-value table of product attributes from Q3. | No (read-only from Q3) |
| Images | Upload area, drag-and-drop gallery with reordering; first image becomes featured. | Yes |
| Files | Upload and manage downloadable documents (guides, spec sheets). | Yes |
| Connections | Related products defined in Q3 grouped by connection type. | No (from Q3; can trigger sync for unsynced items) |
| Links | External URLs associated with the product. | No (from Q3) |
| Variants | For variable products: table of child variants; for variants: link to parent. | No (managed in Q3) |
| Cross Sell | Search and add complementary product recommendations; drag-and-drop ordering. | Yes |
| Upsell | Search and add premium alternative suggestions; drag-and-drop ordering. | Yes |
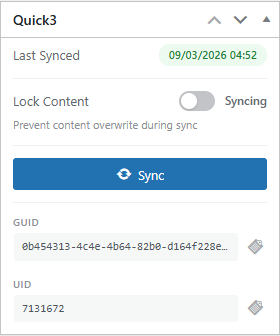
Quick3 Sidebar
Located in the right sidebar of every product editor page:
| Field | Description |
|---|---|
| Last Synced | Timestamp showing when the product was last synced from Q3. |
| Lock Content | Toggle to prevent description overwrite during sync. |
| Sync | Button to sync this individual product from ERP. |
| GUID | Product's ERP GUID (copyable). |
| UID | Product's ERP UID (copyable). |
Product Sync
Products are synchronized from Quick3 to WordPress. You cannot create new products from WordPress -- products are created in Quick3 and then synced.
Initial Sync
The Setup Wizard handles the initial full catalog import. Categories and models are synced first so that products can reference them.
Automatic Sync
QuickCommerce schedules automatic syncs using the WordPress Action Scheduler (WordPress's built-in background task system). By default, each entity type runs every 3 hours (configurable in Data Sync settings).
During each automatic product sync, Quick3 is queried for changes since the last run. New and updated products, prices, stock levels, and images are pulled into WordPress automatically. For a complete list of which fields are synced and in which direction, see section What Gets Synced later in this article.
Manual Sync
Three methods to trigger a manual sync:
- From Settings: QuickCommerce > Data Sync > click the Sync button for the desired entity type.
- From a Single Product: Open the product editor and click Sync in the Quick3 sidebar.
- From WP-CLI: Run
wp qcom sync productsfrom the server terminal.
Sync Summary
After a sync completes, a summary message appears:
Synced: 847 products (12 new, 835 updated). 0 failed.
Product Visibility
Product visibility is controlled by the webactive property in Quick3:
webactive = true-- Product is published and visible on the storefrontwebactive = false-- Product is set to draft and hidden from the storefront
To make a product visible or hidden, change its web-active flag in Q3 ERP and re-sync.
Image and Description Management
While most product data comes from Quick3, images and descriptions can be managed in WordPress.
Lock Content
The Lock Content toggle in the Quick3 sidebar controls whether Q3 sync overwrites descriptions:
- Locked (on): Your WordPress descriptions are preserved during sync.
- Syncing (off): The next sync will overwrite WordPress descriptions with Q3 data.
This can also be set globally via the Lock Content Sync toggle in the Data Sync settings.
Images
- Upload, reorder, and remove images from the Images tab.
- The first image automatically becomes the featured image.
- For variable products, variant images appear in a separate read-only section below the main gallery.
- Image changes are saved automatically via AJAX.

Product Fallback Image
Set a default image in QuickCommerce > Settings > General for products that do not have a featured image. For variable products, the system checks variant images first before falling back to the default.
Categories and Taxonomies
QuickCommerce uses four product taxonomies to organize products.
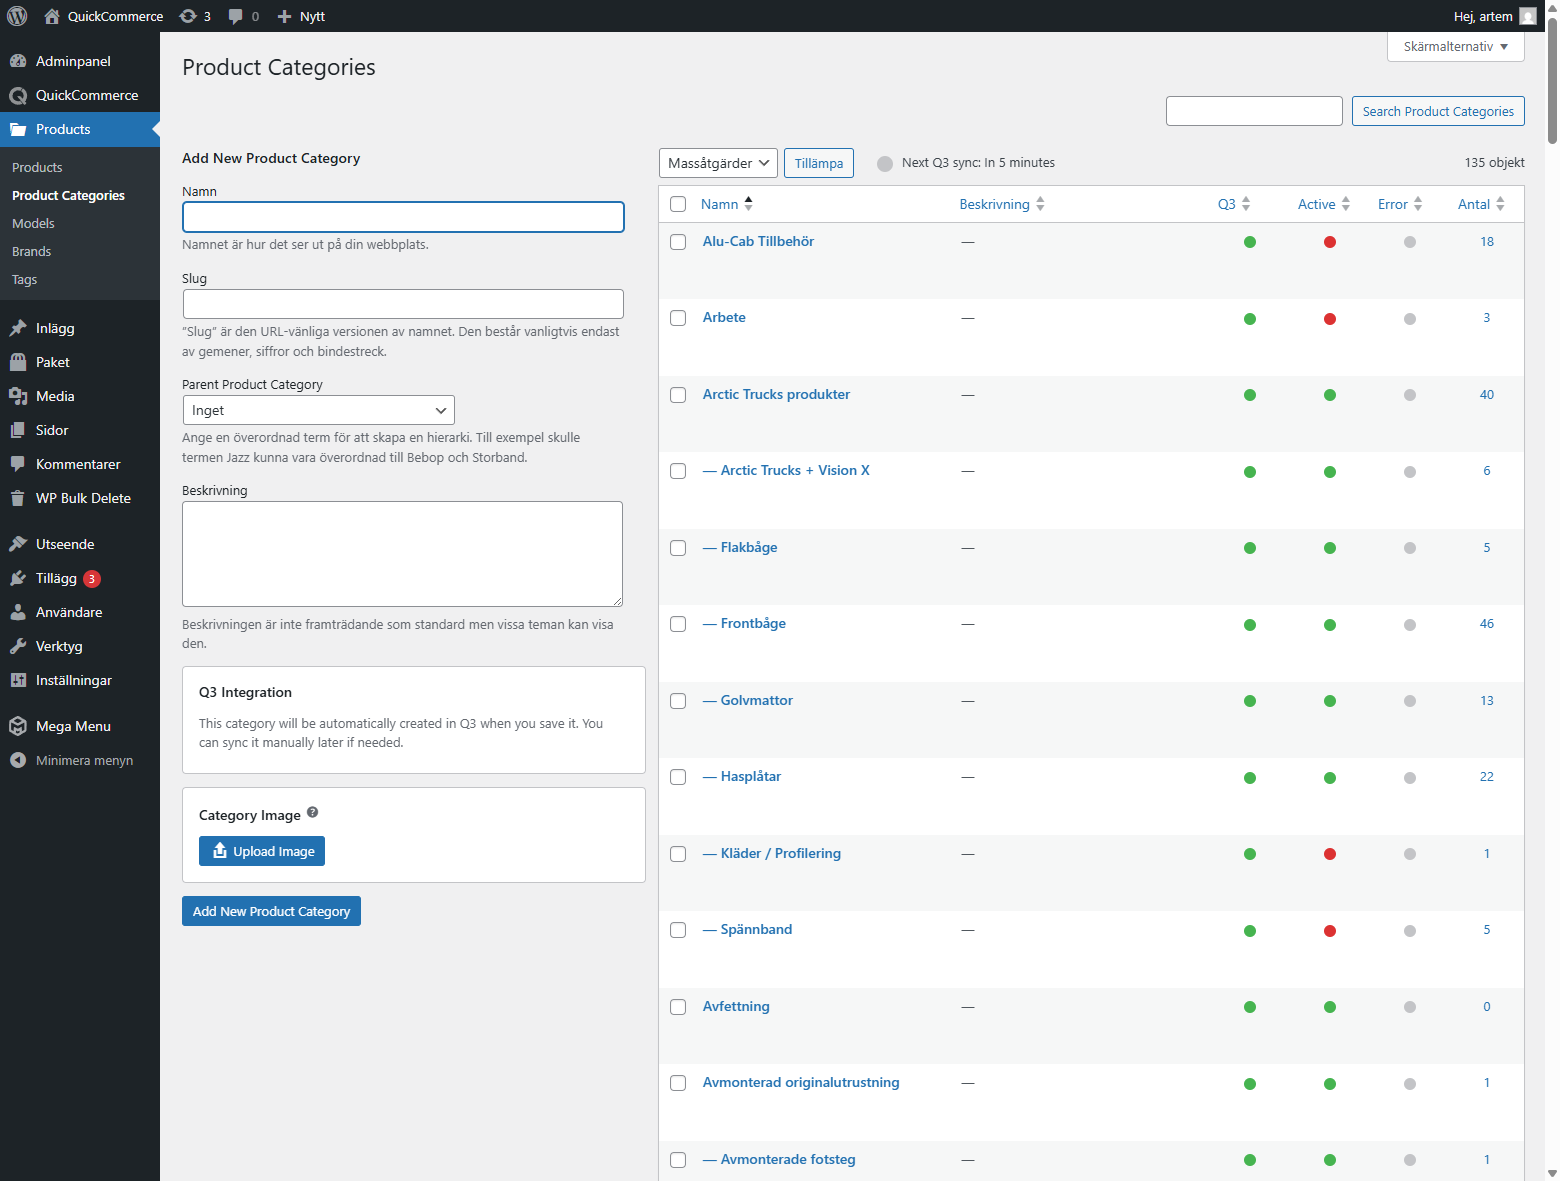
Categories
Access: WordPress Admin > Products > Categories
Categories are organized hierarchically (parent/child) and support bidirectional sync with Quick3. Categories can be created and edited in both systems.
Sync behavior:
- Categories sync from Q3 to WordPress and vice versa.
- New categories created in WordPress are automatically pushed to Q3 on save.
- Editing or deleting a category in WordPress updates Q3 accordingly.
- Automatic sync runs every 3 hours by default (configurable). A "Next Q3 sync" indicator is shown above the category list.
- Manual sync available from QuickCommerce > Data Sync, or per-category via the Q3 Sync row action.
Managing categories:
- Navigate to Products > Categories.
- Create, edit, or delete categories as needed.
- Assign categories to products via the product editor's Categories tab.
Category Images
Each category can have an image managed in WordPress (not synced to Q3):
- Go to Products > Product Categories.
- Click Add New or edit an existing category.
- In the Category Image section, click Upload Image.
- Select an image and save the category.
Category List Columns
| Column | Description |
|---|---|
| Name | Category name with hierarchical indentation. |
| Description | Category description |
| Q3 | Connection status: Green = linked to Q3, Gray = not linked. |
| Active | Visibility: Green = active, Red = inactive. |
| Error | Red = sync error (hover for details), Gray = no error. |
| Slug | URL-friendly identifier. |
| Count | Number of products in this category. |
Tags
Access: WordPress Admin > Products > Tags
Tags are a flat (non-hierarchical) taxonomy managed entirely in WordPress. They are not synced from Quick3.
| Aspect | Detail |
|---|---|
| Source | WordPress only |
| Hierarchical | No |
| Editable | Fully -- create, edit, delete freely |
| Synced to Q3 | No |
Common use cases:
- Product attributes: "waterproof", "organic", "sale", "new-arrival"
- Seasonal labels: "summer-collection", "black-friday"
- Internal organization labels
Tags can be assigned to products from the product editor's Tags tab. On the frontend, tags can be used for filtering via query parameters or FacetWP facets.
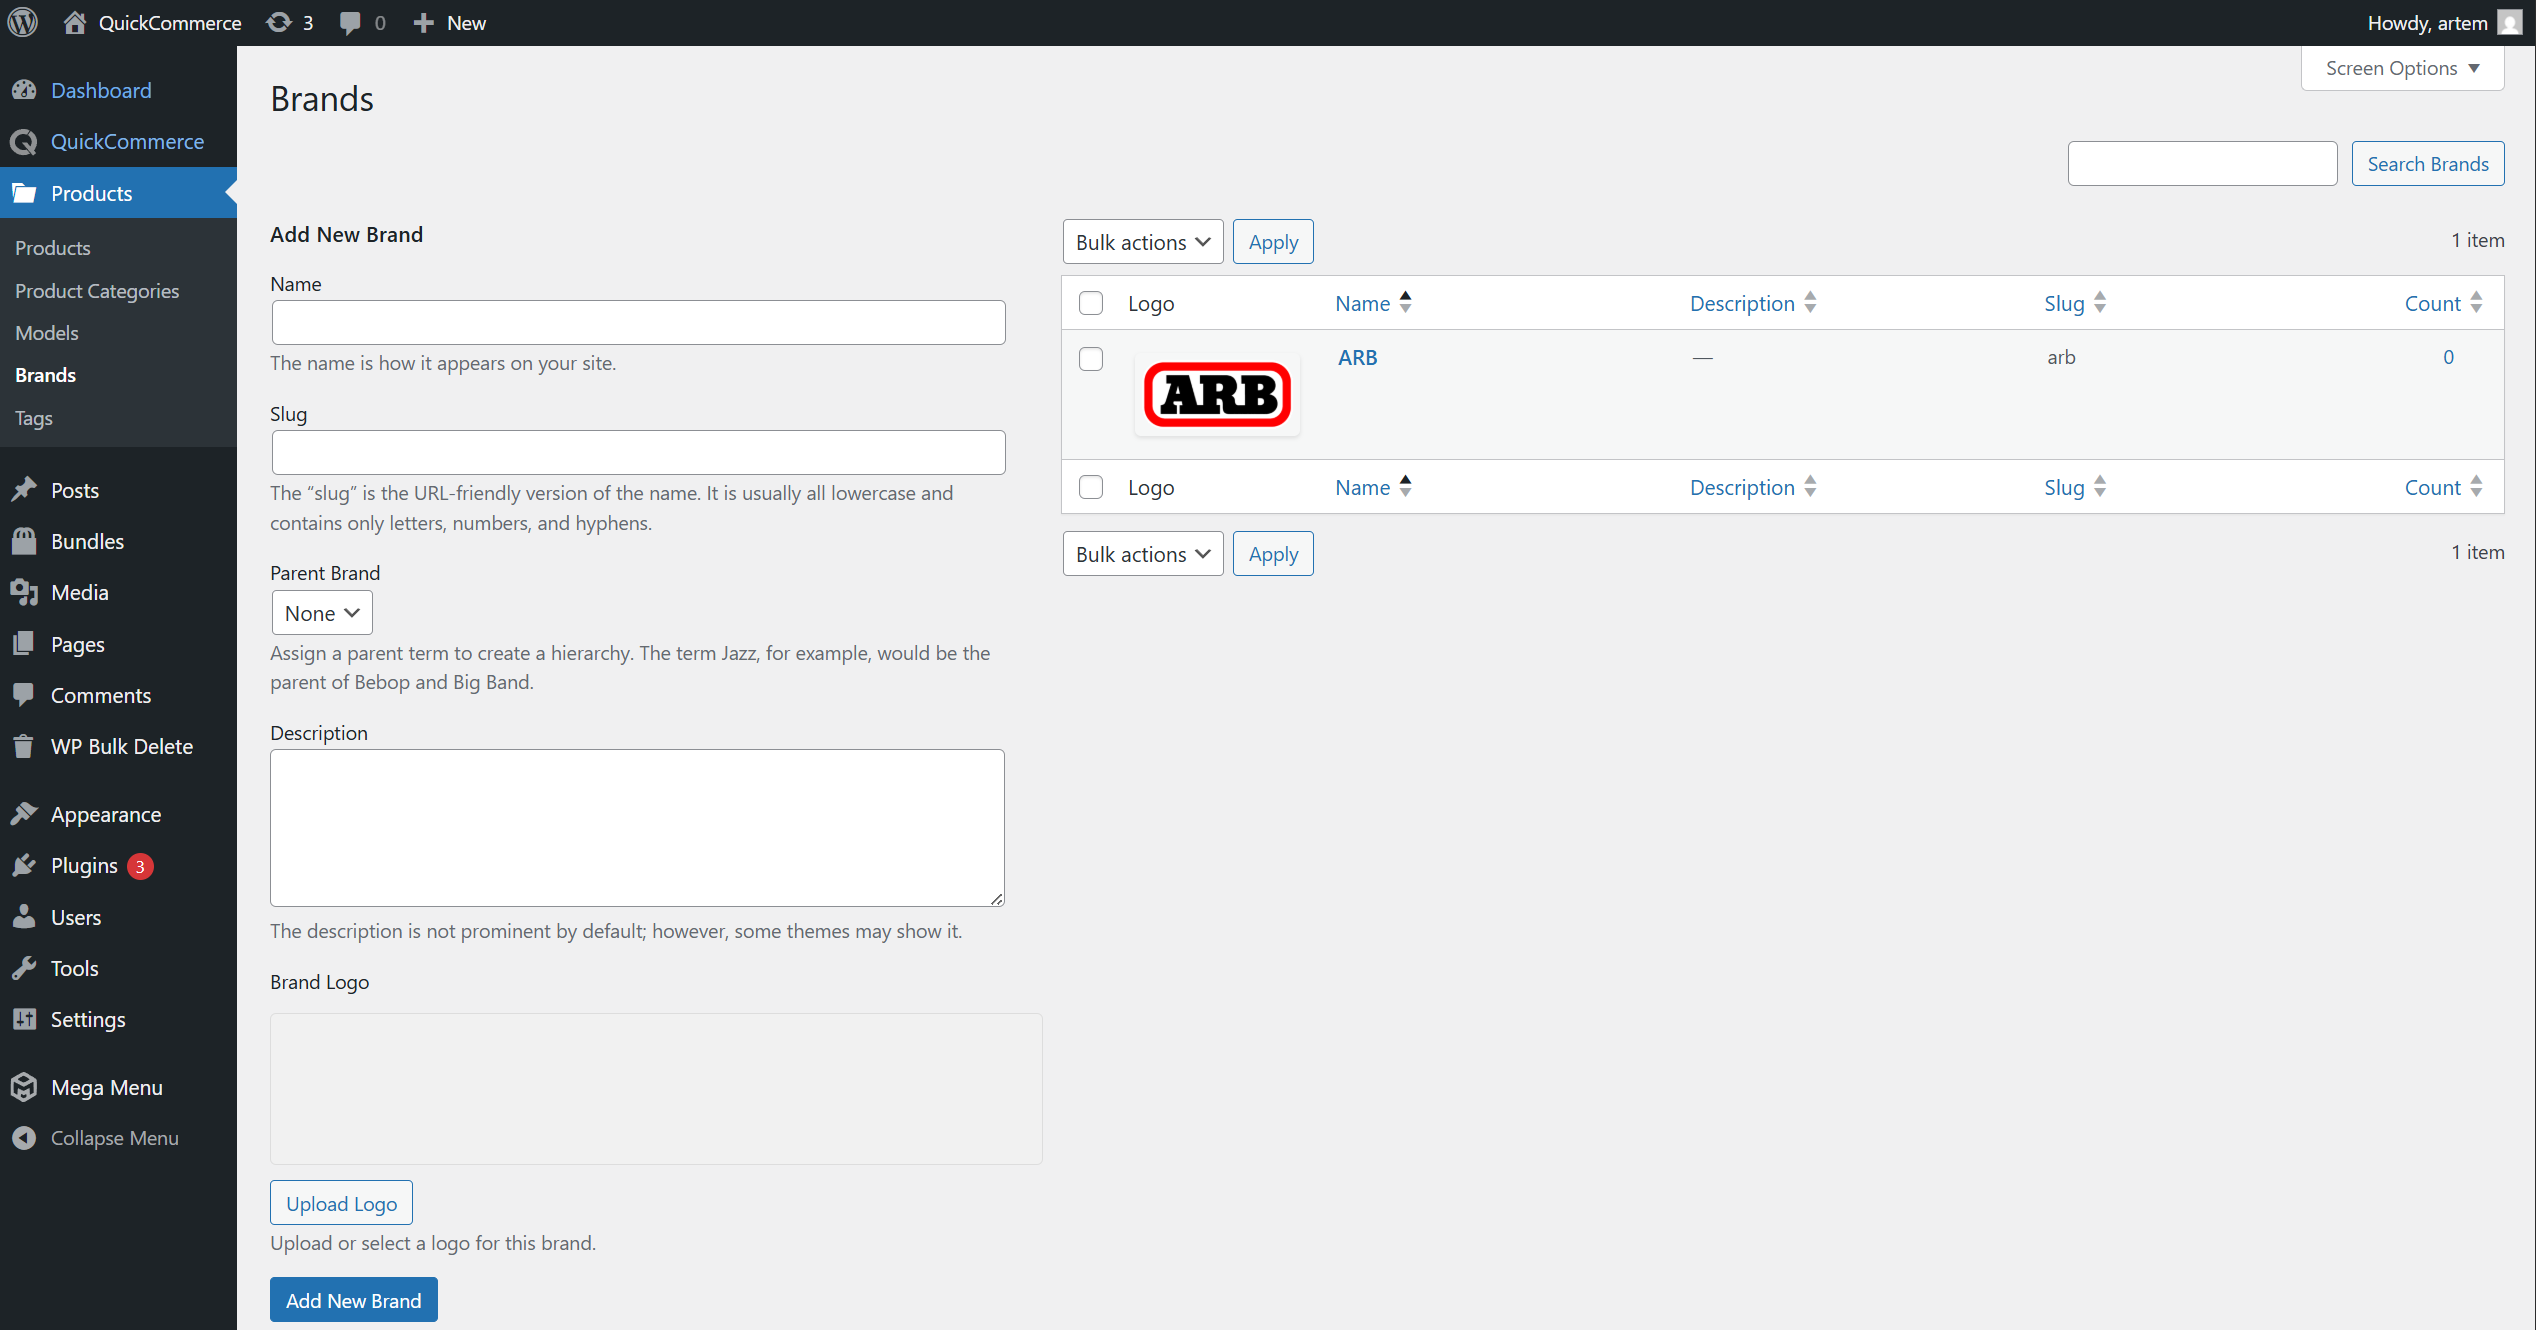
Brands
Access: WordPress Admin > Products > Brands
Brands are a hierarchical taxonomy managed in WordPress. They are not synced from Quick3.
| Aspect | Detail |
|---|---|
| Source | WordPress only. |
| Hierarchical | Yes (can have parent/child brands). |
| Editable | Fully -- create, edit, delete freely. |
| Has Logo | Yes -- upload brand logo images. |
| Frontend Block | Product Brand Logo block. |
Brand Logos
Each brand can have a logo image:
- Go to Products > Brands.
- Click Add New Brand or edit an existing brand.
- In the Brand Logo field, click Upload Logo.
- Select an image and save the brand.
The Brands admin list table shows a thumbnail preview of each brand's logo.
Hierarchy Example
Renault (parent brand)
+-- Renault Passenger
+-- Renault Commercial
Most stores use a flat brand list. Hierarchy is optional and mainly useful for large multi-brand catalogs.
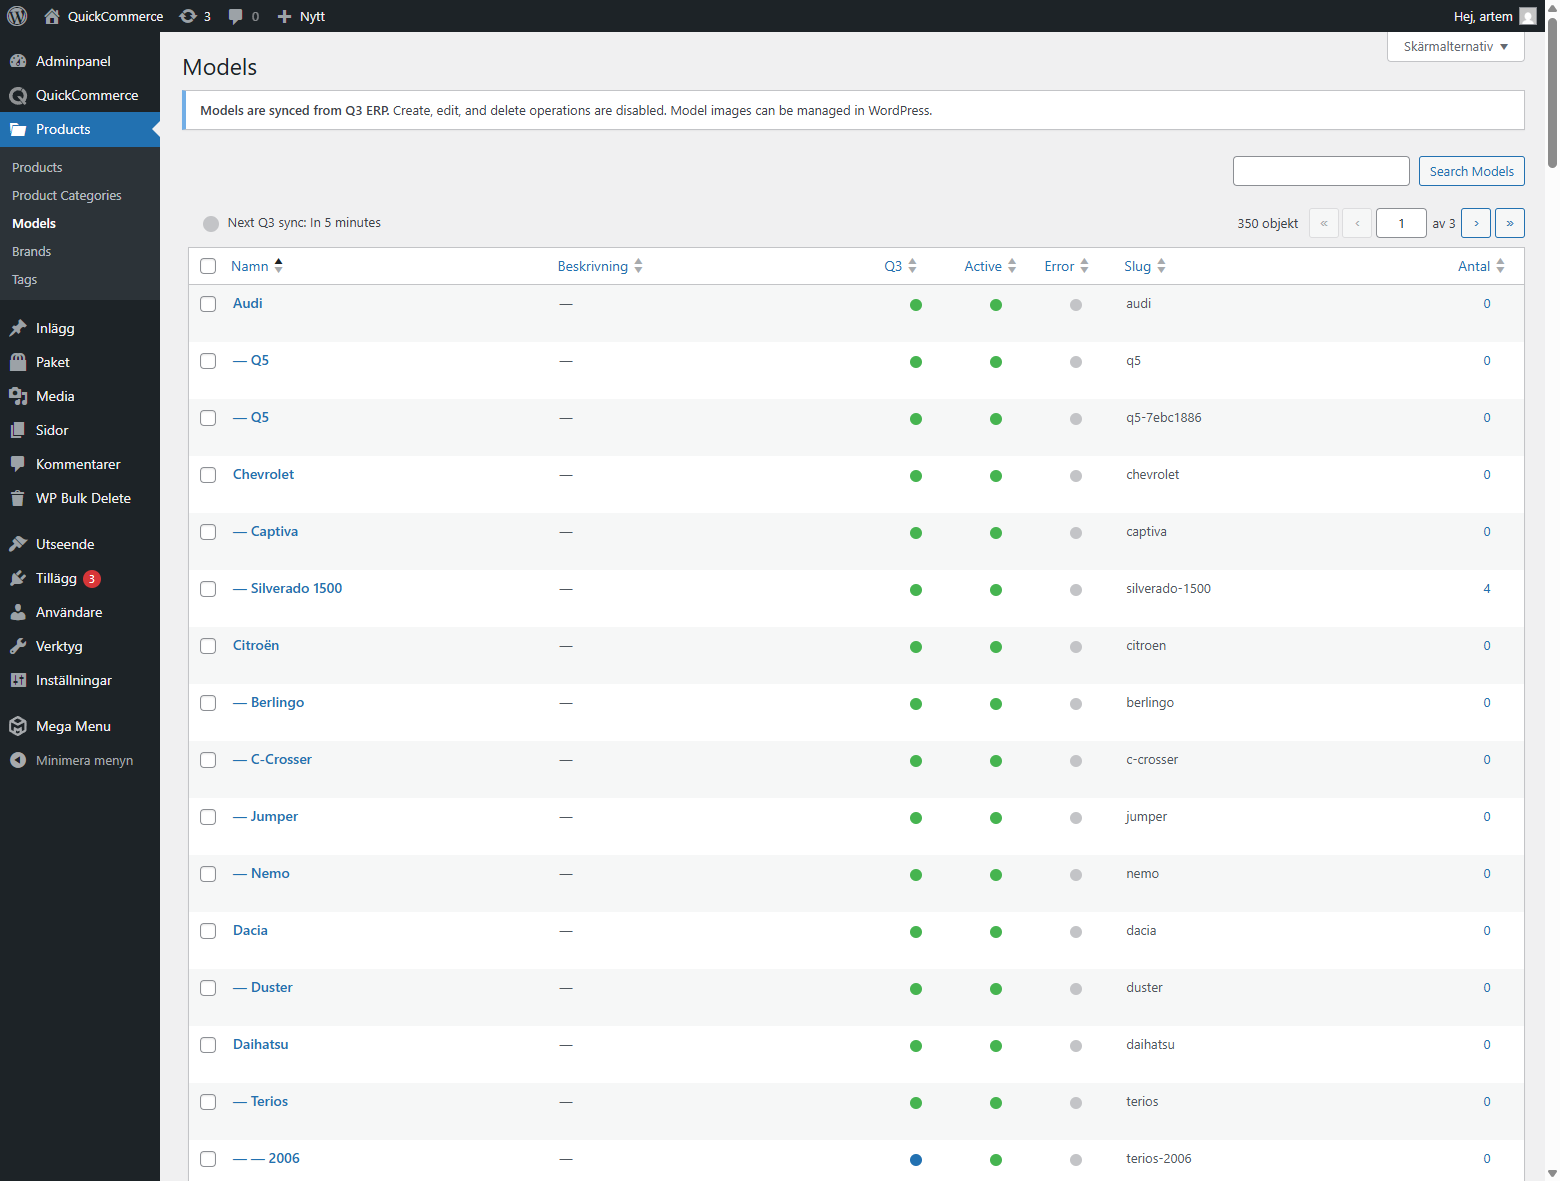
Model Specifications
Access: WordPress Admin > Products > Models
Models represent vehicle makes and models (or any hierarchical specification system). They are synced one-way from Quick3 and are read-only in WordPress (except for images).
Hierarchy
Models are organized in a three-level hierarchy:
Brand (e.g., Audi)
  +-- Model (e.g., Q5)
       +-- Year Terms (e.g., 2020, 2021, 2022, 2023)
- Level 1 -- Brand: Top-level model specs from Quick3.
- Level 2 -- Model: Child specs under brands.
- Level 3 -- Year: Auto-generated child terms from the model's year range in Q3.
Read-Only Behavior
Models are controlled by your Quick3 system. The following actions are blocked in WordPress: creating new models, editing names/slugs/descriptions, changing parents, deleting models, quick edit, and bulk edit/delete.
An info notice on the edit page explains this restriction. Only the Model Image can be edited in WordPress.
Year Terms
Year terms are automatically generated for models with a valid year range defined in Quick3. For example, a model with years 2018-2023 produces child terms: 2018, 2019, 2020, 2021, 2022, 2023.
| Scenario | Result |
|---|---|
Both valueFrom and valueTo set | Creates terms for each year in the range. |
Only valueFrom set | Creates terms from that year to the current year. |
Only valueTo set | Creates terms from 2010 to that year. |
| Neither value set | No year terms created. |
| Invalid values (< 1900) | No year terms created. |
Model Images
Model images are managed exclusively in WordPress and are never synced to Quick3. To add or change an image:
- Click on the model name to open the edit page.
- In the Model Image section, click Upload Image or Replace Image.
- Select an image from the Media Library or upload a new one.
- Click Save Image.
Recommended: Medium (300x300) or larger. Supported formats: JPG, PNG, GIF, WebP.
Model Sync
- Automatic: Every 3 hours (configurable in Data Sync settings).
- Manual (all): QuickCommerce > Data Sync > Model Specs > Sync Now.
- Manual (single): Hover over a model in the list and click Q3 Sync.
- WP-CLI:
wp qcom sync models.
Model List Table Columns
| Column | Description |
|---|---|
| Name | Model name with hierarchical indentation |
| Description | Model description from Q3 |
| Q3 | Connection status: Green = linked, Red = not linked, Blue = year term |
| Active | Visibility: Green = active, Red = inactive |
| Error | Red = sync error (hover for details), Gray = no error |
| Slug | URL-friendly identifier |
| Count | Number of products associated with this model |
Taxonomy Comparison
| Feature | Categories | Tags | Brands | Models |
|---|---|---|---|---|
| Source | Bidirectional (Q3 + WP) | WordPress only | WordPress only | Quick3 (read-only) |
| Hierarchical | Yes | No (flat) | Yes | Yes (3 levels) |
| Editable in WP | Fully | Fully | Fully | Image only |
| Has Image/Logo | Yes (WP-managed) | No | Yes (logo) | Yes (WP-managed) |
| Frontend Block | Category blocks | None | Product Brand Logo | Model Filter |
| Sync Direction | Bidirectional | None | None | Q3 to WordPress |
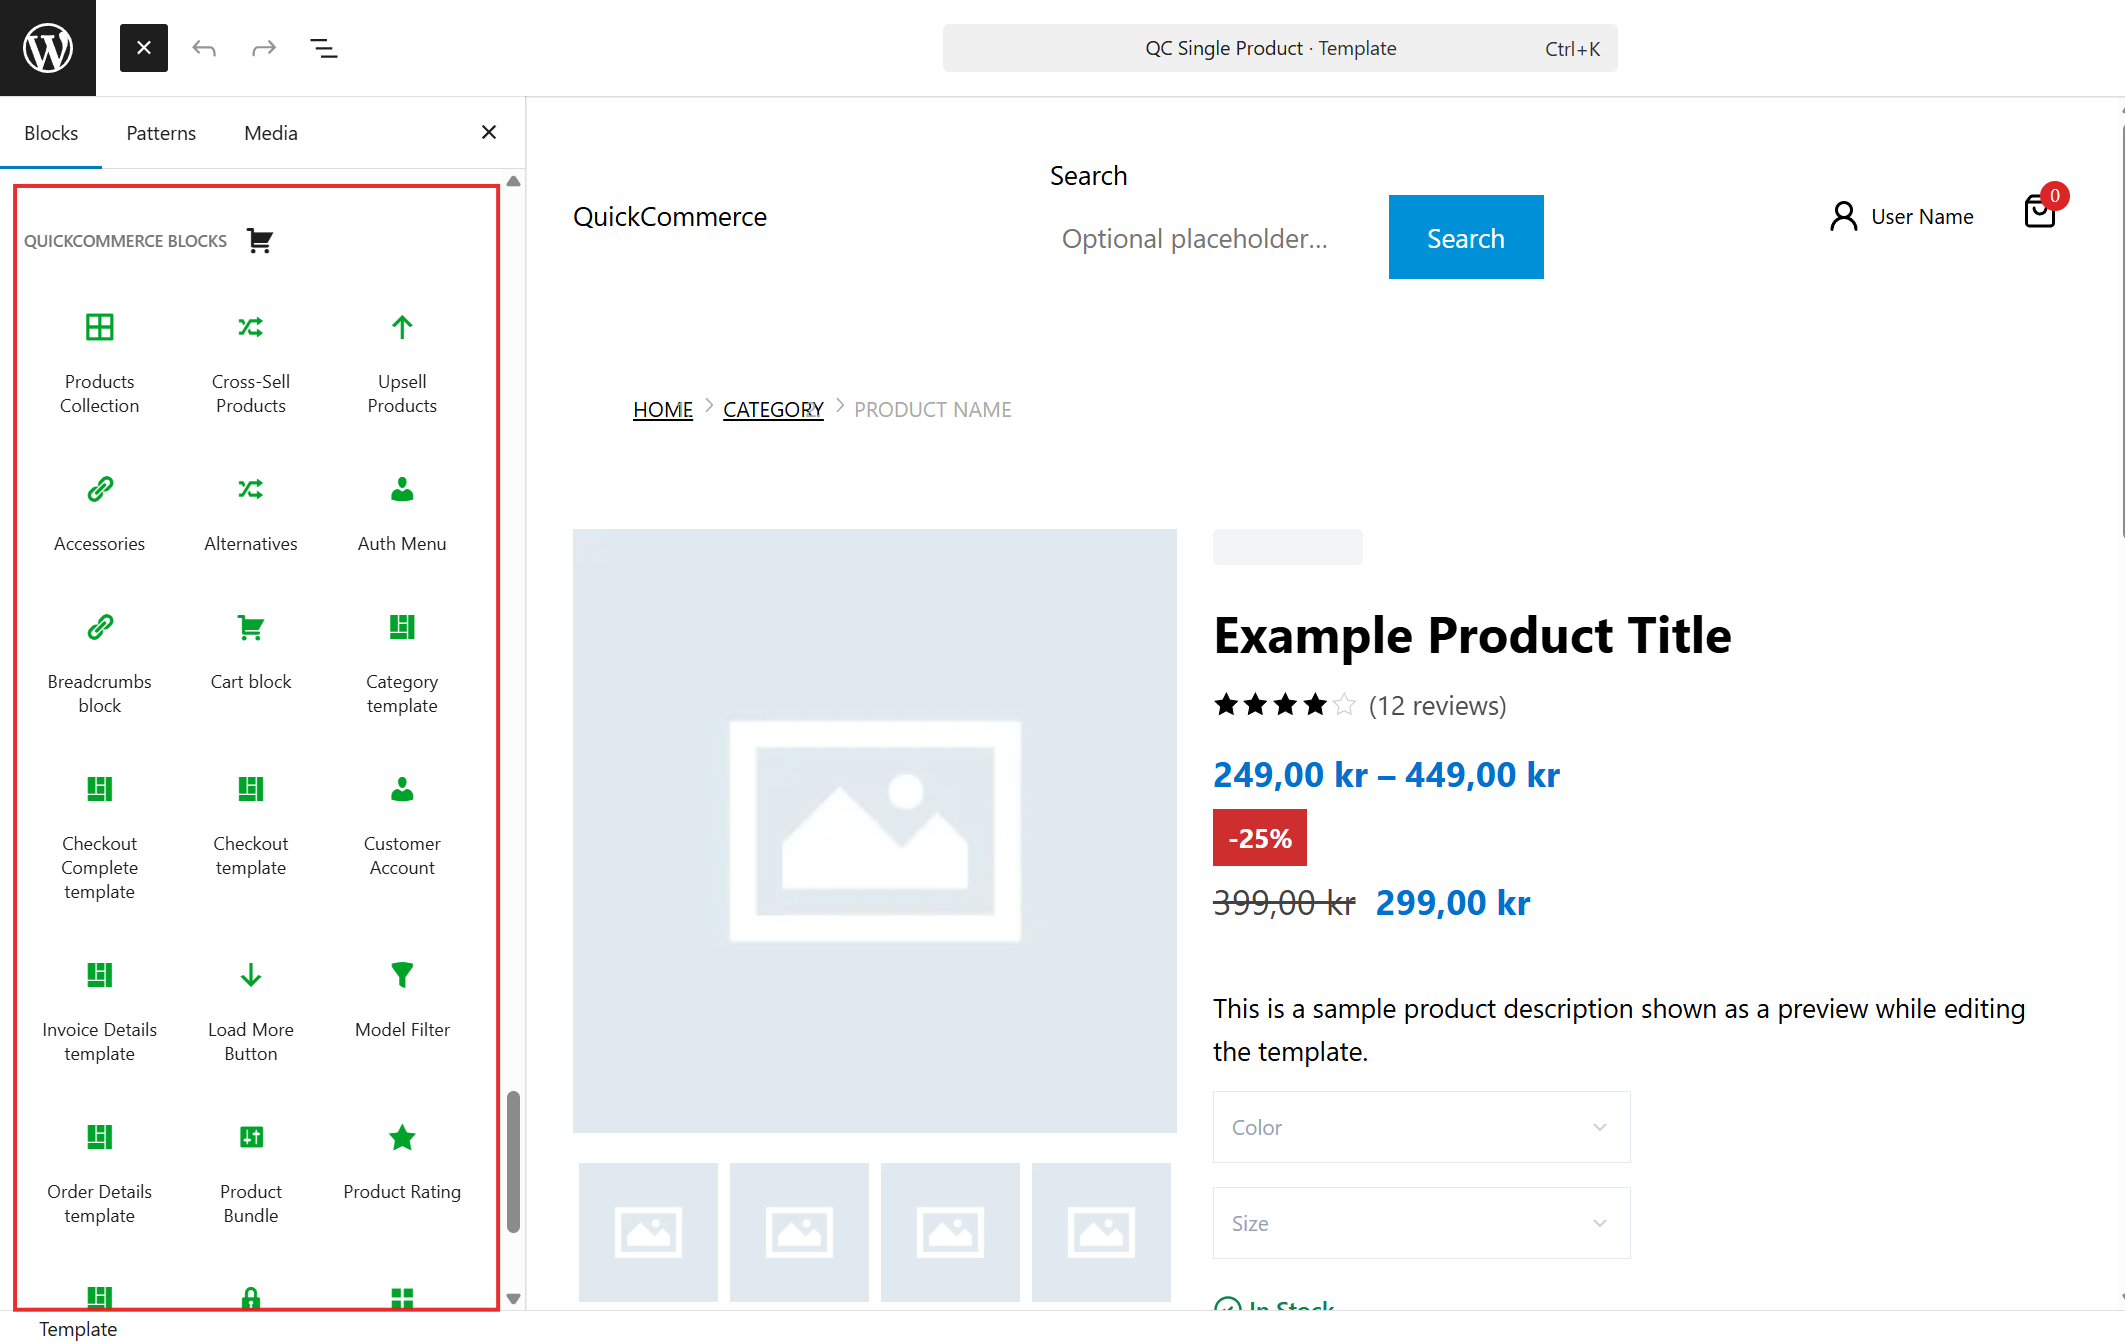
Storefront Blocks
Overview
QuickCommerce provides 50 Gutenberg blocks for building your storefront. All blocks are found in the QuickCommerce category in the block inserter and are identified by green icons.
To access blocks:
- Open the WordPress Site Editor or a page for editing.
- Click the + (Block Inserter) button.
- Search for a block name or browse the QuickCommerce category.
All blocks support visual customization through the block editor's built-in controls for colors, typography, spacing, borders, and shadows.
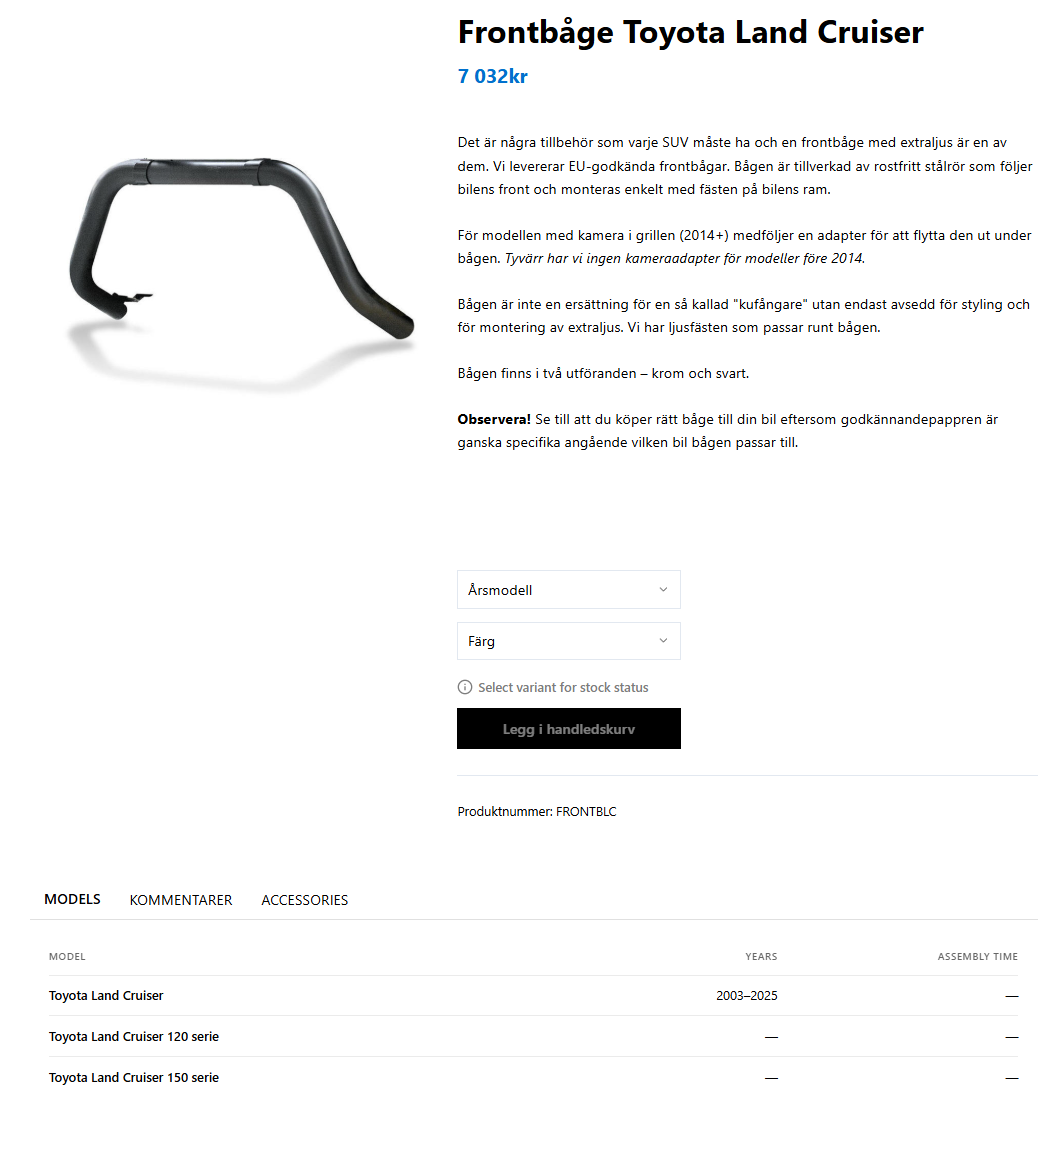
Product Blocks
These blocks display product-specific data and are typically placed inside a Product Template block or a WordPress Post Template configured for products.
| Block | Description |
|---|---|
| Product Template | Wrapper container that provides product context to all child blocks. Required as a parent for most product blocks. |
| Product Title | Displays the product name. Supports heading level selection (H1-H6) and typography customization. |
| Product Code | Displays the product code with an optional label prefix. Variant-aware on single product pages. |
| Product Short Description | Displays the product excerpt. Supports max length truncation and HTML stripping. |
| Product Gallery | Responsive image gallery with lightbox support and configurable thumbnail positions (bottom, left, right). |
| Product Buyblock | Add-to-cart interface with quantity selector and variant option dropdowns. |
| Product Stock Status | Shows stock availability with customizable icons and colors for in-stock, out-of-stock, delivery, and unknown states. |
| Product Delivery Date | Shows expected delivery date with distinct styling for confirmed vs. unconfirmed dates. |
| Product Brand (Logo) | Shows the product's brand logo. Configurable size, image effects (none, grayscale), and links to brand archive. |
| Product Properties | Displays product attributes in a key-value table format. |
| Product Files | Lists downloadable files attached to the product. |
| Product Links | Displays external URLs associated with the product. |
| Product Model Specs | Shows model/vehicle specifications connected to the product. |
| Product Bundle | Displays bundle information for bundled products. |
| Product Component Items | Shows bundled or included component items within a product. |
| Product Tabs | Tabbed interface for organizing product information (description, properties, models, links, files, cross-sell, comments). |
| Product Tab | A single tab pane within the Product Tabs block. |
| Product Cross Sell | Displays cross-sell product recommendations. |
| Product Upsell | Displays upsell product recommendations. |
| Product Rating | Shows product star rating. |
| Variant Selector | Dropdown controls for selecting variant attributes (size, color, etc.) on variable products. |
| Selected Products | Displays a curated collection of hand-picked products. |
| Wishlist Add Button | Heart icon toggle for adding/removing products from wishlists. Shows filled heart when product is saved. Prompts guest users to log in. |
Price Blocks
Price blocks are composable -- you place them inside the Product Price container block to build your desired price display.
| Block | Description |
|---|---|
| Product Price | Container block for all price-related inner blocks. |
| Price Amount | The current/active product price. |
| Price Original | The original (pre-discount) price, typically shown with a strikethrough. |
| Price Range | Price range display for variable products (e.g., "99 kr - 199 kr"). |
| Price Discount | Discount percentage or amount badge. |
| Price Tax | Tax label (e.g., "inkl. mva"). |
| Price Savings | Shows the amount saved compared to the original price. |
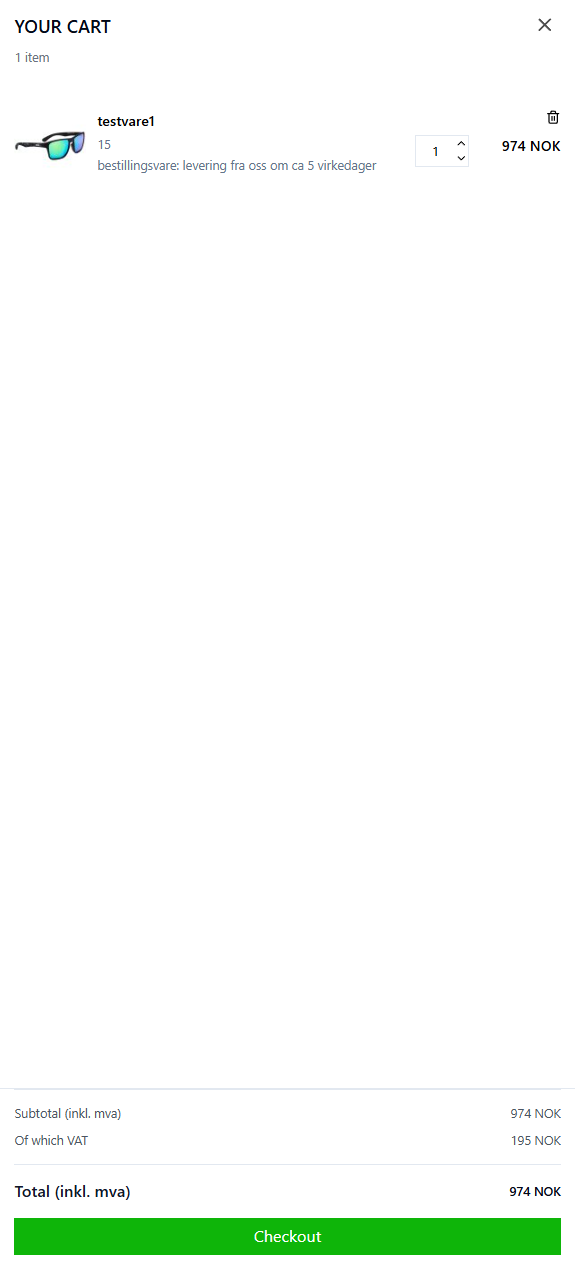
Cart Blocks
| Block | Description |
|---|---|
| Cart | Cart icon with item count badge and interactive side drawer panel. Drawer shows product list, quantities, prices, remove buttons, subtotal, and "Go to Checkout" button. |
| Add to Cart Button | Adds the current product to cart. For simple products, adds immediately; for variable products, links to the product page. Supports Fill and Outline styles. |
| Quantity Input | Compact number input with +/- buttons for selecting product quantity. Configurable min, max, step, and default values. |
Cart block placement:
Typically placed in the site header alongside the Auth Menu block.
Add to Cart Button settings:
| Setting | Default | Description |
|---|---|---|
| Button Text | Add to cart | Text for simple products |
| Variants Button Text | View Product | Text for variable products |
| Hover Background/Text Color | (inherit) | Hover styling |
Checkout Blocks
| Block | Description |
|---|---|
| Checkout | Full checkout form with customer information, shipping, payment, order summary, terms acceptance, and submit button. |
| Checkout Complete | Order confirmation page with store logo, confirmation message, and order reference. Handles payment finalization. |
| Checkout Complete: Order Details | Displays order details within the completion page. |
| Checkout Complete: Order Summary | Shows the order total summary. |
| Checkout Complete: Ordered Items | Lists the items in the completed order. |
| Checkout Complete: Delivery Info | Shows delivery/shipping information for the completed order. |
Checkout setup:
Create a page (e.g., "/checkout") and add the Checkout block.
Checkout Complete setup:
Create a page (e.g., "/checkout-complete") and add the Checkout Complete block. Customers are automatically redirected here after payment.
Customer and Account Blocks
| Block | Description |
|---|---|
| Auth Menu | Login/account icon for the site header. Shows login prompt for guests and account link for logged-in users. |
| Customer Account | Full account dashboard with tabs for Profile, Settings, Addresses, Orders, Invoices, and Wishlist. |
| Reset Password | Password reset form for the password reset page. |
Navigation and Utility Blocks
| Block | Description |
|---|---|
| Breadcrumbs | Hierarchical navigation path (e.g., Home > Electronics > Headphones). Configurable separator, colors, and text styling. |
| Load More Button | Loads additional products in paginated collections. Shows configurable button text, loading text, and "no more" text. |
| Model Filter | Cascading dropdown filter for finding products by vehicle compatibility (Brand > Model > Year). |
Breadcrumbs settings:
| Setting | Default | Description |
|---|---|---|
| Text Case | (inherit) | Transform text casing. |
| Active Text Color | (inherit) | Color of the current breadcrumb item. |
| Separator Type | Chevron | Separator character between items. |
| Separator Color | (inherit) | Separator color. |
Category Blocks
| Block | Description |
|---|---|
| Category Description | Displays the current category's description text. |
| Category Image | Displays the current category's image. |
| Category Wrapper | Container block that provides category context to child blocks. |
Order and Invoice Blocks
| Block | Description |
|---|---|
| Order Details | Page-level block displaying full order details: reference number, date, status, line items, totals, shipping, and payment info. |
| Invoice Details | Page-level block displaying invoice information: number, date, billing details, line items, totals, and payment status. |
Setup:
Create dedicated pages (e.g., "/order-details" and "/invoice") and add the respective blocks. Orders and invoices link to these pages from the customer account dashboard.
Building Pages with Blocks
Basic single product page structure:
- Add a Product Template block as the top-level container.
- Inside it, use WordPress Columns or Group blocks for layout.
- Place a Product Gallery in one column.
- In the other column, add Product Title, Product Price (with inner price blocks), Product Stock Status, Variant Selector, and Product Buyblock.
- Below, add a Product Tabs block for description, properties, and other content.
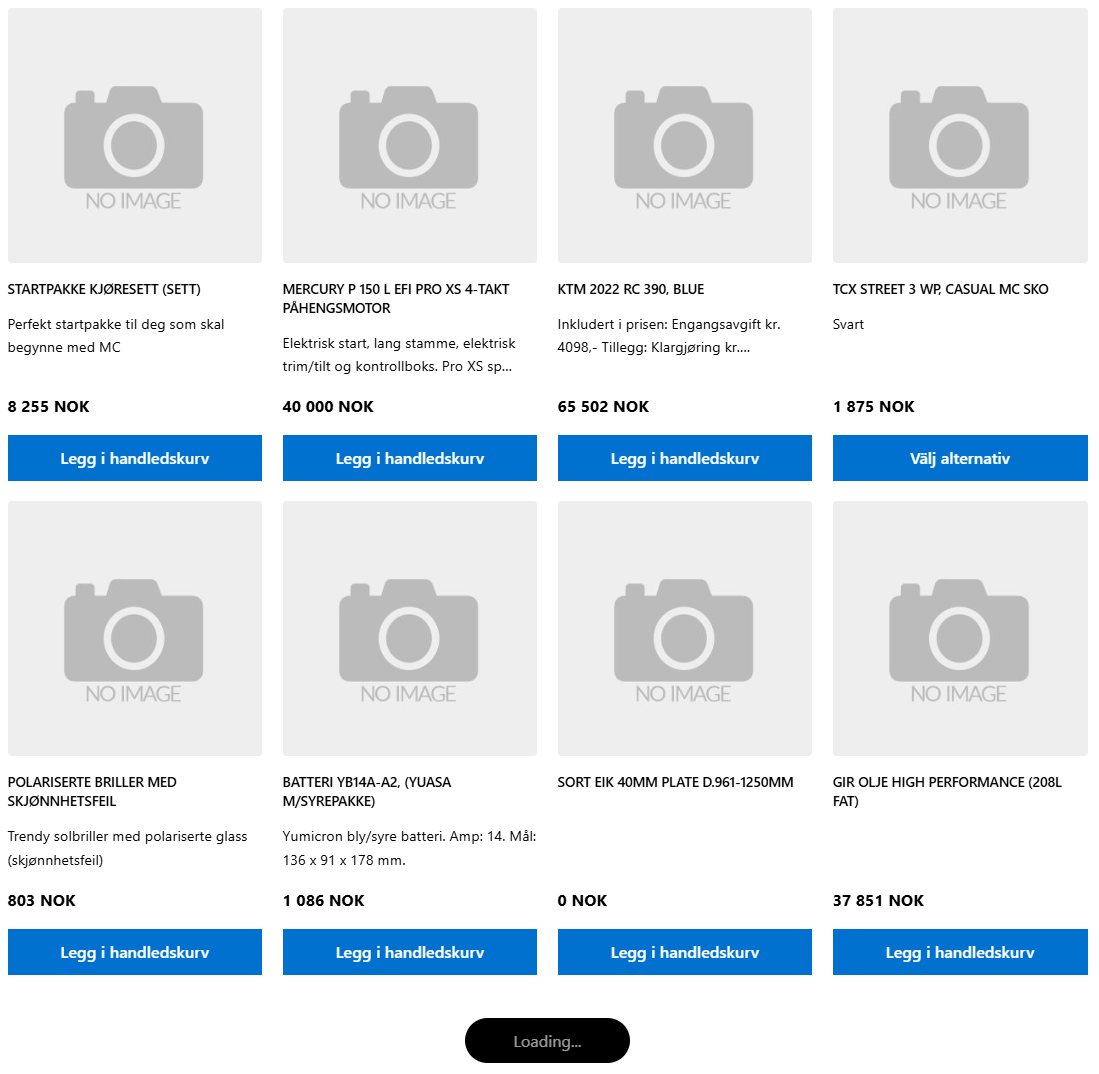
Basic category archive page:
- Use a WordPress Query Loop block configured for products.
- Inside the Post Template, add product blocks like Title, Price, Image, Add to Cart Button, and Wishlist Add Button.
- Below the query, add a Load More Button for pagination.
Shopping Cart
The cart is managed entirely through the Quick3 API -- no cart data is stored in WordPress.
How the Cart Works
- Customer adds a product using the Add to Cart Button.
- Cart is created/updated in Quick3 via API call.
- Cart icon updates showing the new item count.
- Customer views cart by clicking the cart icon to open the side drawer.
- Cart persists across sessions via the Quick3 system.
| Since carts live in Quick3, they are not affected by WordPress cache clearing or database operations. |
Cart Side Drawer
The cart drawer slides open when the cart icon is clicked, showing:
- Product list with images, names, quantities, and prices
- Quantity adjustment controls (+/- buttons)
- Remove item buttons
- Cart subtotal with tax breakdown
- Cross-sell product carousel
- "Go to Checkout" button
Stock validation occurs in real-time -- if a product goes out of stock while in the cart, the customer is notified.
Checkout
Checkout Flow
The typical customer checkout flow:
Cart --> Checkout Page --> Payment --> Checkout Complete Page- Customer reviews cart and clicks "Go to Checkout."
- Checkout page loads with the Checkout block.
- Customer fills in:
- Personal information (name, email)
- Shipping address (with saved address selection)
- Shipping method
- Payment method
- Customer accepts terms and conditions and submits the order.
- Payment is processed based on the selected method.
- Customer is redirected to the Checkout Complete page.

Payment Methods
| Payment Method | Description |
|---|---|
| None (Invoice) | Direct order with no online payment required. Order is confirmed immediately. |
| Nets Easy | Online card payment via the Nets Easy payment gateway. |
Nets Easy Integration
When Nets Easy is selected:
- Customer clicks "Pay" on the checkout page.
- A Nets Easy payment session is created (includes your store's Terms URL and Merchant Terms URL from Legal Pages settings).
- Customer is redirected to the Nets payment form.
- After successful payment, customer returns to the Checkout Complete page.
- Payment is verified and the order is confirmed in Quick3.
Sold-out item verification is performed before payment submission to prevent purchasing unavailable products.
| Nets Easy payment type is configured in Quick3. The payment type UID must match the configuration in Quick3. |
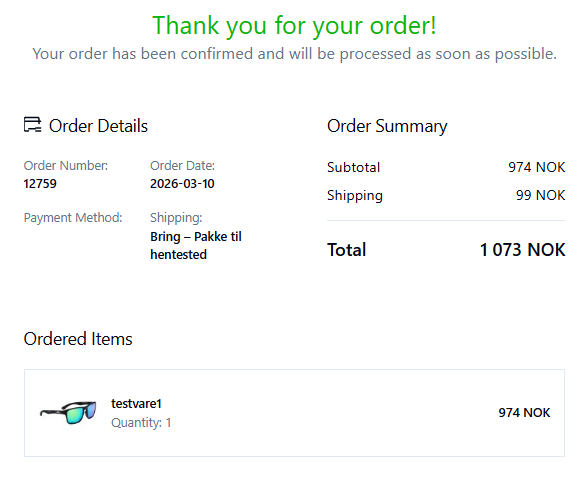
Order Confirmation
The Checkout Complete page displays:
- Store logo
- Order confirmation message
- Order reference number/UID
For Nets Easy payments, the page verifies the payment with the Nets API before confirming. The cart is cleared after successful order confirmation.
If the customer is a new user, their account registration is finalized at this stage.
Customer Accounts
Registration
Customer accounts are connected to the Quick3 system. Registration is a two-step process: form submission followed by e-mail confirmation.
Private Customer Registration
- Navigate to the registration page.
- Select the Private Customer tab (default).
- Fill in required fields: First Name, Last Name, Email, Password, Confirm Password.
- Optionally fill in Phone Number, Address, City, Postal Code, Country.
- Accept the Terms and Conditions checkbox.
- Click Create Account.
- Check your email for a confirmation link and click it within 15 minutes.
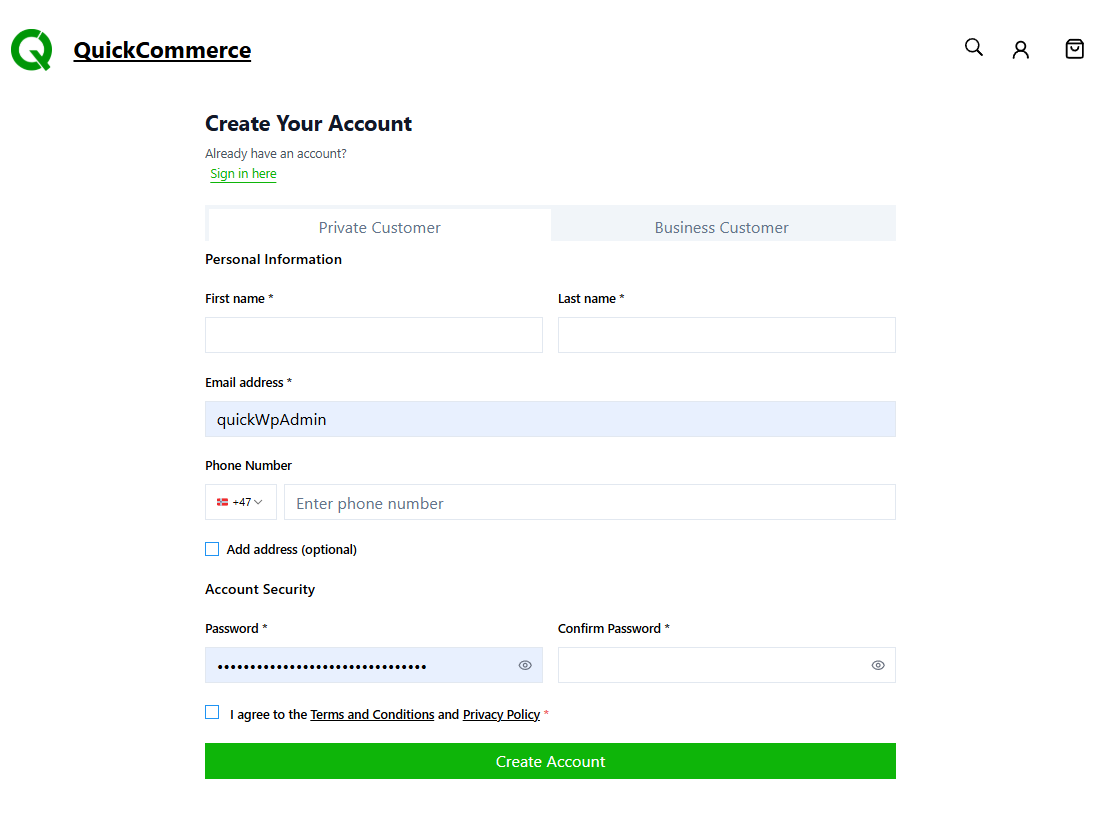
Business Customer Registration (B2B)
The same process as private registration with additional required fields:
- Company Name -- Legal name of the company
- Organization Number -- Company registration number
Email Confirmation
After submitting the registration form, a confirmation email is sent. You must click the link within 15 minutes to activate the account. After confirmation, you can log in with the email and password chosen during registration.
Login Methods
Email and Password
- Navigate to the login page or click the account icon in the header.
- Enter your email and password.
- Click Sign In.
Rate limiting:
After multiple failed attempts, you will receive a "Too many requests" error. Wait 15 minutes before trying again.
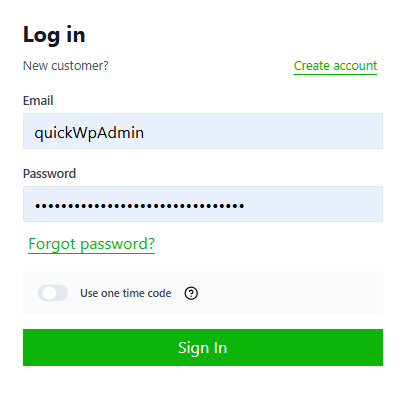
One-Time Code (OTP) via Email
- On the login form, toggle "Use one time code."
- Enter your email address.
- Click Send Code.
- Check your email for a 6-digit verification code.
- Enter the code and click Sign In.
Rate limits: 3 code sends per 5 minutes, 5 verification attempts per 15 minutes.
Phone Number Login (SMS)
- On the login form, click "Use phone number instead."
- Select your country code (Sweden, Norway, Denmark, or Finland).
- Enter your phone number.
- Click Send Code.
- Enter the 6-digit SMS verification code.
- Click Sign In.
Phone login is useful when you do not remember which email you registered with.
Auth Modal
When you attempt an action requiring login (such as adding to a wishlist or proceeding to checkout), a login modal appears automatically. It supports both password and OTP login. After successful login, the modal closes and the page refreshes.
Password Reset
- On the login form, click "Forgot password?"
- Enter your email address and click Send Reset Link.
- Open the reset email and click the link (valid for 1 hour).
- Enter your new password (minimum 8 characters) and confirm it.
- Click Reset Password.
You can request a maximum of 3 reset emails within 15 minutes. For security, the success message is shown regardless of whether the email exists in the system.
Account Dashboard
After logging in, the account dashboard provides tabs for managing your account:
| Tab | Description |
|---|---|
| Profile | View and edit personal information (name, email, phone). Company info and customer number are read-only. |
| Settings | Change password and toggle price display mode (with tax / without tax). |
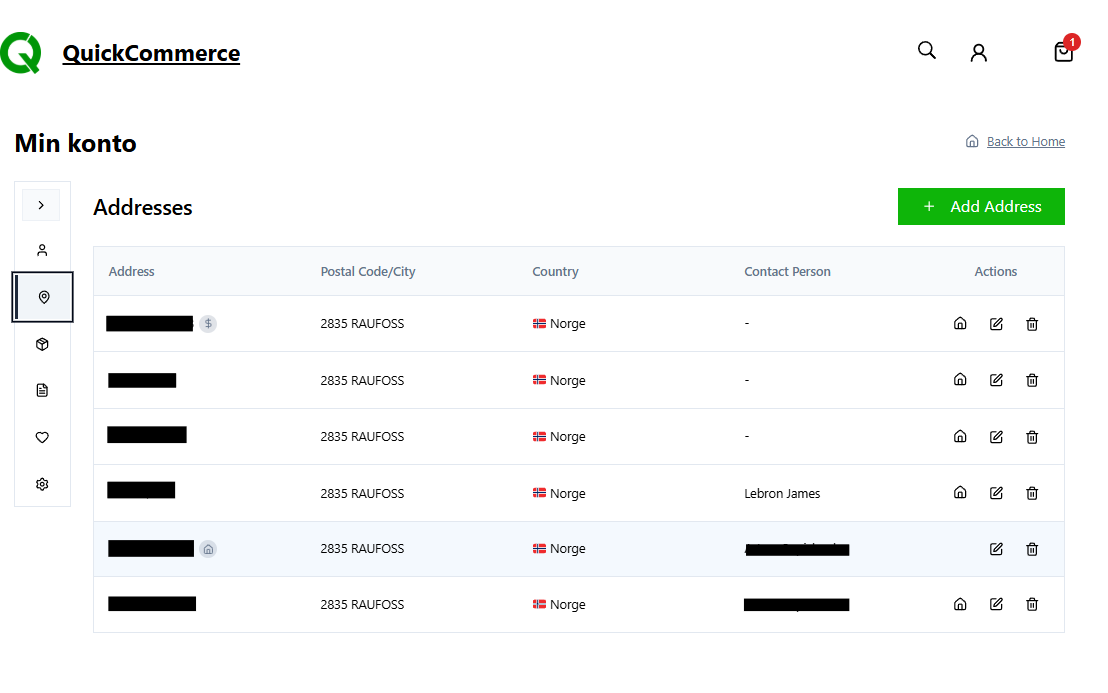
| Addresses | Manage up to 10 shipping addresses with a default address option. |
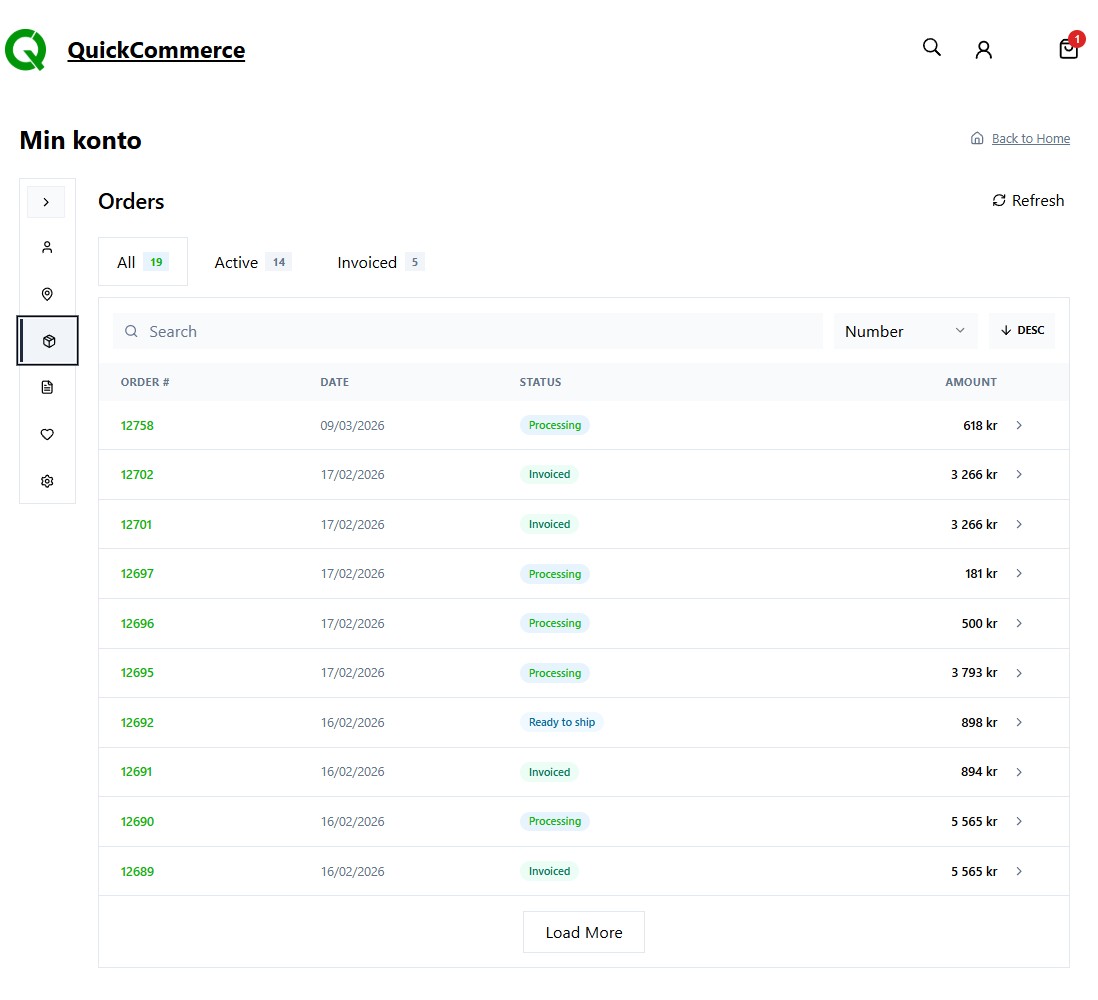
| Orders | Order history with search, sort, pagination, and detail view. |
| Invoices | Invoice list with status badges (Paid/Overdue), search, sort, and detail view. |
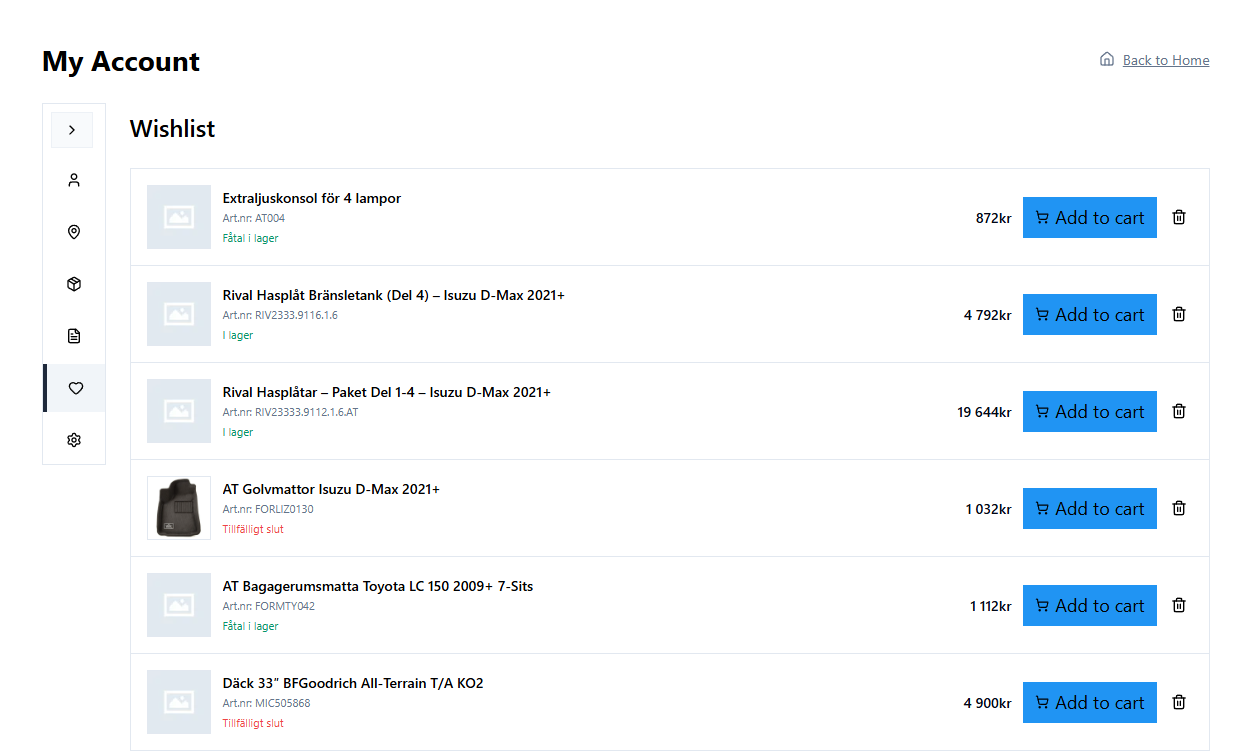
| Wishlist | Saved products displayed in a responsive grid with images, prices, notes, and delete options. |
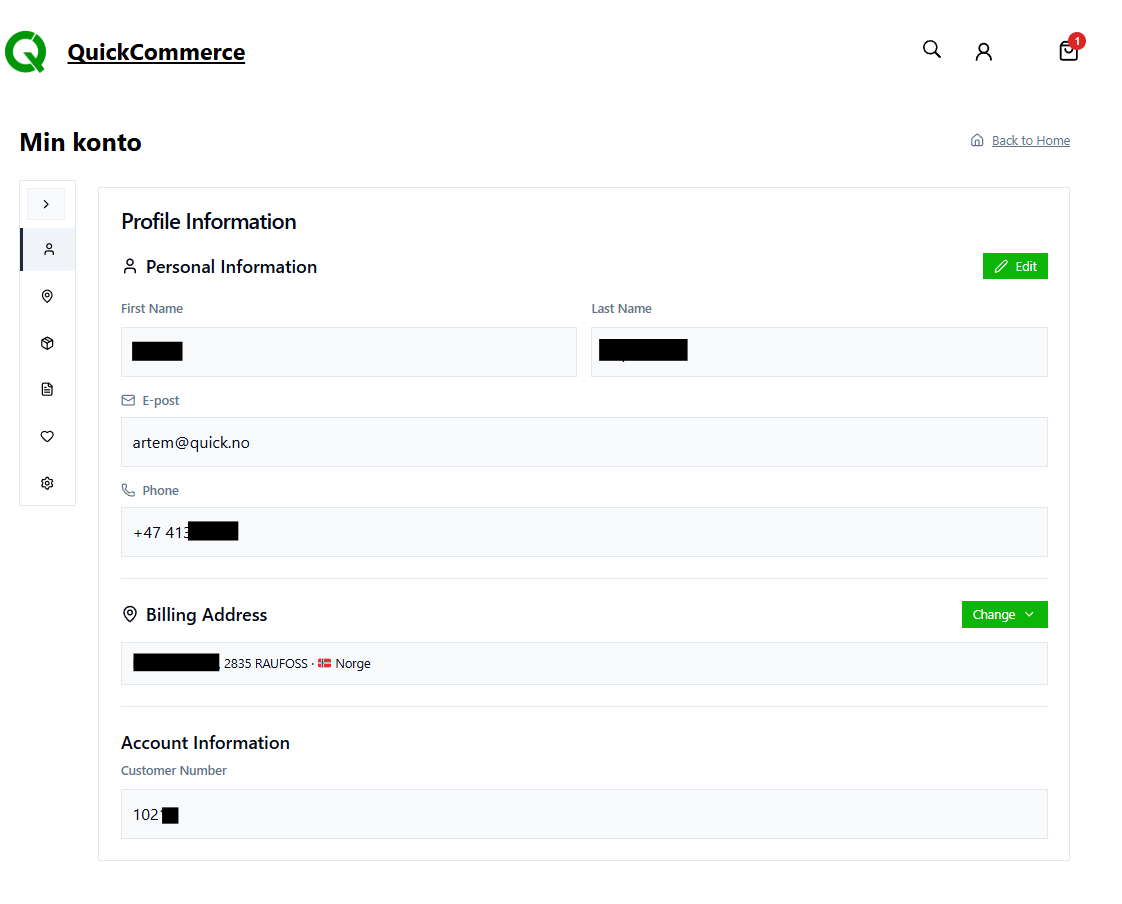
Profile Management
- Navigate to your account page and click the Profile tab.
- Click Edit to activate editable fields: First Name, Last Name, Email, Phone Number.
- Make changes and click Save.
Changes are saved to both WordPress and Quick3, so updated information is reflected in invoices and correspondence from the back-office system.
Shipping Addresses
You can store up to 10 shipping addresses. These are available during checkout for quick selection.
Adding an Address
- Go to the Addresses tab and click Add Address.
- Fill in: Address, City, Postal Code, Country. Optionally: Contact Person, Company, Set as Default.
- Click Save.
Editing and Deleting
- Click the Edit icon to modify an address, or the Delete icon to remove it.
- You cannot delete an address in use by an active order.
Default Address
Check Set as Default when adding or editing. The default address is pre-selected during checkout. Only one address can be default at a time.
Orders and Invoices
How Orders Work
Orders exist only in Quick3. WordPress does not store order data.
- Customer completes checkout.
- Order is created in Quick3 with status "Unconfirmed."
- Payment is processed (if required).
- Order is confirmed in the ERP system.
- Customer can view the order from their account dashboard or the Order Details page.
Order States
Orders in QuickCommerce use states defined by the Quick3 system. Each state has a numeric code, an internal name, and a user-facing label displayed in your storefront:
| Code | Internal Name | User-Facing Label | Description |
|---|---|---|---|
| 0 | Unknown | Unknown | State could not be determined. |
| 1 | Order | Processing | Order placed and being processed. |
| 2 | PartiallyPicklisted | Being prepared | Some items have been picked for shipment. |
| 3 | FullyPicklisted | Ready to ship | All items picked and ready to ship. |
| 4 | Invoiced | Invoiced | Order fully invoiced. |
| 5 | PartiallyInvoiced | Partially invoiced | Some items invoiced, others pending. |
| 6 | Offer | Quote | Price quote sent to customer. |
| 7 | PartiallyConfirmedOffer | Quote (partial) | Some quote lines confirmed by customer. |
| 8 | ConfirmedOffer | Quote confirmed | Full quote accepted by customer. |
| 9 | RejectedOffer | Quote rejected | Quote declined by customer. |
| 10 | Unconfirmed | Not completed | Order started but not yet submitted. |
| 11 | ReturnOrder | Return | Return request created. |
| 12 | ClosedReturnOrder | Return completed | Return fully processed. |
Order state transitions are managed by the Quick3 system based on payment status and fulfillment actions.
Filter Groups
The order history page groups these states into tabs for easy browsing:
| Filter Tab | Included States |
|---|---|
| All | All orders. |
| Active | Processing, Being prepared, Ready to ship. |
| Unconfirmed | Not completed. |
| Invoiced | Invoiced, Partially invoiced. |
| Offers | Quote, Quote (partial), Quote confirmed, Quote rejected. |
| Returns | Return, Return completed. |
Order History
From the Orders tab in your account dashboard:
- View all orders with order number, date, status (color-coded badges), and amount.
- Search for specific orders.
- Sort by date, order number, status, or amount.
- Click View Details to see the full order with line items, totals, shipping information, and payment details.
- Use the Refresh button to reload the latest data.
Invoices
From the Invoices tab:
- View invoices with number, date, type, status (Paid/Overdue), due date, amount, and balance.
- Search, sort, and paginate through invoices.
- Click View Details for full invoice information.

Wishlists
Wishlists allow logged-in customers to save products for later. Wishlists sync bidirectionally with Quick3, so they persist across devices and sessions.
Key Features
- Login required: Wishlists are only available to logged-in customers.
- Multiple wishlists: Customers can create multiple named wishlists (up to 50 items each).
- No duplicates: The same product cannot be added to a wishlist twice.
- ERP synced: Wishlists persist across devices and sessions.
Adding Products to a Wishlist
The Wishlist Add Button block appears on product cards and single product pages as a heart icon:
- Empty heart = product is not in the wishlist. Click to add.
- Filled heart = product is already in the wishlist. Click to remove.
- Guest users are prompted to log in first.
Managing Wishlists
From the Wishlist tab in the account dashboard:
- View saved products with images, names, prices, notes, and date added.
- Click View Product to visit the product page.
- Click Delete to remove an item from the wishlist.
If the wishlist is empty, a "No products in wishlist" message is shown with a Start Shopping button.
Navigation
Breadcrumbs
The Breadcrumbs block displays a hierarchical navigation path showing the customer's current location in the store.
Example: Home > Electronics > Headphones > Product Name
Placement: Typically at the top of product and category pages, below the header. Customizable separator type, colors, text styling, and gap spacing.

Load More Button
The Load More Button block provides pagination for product collections. When clicked, additional products load below the existing ones without a full page reload. When all products are loaded, the button disappears or shows configurable "no more" text.
Model Filter
The Model Filter block provides cascading dropdown menus that let customers filter products by vehicle compatibility (Brand > Model > Year). This block uses the model specification taxonomy data.
Sync and Data Management
How Sync Works
QuickCommerce uses a queue-based producer-consumer architecture for synchronization. Data flows primarily from Quick3 to WordPress:
- The sync process queries Q3 ERP for data (products, categories, or models).
- New items are created in WordPress; existing items are updated.
- Items are marked as active (published) or inactive (draft) based on their Q3 status.
- Sync results are logged for review.
Configuring Sync Intervals
Different entity types can have different sync frequencies.
- Navigate to QuickCommerce > Settings > Data Sync tab.
- Use the dropdown menus to select a frequency for each entity type.
| Interval | Recommended For |
|---|---|
| 1 hour | Products with frequently changing stock/pricing. |
| 3 hours (default) | Good balance for most stores. |
| 6 hours | Moderate-volume stores. |
| 12 hours | Stores with stable inventory. |
| 24 hours | Categories and models that rarely change. |
| 7 days | Very stable data sets. |
Changes take effect immediately on the next Action Scheduler processing cycle.
Manual Sync
From the Admin Settings
Navigate to QuickCommerce > Data Sync and click the Sync button for the desired entity type.
Recommended order for a full re-sync:
Categories first, then Models, then Products. This ensures products can reference correct categories and models. The Setup Wizard guides you through this order with sequential sync buttons.
From a Single Product
Open the product editor and click Sync in the Quick3 sidebar to refresh that specific product from Q3.
From WP-CLI
See the WP-CLI Commands section of the article.
What Gets Synced
| Data | Direction | Notes |
|---|---|---|
| Product name/title | Q3 to WordPress | Always from Q3. |
| Product code | Q3 to WordPress | Always from Q3. |
| Price (base, sale, discount) | Q3 to WordPress | Always from Q3. |
| Stock quantity and status | Q3 to WordPress | Always from Q3. |
| Supplier and manufacturer info | Q3 to WordPress | Always from Q3. |
| Weight and unit | Q3 to WordPress | Always from Q3. |
| Properties/attributes | Q3 to WordPress | Always from Q3. |
| Connections | Q3 to WordPress | Always from Q3. |
| Links/hyperlinks | Q3 to WordPress | Always from Q3. |
| Variants | Q3 to WordPress | Always from Q3. |
| Web active status | Q3 to WordPress | Controls publish/draft. |
| Description | Q3 to WordPress | Unless Lock Content is enabled. |
| Short description | Q3 to WordPress | Unless Lock Content is enabled. |
| Images | Bidirectional | Can be managed in WordPress. |
| Categories | Bidirectional | Synced from Q3 and editable in WordPress. |
| Brands | WordPress only | Not synced. |
| Tags | WordPress only | Not synced. |
| Cross-sell/upsell | WordPress only | Not synced. |
| Model specs | Q3 to WordPress | Read-only in WordPress (except images). |
| Model images | WordPress only | Not synced to Q3. |
Sync Error Handling
QuickCommerce is designed to be resilient to transient errors:
- Automatic retries: Failed items are retried up to 3 times with increasing delays (30s, 60s, 120s).
- Sync summary with failures: If items fail after all retries, the summary shows the failure count with a "View details" link to the Sync Logs.
- Background recovery: The next scheduled automatic sync will attempt any missed items again.
Common failure causes:
- ERP API errors for specific products (may need attention in Q3)
- Network timeouts (usually resolve on retry)
- Rate limiting (wait a few minutes and try again)
For persistent failures, try syncing the individual product from its editor page, or check your Q3 API connection.
Conflict Resolution
Default rule: Quick3 wins (source of truth).
Exceptions (configurable):
- Product descriptions can be locked from overwrite using the Lock Content toggle (per product or globally).
- Product images can be managed in WordPress independently.
- Tags, brands, cross-sell, and upsell are WordPress-only and never overwritten by sync.
WP-CLI Commands
For advanced users and automated workflows, QuickCommerce provides WP-CLI commands.
Sync Commands
# Sync products (delta mode -- changes only)
wp qcom sync products

# Sync products (full mode -- all products)
wp qcom sync products --mode=full

# Sync products with custom batch size
wp qcom sync products --batch-size=200

# Sync categories
wp qcom sync categories

# Sync model specifications
wp qcom sync models

# Check sync status
wp qcom sync status

# Output sync status as JSON
wp qcom sync status --format=json
Setup Command
# Initial setup (configure and sync)
wp qcom setup --url=https://your-erp-api.com --token=your-api-token

# Setup without running sync
wp qcom setup --url=https://your-erp-api.com --token=your-api-token --skip-sync

# Force re-setup (overwrite existing configuration)
wp qcom setup --url=https://your-erp-api.com --token=your-api-token --force
Troubleshooting
Connection Issues
| Problem | Solution |
|---|---|
| "Test Connection" fails | Verify the API URL and token are correct. Check that the Quick3 instance is running and accessible from your WordPress server. |
| Intermittent connection errors | Check network connectivity between your WordPress server and the Q3 API endpoint. Temporary outages may resolve on their own. |
| Rate limit errors (429) | The Q3 API limits certain requests. Wait a few minutes and try again. Use pagination-based sync (default) to avoid limits. |
Sync Issues
| Problem | Solution |
|---|---|
| Sync appears stuck or not progressing | Check Tools > Scheduled Actions for failed or pending sync jobs. Verify Action Scheduler is running. |
| Sync completed but products are missing | The next sync run will resume from where it left off. Trigger another sync to pick up remaining products. |
| Sync summary shows failed products | Check Sync Logs for details. Failed products are retried automatically up to 3 times. If failures persist, check Q3 API connectivity. |
| Categories not assigned to products | Run a category sync first, then a product sync. Categories must exist before products can reference them. |
Product Issues
| Problem | Solution |
|---|---|
| Product not appearing on storefront | Product may be set to "draft" because it is not web-active in Q3. Check the web-active flag in Q3 ERP and re-sync. |
| Prices not updating | Trigger a manual sync from QuickCommerce > Data Sync or the product's Quick3 sidebar. |
| Images not showing | Enable Media Sync in Data Sync settings and trigger a sync. |
| Description keeps getting overwritten | Enable the Lock Content toggle in the product's Quick3 sidebar. |
| Stock shows "0" but product has stock in Q3 | Sync data may be stale. Trigger a manual sync for that product. |
| Variant images not appearing | Check the Images tab -- variant images are shown in a separate section below the main gallery. |
Customer Account Issues
| Problem | Solution |
|---|---|
| Cannot log in with correct password | Password may have been changed in Q3. Use "Forgot password?" to reset and re-synchronize. |
| "Too many requests" error | Rate limit exceeded. Wait 15 minutes and try again. |
| Confirmation email not arriving | Check spam/junk folder. Wait a few minutes. If still absent, try registering again. |
| Confirmation link expired | The 15-minute window has passed. Start registration again. |
| OTP code not accepted | Code may have expired. Request a new code using "Send new code." |
| Cannot add a new address | Maximum of 10 addresses reached. Delete an unused address first. |
| Cannot delete an address | Address may be in use by an active order. Wait until the order completes. |
| Profile changes not saving | Refresh the page and check your internet connection. |
Model Issues
| Problem | Solution |
|---|---|
| Model not syncing | Check the Error column in the models list (hover for details). Try manual Q3 Sync from row actions. Verify the model is active in Q3. |
| Year terms not appearing | Year terms require valid year values (> 1900) in Q3. If both values are 0 or null, no terms are created. Run a manual sync after Q3 changes. |
| Model image not saving | Ensure you click Save Image after selecting. Verify you have the manage_categories permission. |
Where to Check Logs
- Navigate to QuickCommerce in the admin sidebar.
- Click the Logs tab for the log viewer.
- Use the level filter and search to find specific entries.
- Download log files for detailed analysis.
How to Force a Complete Re-Sync
- Go to QuickCommerce > Data Sync.
- Sync Categories first, then Models, then Products.
- Monitor the progress bar until each completes.
For a single product, open its editor and click Sync in the Quick3 sidebar.
To re-run the full initial setup (e.g., after changing your Quick3 instance), use the Cleanup tab to clear data, then go through the Setup Wizard again.
FAQ
Q: Can I create products directly in WordPress?
A: No. Products are created in your Q3 ERP system and synchronized to WordPress. Use Q3 to add products, then sync them.
Q: Where are orders stored?
A: Orders exist only in Q3 ERP. WordPress does not store order data. Customers view their orders through the account dashboard, which fetches data from Q3 in real time.
Q: Where is the shopping cart stored?
A: Carts are managed entirely through the Quick3 API. No cart data is stored in WordPress. This means carts are not affected by WordPress cache clearing or database operations.
Q: Can I edit product prices in WordPress?
A: No. Prices are controlled by Q3 ERP and are read-only in WordPress. Update prices in your ERP system and sync.
Q: Can I edit product descriptions in WordPress?
A: Yes. Enable the Lock Content toggle on individual products (or globally) to prevent Q3 sync from overwriting your WordPress descriptions.
Q: How often does sync run?
A: By default, every 3 hours for all entity types. You can configure different intervals (from 15 minutes to 7 days) for products, categories, and models independently under QuickCommerce > Data Sync.
Q: What happens if Quick3 is temporarily unavailable?
A: Your WordPress storefront continues to display the last synced product data. Cart and checkout operations will fail until the Q3 connection is restored. Syncs will retry automatically.
Q: Is this plugin compatible with WooCommerce?
A: QuickCommerce is a standalone eCommerce solution and does not use WooCommerce. It is a custom implementation designed specifically for Quick3 integration.
Q: What payment methods are supported?
A: Invoice (no online payment) and Nets Easy (online card payments). Payment types are configured in Quick3.
Q: Can customers use both B2B and private accounts?
A: The registration form offers separate tabs for private and business customers. Business accounts include additional fields for company name and organization number.
Q: How do I change the currency or price format?
A: Navigate to QuickCommerce > Settings > Prices tab to configure decimal places, separators, currency symbol, position, and tax display options.
Q: What happens when I clear synced data?
A: The Clear All Data operation in the Cleanup tab removes all synced products, categories, brands, and model specs from WordPress. Your plugin settings and all original data in Quick3 are preserved. You can re-sync afterward.
Q: How do I add blocks to my storefront?
A: Open the WordPress Site Editor, click the block inserter (+), and search for QuickCommerce blocks or browse the QuickCommerce category. All blocks use green icons for easy identification.
Q: Can customers log in with their phone number?
A: Yes. On the login form, click "Use phone number instead" to switch to SMS-based login. Country codes for Sweden, Norway, Denmark, and Finland are supported.
Q: What is the maximum number of shipping addresses a customer can have?
A: Each customer can store up to 10 shipping addresses. To add more, an existing address must be deleted first.
Q: How do wishlists work across devices?
A: Wishlists are synced with Quick3, so they persist across all devices and browser sessions as long as the customer is logged in.
Was this article helpful?
That’s Great!
Thank you for your feedback
Sorry! We couldn't be helpful
Thank you for your feedback
Feedback sent
We appreciate your effort and will try to fix the article